YOU'D THINK IT'D BE EASIER TO GET THE EMPLOYEE ID, RIGHT? Just add Office365 as a data source to your Power Apps form then call:
Office365Users.UserProfile(ThisItem.Id).employeeId
... or something similar. But no. Can't do it that way.
As is my habit with this sort of thing, I went first to Google. And from what I could see there wasn't a way to get the employeeId natively in PowerApps. Any solution I found wanted me to run a PowerAutomate Flow, which wasn't what I was after.
Then I had a breakthrough. I hadn't realised it before, but there is also a flavour of Power Automate you can call directly from a Power App - it really is a constant learning journey, this PowerApps stuff, isn't it?
WHAT I NEEDED IT FOR
There are probably many scenarios where you might need to know a colleague's employeeId. By that I mean the multi-digit label (often sourced from WorkDay) that Active Directory copies and uses to identify a colleague. In the case of our corporation, it's a six digit number that you can see in Delve but can't otherwise access, at least not programmatically.
 |
| Why does Microsoft display the Employee ID in Delve, yet won't let you retrieve it via the Office365Users method? |
In this case, I was looking to allow colleagues to book a session with the official corporate photographer. In order to differentiate between two John Smiths, we name the images in the format:
FirstName_Surname_EmployeeID
Then they all get stored in a SharePoint Document library and I can showcase them to the Business using a SharePoint Gallery (out of scope for this blog post).
HOW I DID IT
The first part is fairly easy. I created a SharePoint list with a particular set of columns then, to keep it simple, customised the list's native forms via Power Apps.
 |
| There are other columns in the application, but these are the minimum needed to make the Get Employee ID function work. |
The key columns were:
- Timeslot (Text)
- UserName (Name)
- PhotoFileName (Text)
- Location (Text)
- Date (Date)
 |
| This is what the Gallery looks like ... just one timeslot added for demo purposes. |
To make the booking form available to fellow employees, I created a Power Apps Gallery and set it up to display the vacant sessions which colleagues could reserve by clicking on "Book this timeslot" (a link to the list's EditForm). Once the Timeslot was booked, I made it invisible by having the Gallery check whether the PhotoFileName cell in the list was empty. I may discuss the building of the Gallery in a future blog if anyone is interested.
So, to get started with customising the List's EditForm, let's click on Integrate and select from Power Apps the Customize forms option from the drop-down's flyout menu.
 |
| This is pretty simple customisation, so no need for a Canvas App. |
Before starting an customisation on the form, I needed to add Active Directory as a datasource, because that's where the employeeId is stored.
 |
| Add data, then select Office365Users directly. |
I didn't want our registrants to mess with the Date or Timeslot fields, because they're fixed for each Photography session. So I added a Text Label to the DataCard and made it a concat of the Timeslot and the Date, separated by a comma, like this:
DateTime_Label.Text =
Concatenate(
Text(DateTimeValue(ThisItem.Date), "dd/mm/yyyy"),
", ",
ThisItem.Timeslot
)
 |
| To display the Time and Date, add a Text Label and use the Concat function to join the two. |
Next, I set up the UserName field to get the email of the current user - I'm going to use this value in the Flow that will retrieve the employeeId:
UserName.Default = Office365Users.MyProfile().Mail
Then I added a Text label to the PhotoFileName field, to start building the final filename for the image that will be added to the directory once the Photographer's done his work. This will be in the format:
FirstName_Surname_
I did this by adding this script to the Text value of the label:
Photofile_Label.Text =
Concatenate(
Office365Users.MyProfile().GivenName,
"_",
Office365Users.MyProfile().Surname,
"_",
vEmpID.empid
)
The value for the variable "vEmpID" will be generated by the Flow. We're just setting up the form to receive the value when the Flow delivers it.
 |
| The UserName field captures the email of the current user and the PhotoFileName field compiles a string of the user's name and their Employee ID. |
Finally, for this part of the process, set the Update value of the PhotoFileName DataCard to fetch its value from the PhotoFile_Label.
PhotoFileNameDataCard.Update = Photofile_Label.Text
We'll come back to the EditForm shortly, but now let's set up the Flow ...
ADD AN EMBEDDED FLOW TO THE FORM
So the trick to fetching the current user's employeeId value is to add an embedded Flow to the PowerApps form. This was quite a revelation to me, but a welcome one. To embed a Flow in PowerApps all you need to do is to click on the Power Automate icon in the PowerApps left-hand column. Then, give the Flow a name and start building it, the same way you would in the Power Automate application.
 |
| Each Flow you create in your PowerApps environment will need a unique name. |
Once you have created the Flow, you'll need to edit it to add the functions, so click on the ellipsis then select Edit from the flyout menu.
 |
| I called my Flow "GetIDPB", because I had another Flow in my PowerApps environment called "GetID" ... |
The first item you'll need to add to your Flow is the PowerApps function. This is what will take the current user's email address and use it to retrieve the corresponding employeeId. Add "Email" as the Input type and put the Form field value in the adjacent field, like this:
 |
| The name of the form field that holds the current user's email address will be different in your form. |
Next, we're going to add the function, Get user profile, click on the Advanced option and add the output from the previous function into the User (UPN) field and add "employeeid" into the Select fields field.
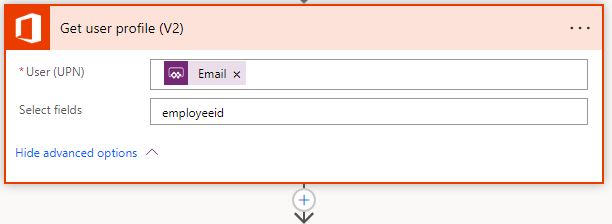 |
| This is the step that goes off and finds the Employee ID. |
Now we add a Compose function and make the Input the Output from the previous Get user profile function.
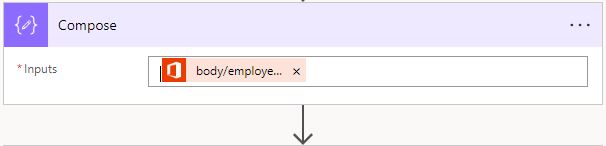 |
| I'm not exactly sure what this step is doing, but just go with it ... |
For me, the Dynamic Content menu didn't offer me the Output from the Get user profile function, so I had to add it as an expression, like this:
outputs('Get_user_profile_(V2)')?['body/employeeid']
The next step is optional, but I found it handy during testing to make sure the Flow was triggering when I needed it to and that the Employee ID was being captured, like this:
 |
| You can always remove the Send an email function when you're happy the Flow is performing as expected. |
We're going to hold the Employee ID in a variable, so we can deliver it back to the Power App form, so let's initialise one.
 |
| No need to populate Value, we'll assign one to the variable in the next step. |
The last step is to deliver the result back to the Power App form, so that requires the Respond to a PowerApp flow function. Just add the variable name and set its value to the output from the Compose function. It does seem like overkill because I added the same value for the variable in the next step, as well ...
 |
| We're setting the value of the variable in this step and sending it back to the PowerApps form. |
And that's it ... we're ready to return to the Form and make sure the PhotoFileName field is ready to receive the value for the Employee ID.
But don't forget to Save your Flow first.
AND ... BACK TO THE FORM
I'd already set up the PhotoFileName field to receive the value from the EmpID variable once the Flow had run. The next challenge was to come up with a way to trigger the Flow.
In most scenarios, we ask the user to make some sort of change to the form, and we can usually piggyback on that change to trigger other actions. But in this case, I just wanted the person booking the session with the photographer to check that the timeslot was correct and then click the Save button. The rest I wanted to happen automatically and invisibly.
My first thought was to use a Timer ... so I added one to the Form and set it up like this:
Timer.Duration = 500 -- in milliseconds
Timer.Start = false
Timer.Autostart = true
Timer.OnTimerEnd = Set(vEmpID, GetIDPB.Run(DataCardValue7.Text)
 |
| Adding a Timer button seemed like the right choice, but at first it wouldn't trigger the Flow. |
But that didn't work. For some reason, the Timer button would not launch the command that starts the Flow running. I tried setting the Start function to "true" but that didn't help either.
After some minutes of deep thought I came up with a solution. Swap the actions of the Timer button and the Save button.
On the Timer button I set the Autostart value back to "false". Then I gave the Start function the value of (variable) "vStart". Finally, I set the OnTimerEnd value to what I'd originally put in the Save button:
SubmitForm(SharePointForm1);Navigate(FormScreen_Thanks,ScreenTransition.Fade)
And on the Save button, I changed the OnSelect value to:
Save.OnSelect = Set(vEmpID, GetIDPB.Run(DataCardValue7.Text));Set(vStart, true)
... note the addition of the command that sets the vStart variable to "true".
Now when I clicked on the Save button, the Flow was triggered, the Employee ID was retrieved, the Flow sent me an email containing my Employee ID and the Form updated the SharePoint List field PhotoFileName with my First Name, Surname and Employee ID.
Satisfied that all was working as expected, I could now hide the form's PhotoFileName and UserName fields, along with the Timer button.
 |
| After hiding the fields and functions the user doesn't need to see, this is what the final triggered EditForm looks like. |
The one final test to make sure all was working before removing the Send an email action from the GetIDPB flow ...
 |
| After clicking Save, the SharePoint list will be updated to look like this. |
And that's it. Maybe in the future Microsoft will make this process a bit simpler, but until then, this should suffice.
I hope this helps someone.