YOU'LL RECALL THAT LAST TIME we covered adding metadata columns to the Document Library and the building of cascading menus in Power Apps to manage that metadata ...
So ... now we're going to create the Word Template, insert the Quick Parts that will hold the data or text from the Library metadata columns, then attach it to the Content Type.
I'm not going to spend too much time telling you how to style the Word document here. There's plenty of places where you can look that up online. But what we will cover here is how we add in the Quick Parts that will hold the text that you entered into the Library's metadata columns, and how we style those.
The trick to creating a Word document template with working Quick Parts is to upload it to the Library first. Though this will form the basis of our online template, DO NOT create the Word document as a template, just a simple Word document. You can style up the Word document ahead of loading it up to the system. I did a bit of work on the Word document so it looks a little better than a blank white page.
 |
| Opening the document in desktop Word. If you can't see clearly, click on any image to enlarge it. |
Once you have the Word document loaded into the Library, open the Word document in the desktop version of Word. This is important, as Quick Parts don't work in the browser version of Word.
Once you have the Word doc open, click on the Insert tab and find the Quick Parts drop-down on the right side of the ribbon. Click on Quick Parts to display the drop-down, hover over Document Property to see the fly-out menu of all the Site Columns you can select to insert as a Quick Part.

For the first Quick Part we'll be choosing the Client name. Select that and the Client name is inserted into the document as a Quick Part. Now we'll need to add some styling. Highlight the Quick Part in the document by clicking on it.

Now, with the Quick Part selected, click on the Home tab and then on the Title option in the Styles section of the ribbon (this might not be the style you want, but this is just for demo purposes).

Now the type looks bigger, but a little wan ... let's add some focus to it by selecting a colour. You might want navy blue... so select a strong colour from the Type Colour drop-down.

Feel free to add a bold if you want to.
On the next line, let's add the type of brochure we're creating, in the same way as we did with the Client name. Finally, you're going to need a date ... add the Date QuickPart in the same way. Your document should look like this:

One more thing, we're going to add the Client name to the legal disclaimer on the back cover. Scroll down the Word document until you can see the Disclaimer text at the end of the document and click to place the cursor at the right place in the text (I put in a bit of holding text, so I'd know where the Quick Part goes).

If you've done it right, you won't even need to apply any styling, as the Quick Part should pick up the styling of the surrounding text.

Cool, eh?
You can keep on going, adding Quick Parts to headers and footers if you want, it's up to you. For example, if you're filling the rest of the document with standard text, you can mention the client every so often by dropping in the Client Quick Part, to give the whole brochure more of a personalised feel.
When you're done, Save your document (just in case the AutoSave hasn't worked or hasn't run in the last couple of minutes).
If you haven't done it already, give your document the same name as the Content Type you'll be attaching it to. If you click on the Document's link in the Library window, the document will open in the browser version of Word and you can rename it, like this:

That's it. Your template is ready.
The next task is to add the Content Type to your Document Library. I was pretty sure I had done this earlier, but after having some trouble attaching the template to the Content type in the following steps, I investigated and found my Content Type hadn't been added to my Library.
... so double-check, and if it's missing in your set-up, go to Library Settings, find the Content Type section and click on Add from existing Content Types.

Find the Content Type in the Available Site Content Types window, select and click the Add button. Then click on OK.

Now you can attach the Word Template to the Content Type. So, first download it from the Library to your desktop.

Now, navigate to the Site Content Type via Library Settings. Find the link for Advanced Settings and click it.

Use the Browse button to find the Word Document you saved to your desktop. Then click OK to add the Word document to your Content Type.

Now if you navigate back to the "AllItems" view of your Document Library, you should be able to select your template from the New drop-down menu.

When you open the Brochure template, you want it to open in the browser version of Word. Don't worry that it doesn't look quite right. Browser Word is funny like that. You're only opening in browser Word so you can easily change the name of the brochure. Like this:

Once you've changed the name from "Document" you can close the tab. You can see your new Brochure sitting in the "All Items" view of the library.

The next job would be to add the metadata to that new brochure, thereby updating the QuickParts. To do that, click on the new document's Properties ... this will bring up the wonderful Power Apps input form you created earlier.

I still haven't hidden the text input fields in the Power Apps form, but that's so you can see how it all works. When I start changing the values of the drop-downs, you can see the cascade in action.

Set the values as you need to, then Save to lock the changes in

Now, if we open in the desktop version of Word, we'll see that the data from the Properties form has filled in the QuickParts in the document. Not unlike magic.

So, that's all working fine, then.
Right ... on to the next bit. Setting up the Flow to get manager sign-off and to convert the final Word document into a PDF form mailing out to the client.
SETTING UP THE FLOW
Navigate back to the "All Items" view of your library. You should see the Automate menu option sitting above the list of documents. Click on that and select:
Power Automate > See your Flows
I prefer See your Flows, as it's less restricting than the Create a flow option.

From the New menu, select Automated from blank, as this is the type of Flow we're going to use.
In the popup window, give your new Flow a name and select the trigger for the Flow ... we're using When an item is created or modified.

Well done for getting this far. Now the real work can start.
If you have had some experience of creating SharePoint Designer WorkFlows, then much of this will be familiar to you. The principles are the same. WorkFlows and Flows are all about the conditions and the actions. It's just some of the terminology that's changed in Flows. But, of course, not everything is the same ...
Your stage for your new Flow should look like this.

Your first task will be to choose the Site where your Library sits ...

If you can't see your site listed, scroll to the foot of the drop-down, where you'll find Enter custom value.
... then in the second drop-down, the name of your Library.

Now we need to set up some conditions, so we're not firing off random alerts every time something changes in the Library. So ...
First row - Approved = false

Second row - Approver_txt is not = Null


Third row - Checked Out = false

When you're done, your Conditions panel should look like this.

So what we're saying is: If the document hasn't been approved, and the Approver email address isn't empty, and the document has been checked in, the Flow can run. If any one of those conditions isn't met, the Flow goes down the empty If no branch and essentially does nothing. So that's what we want to happen.
Next, we're going to turn our attention to the If yes branch, and start loading up actions.
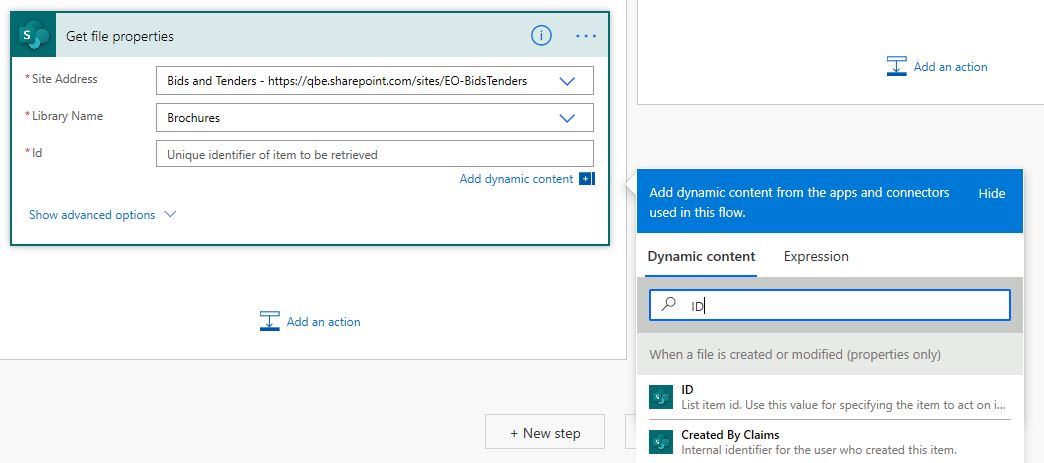
So ... we need to Get file properties so we can identify (by its ID) the file the Flow is working on. So Add an action and find Get file properties.

Then as before, select the Site and the Library, then add the item ID, like this:
Then I added another condition, to check the status of the Approval (that we've not yet asked for), like this.
Approved = false

I would recommend that you start giving your Conditions and Actions descriptive names at this point. Otherwise, things will start to get confusing if all you've got to go on is "Condition 2", "Condition 3" and so on.
So now we have it set up to only continue if the Approval status of the document is "No".
Next, we have to ask the Approver to approve the document. Flow makes that easy for us, as there's a built-in function to ask for approval. Much better than the old SharePoint Designer way of doing things.
So Add an action, Start and wait for an approval.

I used Approve/Reject - Everyone must approve
You'll need to fill in the details of the approval request. Here's how I set mine up:

Title is the subject line of the Approval request email
Assigned to will ask the Flow to grab the value from the Approver_txt
Details is the message in the body of the email. I personalised it by inserting the Name of the document.
Item link is useful as it gives the Approver a quick and easy way to open the document for inspection before approving. Use this format: SiteURL + Full Path
Item link description is the text in the Approval email that the Approver will click on to open the document.
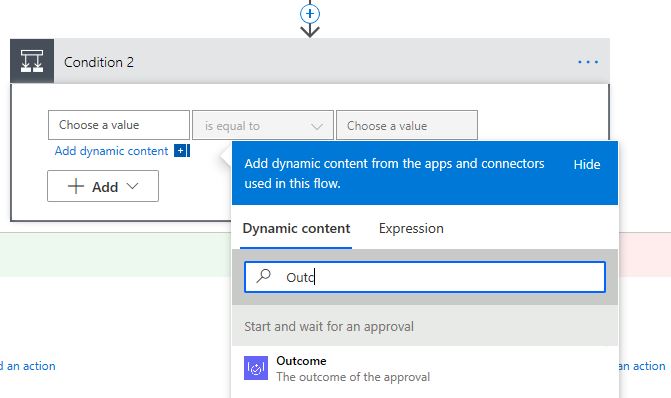
Now we need another Condition ... this time to see if the document has been approved before moving on to the next (lengthy) sequence.
So, add a Condition and set the single row to:
Outcome = Approve
Right, now we're ready for the meat of this Flow. In this series of Actions, if the Document is Approved by the Approver, we'll:
- Check out the file so we can have the Flow make changes to the metadata (so make sure documents need to be checked out to make changes in the Library Settings)
- Update the File Properties, setting the Approved value to true
- Check in the file
- Get the file content, ready for creating a PDF
- Create a New Word Doc and add the file content
- Convert the file to a PDF
- Give the new PDF the same File Properties (metadata) as the original Word Doc
- Check in the PDF (we don't want to send that to the Approver for Approval, as they've already Approved that content)
- Delete the copy of the Word Doc we stored in OneDrive
- Send an Email with the PDF attached (for the convenience of the original author, the PDF has also been stored in the Document Library.
STEP-BY-STEP
First, check out the Word Document so we can make changes to the metadata field, specifically the Approved field, which we're going to change to Yes.
Add an action, type "Check Out" to narrow the options, and select Check Out File. Once you've done that select the Site URL and the Document library (as you did for earlier Get File Properties actions. In the ID field, add ID from the Dynamic Content list - we need to know what document we're working on.

Add an action, Update file properties. Select the Site, the Document Library and the ID again. Leave everything else blank, except for Approved, which you should set to Yes. You could blank out DocType Value and Successful by selecting Custom value and leaving it blank. Or you could maintain the DocType Value by inserting DocType Value from the Dynamic Content listing (I did the latter, last time round).

Now we've done that, we should Check In the file. So Add an action of Check In File, then fill in the form presents with Site, Library, ID, a comment and the version type, Major Version.

That's the sequence for updating the Document's status to Approved. Now we're going to create the PDF. This is a bit clunky, and I'm sure we really should be using a generic access to OneDrive, but I just used my own, since we're deleting the copy of the Document right after we've PDFed it.
So first, we need to hoover up all the content from the document. Add an action and select Get file content from the Dynamic Content list - make sure you choose the SharePoint one, not the OneDrive one!
Fill in the Site URL (again!), and for File Identifier, choose Identifier from the Dynamic Content listing.

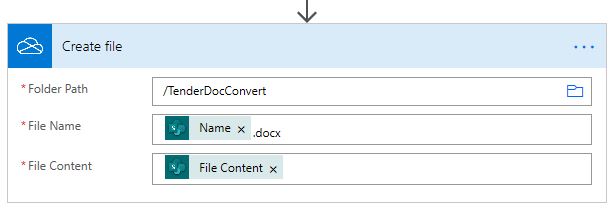
Now we have the file content, we need somewhere to put it, so we'll create a new document on OneDrive. Add an action of Create file (this time choose the OneDrive version and not the SharePoint one).
I created a new folder on my OneDrive to hold these temporary documents. And because I'd already created it, it was available as a choice option on the fly-out menu.

Make the name of the file the same as the source Document (don't forget the ".docx" suffix of the new doc won't be recognised) and add the File Content from the earlier Get file content action.
Now we just have to convert the file to a PDF. Add an action and choose Convert File (Preview). In the File field add ID (from the OneDrive options). Leave the Target type as PDF.

So, we have a PDF of the original Word Document stored on our OneDrive. We need to bring it back to the SharePoint Document Library, so we do the reverse of how we created the PDF.
Add an action to Create a file, choosing the SharePoint version. Select the site URL (yet again!), choose the Library in the Folder Path, Name the file using Name from the Dynamic Content listing and get the File Content from the previous Convert File (Preview) step. It should look like this:

Now we need to Update the properties of the new PDF in the SharePoint Library with the same metadata as the source document. So Add an action and select Update file properties. Fill it in like this:

These should all be from the Update file properties - to Approved action.
Now check your new PDF in (Note: Make sure the Library requires documents to be checked out before editing, otherwise, this Action will cause an error). Add an action, select Check in file. Add Site URL and Library. Get the ID from the previous action - Update file properties - PDF.

And as we don't want our OneDrive getting cluttered with old Word documents, let's delete the copy file. Add an action and select Delete file from the OneDrive options. Choose the ID from the OneDrive Create file action.

All that remains now is to send an email notification the the original document author to let them know their brochure has been approved and to let them have a PDF of the final document.
Use Send an email (V2). Set it up like this:

And that's it.
You may want to create a couple of new views in your document library, perhaps separating completed and approved Word Docs and finished PDFs into different views, just to keep things tidy. Otherwise, you have a working system,
All that remains is to do some testing.
When I had some time, I was going to look into tracking which brochures led to successful pitches and how I could track the resulting revenues. But that's for another post and another time.
I hope that's helped someone.