I STRUGGLED WITH THIS FOR A COUPLE OF DAYS BEFORE REALISING that Microsoft had recently moved the goalposts on how Deep Linking works in PowerApps. Consequently, many of the "how-to" instructions on the Internet have been rendered inaccurate. It wasn't until I stumbled across a post on the Microsoft site that I realised something had been fundamentally changed.
So I'll go through the method that worked for me, and add comments on what I was doing wrong as I go ...
THE REQUIREMENT WAS ...
... the client wanted to create a process where colleagues could request a report from a database. The request would be forwarded to an authoriser, who would add a few more details to the request and save their amendments to the queue.
A SharePoint list seemed the best way to do this and I thought all I needed to do was to create a Canvas App in PowerApps and then pass the ID of the newly-created list item to an EditForm, the method referred to as "deep linking".
I'd started on a similar project in November 2021, but it never progressed beyond the early stages. Nonetheless, I figured I could re-use some of the tech from that project in this new one. That was my first mistake.
I figured I needed to add an "If" statement to the OnStart control of the App in the canvas app, so we would know whether this was a call for a NewForm or an EditForm ... something like:
App.OnStart = If(
!IsBlank(Param("ID")),
Set(
varID,
Value(Param("ID"))
);
Navigate(Screen2)
)
... ought to work, right?
Except that PowerApps told me I couldn't have "Navigate" in the OnStart control.
So I tried other combinations, searched on Google for a day or two and was just about to beg a colleague for some help when I found a mention in a Microsoft blog that good ol' MS had changed the way the App.OnStart and App.StartScreen works.
It's probably my fault for not following the PowerApps roadmap more closely, but still ...
Anyway, piecing together the info from the Microsoft blog and the work I'd done on the earlier project, I was able to figure out a way to get a working app for my client, and ...
THIS IS HOW I DID IT
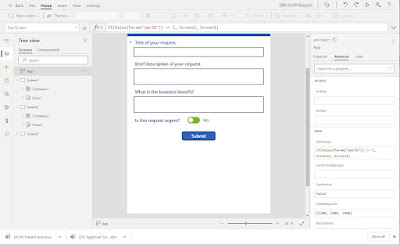
I won't bother going in to how you add fields to a Canvas App ... there's plenty of other blogs that tell you how to do that. So let's assume you have a SharePoint List configured to hold answers to questions you want to ask. And let's assume you have created a Canvas App and you've set the SharePoint List as the App's data source and added the necessary Form fields. Let's take a look at what the Canvas App looks like at this stage.
 |
| Screen1 is the part that acts like a NewForm. The requestor fills in the visible fields and clicks Submit to save the data to the list. |
What we're saying here is, if the value of the parameter we pass to the App in the query string (which we'll get to later) is equal to or greater than the numerical value "1", go to Screen2 ... otherwise, go to Screen1.
Wrapping the 'Value ()' around the 'Param("parID")' expression makes sure we're using a number rather than a text string.
Simple, yes?
Now we jump to the Form in Screen2 and add an expression into its Item control.
 |
| Screen2 will hold the form we're using as the EditForm. We need to set it up to receive the ID passed to it in the query string. |
 |
| Here's the submit expression for the second Submit button ... pretty similar to the Submit button for Form1. |
GO WITH THE FLOW
 |
| Switching the body of the email action to HTML view really helps you get the dynamic ID in the right place. You'll struggle otherwise. |
 |
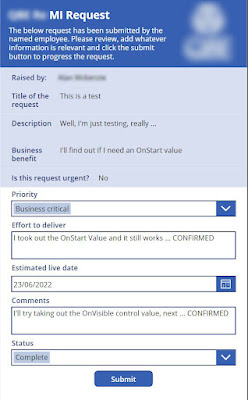
| For ease of use, I displayed the requestor's data in non-editable fields in the top half of Form2, and placed the fields the reviewer needs to complete in the lower half. |
No comments:
Post a Comment