DURING 2024, MICROSOFT HAS BEEN DEPRECATING FUNCTIONS IN CLASSIC SHAREPOINT. Needless to say this has been causing me problems with the legacy Teamsites with our business relies upon.
The first time I noticed this was in July 2024 when Microsoft turned off our ability to edit the landing pages of Classic Teamsites. I know there are workarounds where the Tenant Admin can fiddle with the SharePoint security settings, but I don't have that level of access and, more importantly, my Teamsite Owners don't.
The next change was in November 2024 when Microsoft turned off the Content Editor and Script Editor web parts, meaning that even if we could edit the landing page, we still wouldn't be able to change or add text, or embed any Power Platform functions on the page. This was real problem for me because one of my clients had asked that I revise a PowerApps Gallery to include additional Archive Libraries. I was able to do the PowerApps part of the work (more on that in a future post) but then wasn't able to embed the new Gallery on the page ... so that was very nearly a wasted effort.
I understand that Changes Happen and that while we're hosting Classic and Modern in the same site farm, there will have to be compromises in the functioning of Classic sites ... but I'm still left with the challenge of circumventing these issues.
 |
| There has to be an easier way of transferring data from one list or library to another, right? |
It all came down to one not-so-simple solution - I'd have to migrate the functions from Classic to Modern SharePoint.
It's not difficult to make copies of PowerApps and it's not hard to clone Lists and Libraries from Classic to Modern in the same Tenant. The real challenge is to find a way to copy the data from those lists and libraries to the cloned Data Sources.
There are PowerShell methods and some third party tools that can be used to copy data from one place to another in SharePoint but again, that requires Tenant Admin access and that wasn't available to me. A brief conversation with the actual Tenant Admin ended up in a "Dev-UAT-Live, months of work, yadda-yadda" exchange. I haven't used Dev-UAT-Live methodology since the good old days of Visual Interdev/ASP/.NET. All I wanted to do was migrate some data, preferably keeping the Created/Modified dates, but it wouldn't be the end of the world if that data was lost in translation.
It was going to have to be a Power Automate Flow.
Only one of my business solutions uses Document Libraries. Figuring this would be the most difficult, this is where I decided to start.
The several libraries in this solution all had an identical structure (some are live, some are archives) - over 50 columns, some of which are lookups. Even so, I didn't think this would pose much of a problem, as the migration should be possible using just a few steps on Power Automate.
This was my first try:
 |
| Not shown here, but you can expand the Get file properties' "Show advanced options" and limit the retrieved items to just one View of the library. This is what I did for testing purposes. Click on the image to enlarge. |
... and it almost worked. For some reason the values for one of the Lookup columns, "Class", wasn't migrating across. Which was puzzling me, because the value for "LOB", also a Lookup column, was ported across just fine.
 |
| As you can see, the column for Class remains blank. |
So, thinking that I must have done something wrong, I tried adding an Update file properties function, which I thought might force the Class column to update. But that didn't work either.
 |
| There is a clue here, but I just hadn't spotted it yet. |
A bit of Googling around "Lookup column data not migrated by Flow" didn't get me anywhere, either ... and finally, I posted a question on the Microsoft Power Automate community site. One helpful person suggested that I remake the Lists that supply the main library's lookup columns. I had already tried that, but the comment did get me to thinking ...
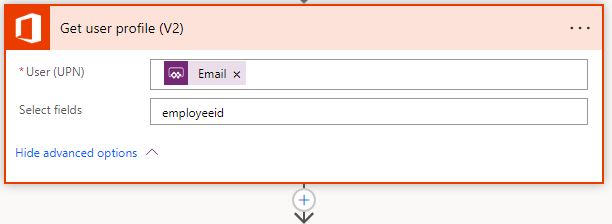
Lookup columns don't use the Value from the feeder list ... they use the ID. So I took another look at the source feeder list and the destination feeder list. And this is what I saw ...

The IDs of the corresponding Lookup values were different. So, during the migration process, the Flow was looking for a Class Value with the ID of 63 in the destination Lookup column and not finding it.
It looked to me like the original builder of the Libraries had created the Lookup list for Class, then added and deleted the values a few times, ending up with a list of values where the lowest ID was 63. When I had cloned the Library across to the destination Modern site, I had added the values for the Class Lookup column and naturally the ID numbers started with 1. Deleting the Lookup list and starting again just repeated the problem.
The solution was to first add (and delete) 62 items to the Lookup list, then add the correct values, slowly, one-at-a-time, to get the ID numbers in the two Lookup lists to correspond. Once I'd done that I could just run the Flow (as pictured above) and everything worked fine ...
 |
| This time the Flow worked perfectly, because the IDs in the source and destination Lookup lists matched. |
SAVING THE CREATED AND MODIFIED DATES
I did fret a little about this. While it's not possible, at least with a Flow, to replicate the Created and Modified dates from one List/Library to another, it did occur to me that I could add two new date columns to the destination Library - "Legacy_Created" and "Legacy_Modified" - and use the Flow's Update file properties function to copy the dates from the source Created column to the destination's Legacy_Created column.

I hope that helps someone.
Next: Moving List items from a live list to an archive list