Yes, you can go to various sites and buy an enhanced Calendar web part, and admittedly, that might well save you time. But if, like me, you work in a corporate environment, you’ll no doubt find that installing alien software on your SharePoint server will involve much sighing and sucking of teeth from the IT Department.
So I thought I’d look into using a DataView Web Part to display a year’s-worth of events. It took me quite a while (I think I started this in 2013), but I’ve finally come up with something that’s at least workable, though by no means perfect. If anyone smarter than me (essentially just about everyone) reading this is able to suggest improvements, I would be hugely grateful.
So here’s what I ended up with:
 |
| This is where we want to be at the end of the process - rendering a calendar in year view. The colours can be changed in the code. |
So the first thing you need to do is to create a SharePoint Calendar and populate it with some events. The one you see here is tracking our company Board and Committee meetings throughout the year. Prior to this, our senior PAs put this information into an Excel spreadsheet and emailed it around. My version at least gives users the ability to click on an event and be taken to a detail page, courtesy of the Calendar’s DispForm.aspx page.
I’ve kept the data in the Title field of each Calendar event as short as possible – three characters – as by necessity the columns in your year calendar are going to be narrow. Users can always click on the event to see more details if they don’t understand a three character acronym.
You should also consider adding a Category column (drop-down list) to your calendar. This will come in handy later when we colour code the types of events in the calendar.
 |
| An additional "Category" column can be added in the browser view of the Calendar's Settings area. |
 |
| I create the page in the browser so I can be sure of getting the right layout quickly and easily. |
 |
| It doesn't really matter what data you insert in the Data View Web Part. We'll be changing the code as we go along and build a completely different view. |
 |
| Oh, how I love the "Common Data View Tasks" panel. |
 |
| Use this control panel to determine the order in which events appear in each day cell. This is important as, left to their own devices, events will appear in the order they were entered in the calendar (ie in order of ID). |
Once you’re done with that, switch back to SP Designer and locate the line:
<xsl:variable name="dvt_1_automode">0</xsl:variable>Directly below, type the following:
<xsl:param name="Today" />
We’ll be using that variable further along. The next thing to do is to add the XSL code that will render the months and the days of the month. This was especially tricky, and most of the heavy lifting here was done by my friend Steve M. who is a Jedi Master when it comes to all kinds of code. So first the Months template, which is added below the dvt_1 template. (We’ll be ripping out the dvt_1 template in a moment, so don’t worry about it too much.) Here’s the code to add:
<xsl:template name="Months">
<xsl:param name="MonthNo" />
<tr>
<xsl:choose>
<xsl:when test="$MonthNo= 0">
<th width="32px" style="border:1px solid #666666; height=30px;background-color:#009fe3;color:#ffffff;">Month</th>
</xsl:when>
<xsl:otherwise>
<td width="32px" class="ms-vb" style="border:1px solid #666666; height=30px;background-color:#009fe3;color:#ffffff;"><strong>
<xsl:choose>
<xsl:when test="$MonthNo= 1">Jan</xsl:when>
<xsl:when test="$MonthNo= 2">Feb</xsl:when>
<xsl:when test="$MonthNo= 3">Mar</xsl:when>
<xsl:when test="$MonthNo= 4">Apr</xsl:when>
<xsl:when test="$MonthNo= 5">May</xsl:when>
<xsl:when test="$MonthNo= 6">Jun</xsl:when>
<xsl:when test="$MonthNo= 7">Jul</xsl:when>
<xsl:when test="$MonthNo= 8">Aug</xsl:when>
<xsl:when test="$MonthNo= 9">Sep</xsl:when>
<xsl:when test="$MonthNo= 10">Oct</xsl:when>
<xsl:when test="$MonthNo= 11">Nov</xsl:when>
<xsl:when test="$MonthNo= 12">Dec</xsl:when>
<xsl:otherwise></xsl:otherwise>
</xsl:choose>
</strong></td>
</xsl:otherwise>
</xsl:choose>
<xsl:call-template name="Days">
<xsl:with-param name="MonthNo" select="$MonthNo" />
<xsl:with-param name="DayNo" select="1" />
</xsl:call-template>
</tr>
<xsl:if test="$MonthNo < 12">
<xsl:call-template name="Months">
<xsl:with-param name="MonthNo" select="$MonthNo +1" />
</xsl:call-template>
</xsl:if>
</xsl:template>
All we’re doing here is writing the first column of the table to iterate the names of the months downwards. For the sake of clarity, it’s best to convert the SharePoint data, which holds the value of the month as a number, into the name of the month.
Next, we need to write the days across the page as columns. So add this template code directly beneath the Months template:
<xsl:template name="Days">
<xsl:param name="MonthNo" />
<xsl:param name="DayNo" />
<xsl:variable name="Year" select="substring-before($Today, '-')" />
<xsl:variable name="isLeapYear">
<xsl:choose>
<xsl:when test="($Year mod 4 = 0 and $Year mod 100 != 0) or $Year mod 400 = 0">True</xsl:when>
<xsl:otherwise>False</xsl:otherwise>
</xsl:choose>
</xsl:variable>
<xsl:variable name="Month">
<xsl:choose>
<xsl:when test="$MonthNo < 10">0<xsl:value-of select="$MonthNo" /></xsl:when>
<xsl:otherwise><xsl:value-of select="$MonthNo" /></xsl:otherwise>
</xsl:choose>
</xsl:variable>
<xsl:variable name="Day">
<xsl:choose>
<xsl:when test="$DayNo < 10">0<xsl:value-of select="$DayNo " /></xsl:when>
<xsl:otherwise><xsl:value-of select="$DayNo " /></xsl:otherwise>
</xsl:choose>
</xsl:variable>
<xsl:variable name="backColor">
<xsl:choose>
<xsl:when test="contains(' 4 6 9 11 ', concat(' ', $MonthNo, ' ')) and $DayNo = 31">gray</xsl:when>
<xsl:when test="$MonthNo = 2 and ($DayNo >= 30 or ($isLeapYear = 'False' and $DayNo = 29))">gray</xsl:when>
<xsl:otherwise></xsl:otherwise>
</xsl:choose>
</xsl:variable>
<xsl:variable name="thisDay" select="concat($Year, '-', $Month, '-', $Day)" />
<xsl:variable name="Rows" select="/dsQueryResponse/Rows/Row[substring-before(@EventDate, 'T') = $thisDay]"/>
<xsl:choose>
<xsl:when test="$MonthNo = 0">
<th width="32px" style="border:1px solid #666666; height=30px;background-color:#83d0f5;"><xsl:value-of select="$DayNo" /></th>
</xsl:when>
<xsl:otherwise>
<td class="ms-vb" width="32px" style="border:1px solid #666666; height=30px;">
<xsl:attribute name="bgcolor"><xsl:value-of select="$backColor" /></xsl:attribute>
<xsl:choose>
<xsl:when test="count($Rows) > 0">
<xsl:for-each select="$Rows">
<xsl:call-template name="rowview" />
</xsl:for-each>
</xsl:when>
<xsl:otherwise>
<xsl:text />
</xsl:otherwise>
</xsl:choose>
</td>
</xsl:otherwise>
</xsl:choose>
<xsl:if test="$DayNo < 31">
<xsl:call-template name="Days">
<xsl:with-param name="MonthNo" select="$MonthNo" />
<xsl:with-param name="DayNo" select="$DayNo +1" />
</xsl:call-template>
</xsl:if>
</xsl:template>
So the first section is testing for a Leap Year. Obviously, we need to know how many days February has in the current year.
The next two sections are placing a zero in front of any single digit Month or Day.
The following section beginning with variable name=”backColour” is determining which months have less than 31 days and setting a background colour for the excess days.
Then the next section is rendering the rows and applying the background colour to the “non-existent” days (for example days 30 and 31 in Feb, 31 in April and so on) … and calling the rowview template. So we’ll need to add that right after this.
<xsl:template name="Days">
<xsl:param name="MonthNo" />
<xsl:param name="DayNo" />
<xsl:variable name="Year" select="substring-before($Today, '-')" />
<xsl:variable name="isLeapYear">
<xsl:choose>
<xsl:when test="($Year mod 4 = 0 and $Year mod 100 != 0) or $Year mod 400 = 0">True</xsl:when>
<xsl:otherwise>False</xsl:otherwise>
</xsl:choose>
</xsl:variable>
<xsl:variable name="Month">
<xsl:choose>
<xsl:when test="$MonthNo < 10">0<xsl:value-of select="$MonthNo" /></xsl:when>
<xsl:otherwise><xsl:value-of select="$MonthNo" /></xsl:otherwise>
</xsl:choose>
</xsl:variable>
<xsl:variable name="Day">
<xsl:choose>
<xsl:when test="$DayNo < 10">0<xsl:value-of select="$DayNo " /></xsl:when>
<xsl:otherwise><xsl:value-of select="$DayNo " /></xsl:otherwise>
</xsl:choose>
</xsl:variable>
<xsl:variable name="backColor">
<xsl:choose>
<xsl:when test="contains(' 4 6 9 11 ', concat(' ', $MonthNo, ' ')) and $DayNo = 31">gray</xsl:when>
<xsl:when test="$MonthNo = 2 and ($DayNo >= 30 or ($isLeapYear = 'False' and $DayNo = 29))">gray</xsl:when>
<xsl:otherwise></xsl:otherwise>
</xsl:choose>
</xsl:variable>
<xsl:variable name="thisDay" select="concat($Year, '-', $Month, '-', $Day)" />
<xsl:variable name="Rows" select="/dsQueryResponse/Rows/Row[substring-before(@EventDate, 'T') = $thisDay]"/>
<xsl:choose>
<xsl:when test="$MonthNo = 0">
<th width="32px" style="border:1px solid #666666; height=30px;background-color:#83d0f5;"><xsl:value-of select="$DayNo" /></th>
</xsl:when>
<xsl:otherwise>
<td class="ms-vb" width="32px" style="border:1px solid #666666; height=30px;">
<xsl:attribute name="bgcolor"><xsl:value-of select="$backColor" /></xsl:attribute>
<xsl:choose>
<xsl:when test="count($Rows) > 0">
<xsl:for-each select="$Rows">
<xsl:call-template name="rowview" />
</xsl:for-each>
</xsl:when>
<xsl:otherwise>
<xsl:text />
</xsl:otherwise>
</xsl:choose>
</td>
</xsl:otherwise>
</xsl:choose>
<xsl:if test="$DayNo < 31">
<xsl:call-template name="Days">
<xsl:with-param name="MonthNo" select="$MonthNo" />
<xsl:with-param name="DayNo" select="$DayNo +1" />
</xsl:call-template>
</xsl:if>
</xsl:template>
So, now we add the rowview template. This will render the events into the appropriate table cells, and apply colour.
<xsl:template name="rowview"> <xsl:variable name="color"> <xsl:choose> <xsl:when test="@Category = 'Boards'">Blue</xsl:when> <xsl:when test="@Category = 'Formal Committees'">HotPink</xsl:when> <xsl:when test="@Category = 'Divisional Boards'">Purple</xsl:when> <xsl:when test="@Category = 'Proposed Trips'">Red</xsl:when> <xsl:when test="@Category = 'Visits'">Green</xsl:when> <xsl:when test="@Category = 'Group Committees/Boards'">Indigo</xsl:when> <xsl:when test="@Category = 'Public Holiday'">Grey</xsl:when> <xsl:when test="@Category = 'Group'">Brown</xsl:when> <xsl:when test="@Category = 'Other'">Darkorange</xsl:when> </xsl:choose> </xsl:variable> <xsl:variable name="EventDate" select="(number(ddwrt:DateTimeTick(ddwrt:GenDisplayName(string(@EventDate))))) div 864000000000" /> <xsl:variable name="EndDate" select="(number(ddwrt:DateTimeTick(ddwrt:GenDisplayName(string(@EndDate))))) div 864000000000" /> <xsl:variable name="width"> <xsl:choose> <xsl:when test="$EndDate - $EventDate = 1">143%</xsl:when> <xsl:when test="$EndDate - $EventDate = 2">178%</xsl:when> <xsl:when test="$EndDate - $EventDate = 3">217%</xsl:when> <xsl:when test="$EndDate - $EventDate = 4">232%</xsl:when> <xsl:otherwise>95%</xsl:otherwise> </xsl:choose> </xsl:variable> <a href="http://yourintranet/departments/management/Lists/Main%20Boards%20%20Committees/DispForm.aspx?ID={@ID}&Source=http://yourintranet/departments/management/Pages/BoardsCommitteesYearView.aspx"> <span style="position:relative;display:inline-block;width:{$width};"> <span style="display:inline-block;width:100%;cursor:pointer;text-align:center;border:1px solid {$color};position:absolute;color:{$color};"><xsl:value-of select="@Title" /></span> <span style="display:inline-block;width:100%;background-color:{$color};text-align:center;border:1px solid;z-index:-1;filter:alpha(opacity=30);opacity:0.3;"><xsl:value-of select="@Title" /></span> </span> </a><br /> </xsl:template>
This is where I’ve swiped some of Christophe’s code to render the different categories of events in different colours, using it to set a variable, color.
Then from Marc D Anderson’s blog, I swiped a bit of XSLT arithmetic and used it to check whether an event is more than one day. This bit gave me a bit of a problem, until I realised that a one day event gives a value of 0, a two day event returns 1, a three day event gives 2 and so on. I was then able to set the width of multiple day events accordingly, using a “width” variable.
NOTE: This is completely different to how SharePoint renders events in the Calendar’s Month View. To be honest, it’s a bit of a clumsy work-around. But the thought of trying to follow how the out-of-the-box month view works was more than a bit scary. You may have a better way of doing this, and if you do, feel free to share it. But this was the best I could manage.
The final section renders the actual event in the table cell and applies the colour. I freely admit I couldn’t done this without Christophe’s and Marc's excellent work.
We still have a couple of things to do to get this all to work. So next, remove all the XLST code that the SharePoint Designer wizard dropped in. That means delete the dvt_body template and the dvt_1.rowview template, then go back to the top and replace the two sections:
<xsl:template match …>
… and the dvt_1 template with this code.
<xsl:template match="/" xmlns:x="http://www.w3.org/2001/XMLSchema" xmlns:d="http://schemas.microsoft.com/sharepoint/dsp" xmlns:asp="http://schemas.microsoft.com/ASPNET/20" xmlns:__designer="http://schemas.microsoft.com/WebParts/v2/DataView/designer" xmlns:SharePoint="Microsoft.SharePoint.WebControls"> <table width="100%" cellpadding="2" cellspacing="0" style="border:1px solid #666666;border-collapse: collapse;"> <xsl:call-template name="Months"> <xsl:with-param name="MonthNo" select="0" /> </xsl:call-template> <xsl:choose> <xsl:when test="ddwrt:IfHasRights(2)"> <tr> <td class="ms-addnew" style="padding: 4px" colspan="99"><img src="/_layouts/images/rect.gif" /> <a class="ms-addnew" ID="idHomePageNewEvent" href="/departments/management/Lists/Main%20Boards%20%20Committees/NewForm.aspx?Source=http://yourintranet/departments/management/Lists/Main%20Boards%20%20Committees/calendar.aspx" onclick="javascript:NewItem('/departments/management/Lists/Main%20Boards%20%20Committees/NewForm.aspx?Source=http://yourintranet/departments/management/Lists/Main%20Boards%20%20Committees/calendar.aspx', true);javascript:return false;" target="_self"> Add new meeting</a></td> </tr> </xsl:when> <xsl:otherwise></xsl:otherwise> </xsl:choose> </table> </xsl:template>
This is what pulls the whole thing together. I also added a text link at the bottom of the table to allow Site Editors to add new events without having to go the whole Site Actions > View All Site Content route.
Admittedly, this may not be the most elegant solution. But I still haven’t been able to find an alternative approach by searching the Internet.
My least favourite aspect of this solution is how a multiple day event will simply overlay any first event in any of the other days in the date range. I wasn’t able to find a way of getting the overlaid event to sit below the multiple day event.
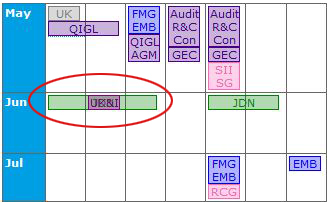 |
| In this case, the green event (a three-dayer) is overlaid on top of the event that is scheduled for the second day, making for an ugly display. |
 |
| The only workaround I could think of was to split the three-day event into two separate sections, forcing the event on the second day to sit below the three day event. It's not great, but it's better than what I first had. |
I hope this helps someone.
Parser Error Message: Only Content controls are allowed directly in a content page that contains Content controls.
ReplyDeleteI am getting this error when i followed all your steps.
Hi, Akul ... I think it's unlikely that you followed the steps exactly. The error you're getting is usually caused by an issue with the <asp:Content> tags. My solution is entirely XSLT, and doesn't mention <asp:Content> tags anywhere. My guess is you've modified or deleted an <asp:Content> or </asp:Content> tag somewhere along the way ...
DeleteI followed the exact steps for a calendar list in sharepoint 2013, but there is a problem. I have 4 events added from july to october. After following your steps the page shows nothing, its blank. It doesnt throw any errors but its blank. Any ideas?
ReplyDeleteWere you able to see the events in the calendar at any stage of the process? For example, at the point where you added the DataView web part to the page? What I'm getting at is trying to backtrack to the point where the events disappeared from the web part ... (and as a disclaimer, I'd add that I developed this in SP2007. Not having access to SP2013, I'm at a bit of a disadvantage when it comes to debugging an application that's in a different environment from the one I'm using)
DeleteHas any one implemented this in SharePoint 2013?
ReplyDeletePlease, I need the solution for SharePoint Online 2013. I cannot see any dvt_1 template code generated in 2013 version of SP Designer
ReplyDeleteI had the same issue on SP Premise.
DeleteI could resolve it by changing the variable 'thisDay' based on the Regional settings.
Keep also in mind that SPD always check your regional settings (/_layouts/15/regionalsetng.aspx).
In my case I've changed it to
I also figured out that the XSLT is configured to display 4 days events.
If your events are longer than 4 days you have to add additional 'when test="$EndDate - $EventDate = {Date Differences}' condition.
xsl:variable name="thisDay" select="concat($Day,'.',$Month,'.',$Year)"
Delete