Saturday, 22 April 2023

Passing SharePoint List values from one list to another

I WAS LOOKING TO PASS LIST VALUES FROM ONE LIST TO ANOTHER in Power Apps, and it was quite a bit trickier than I imagined.

The company I work for has a private box at one of the big London concert venues that is used for entertaining corporate clients. My colleagues in the Events team manage the use of the box, but the process had become mired down in a maze of emails and Excel spreadsheets. I was asked if there was a better way to manage requests to use the box.

Click the image to enlarge.

We already had a SharePoint classic calendar which was populated with the forthcoming events at the venue, but I wanted to create an application form that could manage the request process end-to-end.

The first barrier I ran into is that you can't customise the form-set for a classic calendar using Power Apps. And I wasn't able to see if using SharePoint Designer was an option, as my SPD stopped working a few months back (I've no idea why). So I had to come up with another way.

I didn't really want to get rid of the SharePoint calendar, because a lot of work had been invested in it and it is a pretty good way for our requestors to see a simple layout of forthcoming events ... so I wondered if I could create a second SharePoint list to manage the requests to use the box. It would all hinge on whether I could send some data from the calendar to the secondary Requests list. I was thinking ... query strings!

THE SOLUTION

The first step was to see whether I could send data to a Power Apps form in a query string. So I set up the Requests Management list and made sure I had a DateTime field to hold the Event's start time from the Calendar ("Start Time"). Both Lists would use the Title column to pass the name of the event.

Click the image to enlarge.

So, to see whether it would work, I built a link, including the query string, using the simple canvas app I built to manage the Requests list, like this:

https://apps.powerapps.com/play/[PowerAppID]?tenantId=[tenantID]&Event=[Title]&Date=[Start Time]

I knew from previous Power Apps I'd built that the Date value would be passed in the format "2022-11-06T18:00:00Z", but there would be no need to try to reformat that at this stage.

Then, I needed to prepare the fields in the recipient form to receive the data from the query string. To do that I set the Event field in the Power Apps form to:

Event_DataCardValue1.Default =
Param("Event")

... and the Date field to:

DataCardValue2.DefaultDate =
Param("Date")

But when I pasted the constructed URL into the browser and hit Return, the result wasn't quite what I was looking for.

Click the image to enlarge.

The Event value passed just fine, but the Date ... well, all I got was the date.

A quick search of Google suggested that a Power Apps Date field can't display the time value from a DateTime field. Quite why Microsoft thought that was a good idea, I couldn't say. But it left me in a bit of a bind. Because sometimes, concert venues have more than one show on a particular date and I needed to understand which show the Requestor was asking for.

One partial solution I found via Google was a suggestion that to fill in a time value in a Power Apps form, I could add an invisible dropdown, pre-populated with hour values, to the DateTime DataCard and then have the query string value select the appropriate hour value from the drop down to display. Sounded a bit convoluted, but I thought I might be able to adapt it to my needs.

So, I added the dropdown, then put this in its Items field:

["09","10","11","12","13","14","15","16","17","18","19","20"]

I figured I'd just put the hours that I knew would be likely to turn up in the query string - no show would start before 09.00 hours or after 20.00 hours.

Then I made the Hours dropdown's Default value:

Click the image to enlarge.

ddHours.Default = Text(DateTimeValue(Param("Date")), "hh")

... and tried again. Success!
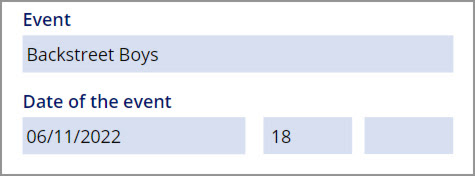
Click the image to enlarge.

That was easier than I thought ... but then came the Minutes field. Using a similar approach, I added a dropdown for the Minutes value into the DateTime DataCard, and set it up like this:

Click the image to enlarge.

Putting this in the Minutes dropdown's Items field:

["00","11","15","30","45"]

... and setting the Mins dropdown's Default value to:

ddMins.Default = Text(DateTimeValue(Param("Date")), "mm")

But it didn't work.

Click the image to enlarge.

A bit more frantic Googling and I came across this variation for the Default field:

ddMins.Default = Minute(Param("Date"))

Ah-ha! Success! This one worked. All I had to do next was figure out the Update value for the parent DataCard and we'd be in business ...

Click the image to enlarge.

So, in the same Google search I found a formula for updating the DateTime column in the Requests Management list. It looked like this:

EventDate_DataCardValue1.Update = DataCardValue2.SelectedDate + Time(Value(ddHours.Selected.Value), Value(ddMins.Selected.Value),0)

I'm not entirely sure what's going on here, but the first bit fetches the Date value that's been passed to the form by the query string. The second bit adds the Hours value from the invisible hours dropdown and the third bit adds the Mins value from the invisible mins dropdown. The bit I'm not sure about is the zero at the end (could it be the value for seconds?) ... but never mind, it works!

AND ... BACK TO THE CALENDAR

So, the other part of this problem was to create a link in the original source calendar that would send our intrepid requestor to the Power Apps Request form.

I've used Power Platform to create a dynamic link before and documented it here. So my first thought was to see if this could be adapted to generate a dynamic link that would be formatted the same way as my manually-created test link above. Just to remind you, the link needed to look like this:

https://apps.powerapps.com/play/[PowerAppID]?tenantId=[tenantId]&Event=[Title]&Date=[Start Time]

But first create a new field in the source calendar, Register, and make it a "Hyperlink or picture field".

Next, as in the earlier post, I thought I could create a Flow in Power Automate that would generate a dynamic link when a new Calendar entry was added.

I used a "When an item is created or modified" flow, because I figured that it would be useful if the time of an event changed, the administrator could make the change, then delete the existing link, and a new link would be generated.

So, to build the dynamic link in the Flow, we're going to use the Send an HTTP Request to SharePoint action:

Click the image to enlarge.

The settings in this Action should be:

Set Method to:

POST

Set Uri to:

_api/web/lists/GetByTitle('Calendar')/items([ID])

... where the [ID] is replaced with a dynamic ID look up.

Set Header to:

{
   "Content-Type": "application/json;odata=verbose",
   "X-HTTP-Method": "MERGE",
   "IF-MATCH": "*"
 }

And finally, I set Body to:

{'__metadata': {'type':'SP.Data.HRBookSlotListItem'},'Register':
 {'Description': 'Book this slot',
 'Url': 'https://apps.powerapps.com/play/[PowerApps ID]?tenantId=[tenantId]&Event=[Title]&Date=[Start Time]'}
}

BUT ... this only nearly worked. What I found on testing was that the dynamic link generated wasn't quite right. Any wordspaces from the Title field were being replaced with a "+" sign. Random! Why not "%20", which is the usual replacement for a word space in a URL? Who knows?

So I figured what I would do is write the Title value to a variable then replace the + symbol with the more functional encoded wordspace ("%20"). Here's how I did it.

First, Initialise a variable to hold the Title value.

Click the image to enlarge.

Then, initialise a second variable to process and hold the transformed Title value.

Click the image to enlarge.

Here's the formula that we use to scan the Title value and replace the open word space with the encoded "%20":

[
  {
    "Old": " ",
    "New": "%20"
  }
]

Next, I added a condition to make sure that the new Register field in the calendar was empty:

Click the image to enlarge.

In the Yes branch of the Condition, we need to add an Apply To Each container, so we can cycle through the Title values and replace the wordspace with "%20", like this:

Click the image to enlarge.

We place the vReplace variable in the Select an output from a previous step.

Then we add a Compose action and insert this expression:

Inputs.fx = replace(variables('vTitle'), item()?['Old'], item()?['New'])

Finally, add a Set variable action and select vTitle in the Name field and add Outputs from the Compose action in the Value field.

Next comes the Send an HTTP request to SharePoint that we already configured earlier, but now we've replaced the dynamic Title value with the vTitle variable.

Click the image to enlarge.

Now when you add a new event to the event calendar, the appropriate dynamic link is generated and added to the Register field in the Calendar, like this:

Click the image to enlarge.

That's pretty much it. The Event Name and the Event DateTime get passed from the original calendar item, via the Power Apps form, to the Requests Management list. Once a new instance is created in the Requests Management list, a different Flow takes care of routing the request to the Department Head for approval, and finally informing the Requestor of the status of their request.

EDIT - REVISE A STEP

So, I was having to move my applications from Classic SharePoint TeamSites to Modern SharePoint, because, you know, Microsoft is switching stuff off. But when it came to generating the dynamic link in the Calendar that leads our intrepid requestor to the Event Booking Form, I wondered why I was making it so complicated.

The original Calendar used a SharePoint hyperlink column to hold the link, but as you've seen, populating that content type requires some gymnastics with the Send an HTTP Request to SharePoint Flow Action. As we were starting from scratch again I thought I'd use the opportunity to simplify things a bit.

Instead of using a Link content type, I decided to use two simple text content types - one to hold the display text of the link and the other to hold the link itself, then I could just concatenate them in a HTMLText box in the Power App form and save myself unnecessary scripting.

Click the image to enlarge.

The Concatenate call would be:

Concatenate("<b><a href='",ThisItem.BookURL,"'>",ThisItem.Book_txt,"</a></b>")

Then, to populate those columns in the List, instead of the Send an HTTP Request to SharePoint Action, I just used an Update item Flow Action, like this:

Click the image to enlarge.

And that kept that part of the application a good deal simpler to implement.

I hope that helps someone.

Next: More query string shenannigans


Thursday, 2 February 2023

Where did that Contoso dummy content come from?

HERE'S A THING ... an internal client of mine was working on a modern Experience site, and some of her navigation links were taking her to a page of dummy Contoso content. Like this:

Trying to Google for things like "Contoso content" was no help at all ... so I needed to figure this out by myself.

I wondered if there was a dummy or template page lurking in the SitePages library of the site, but I couldn't see anything. When I looked at the URL in the browser address window, I saw a long URL, but no sign of a page name.

https://xxx.sharepoint.com/sites/DataMI/?xsdata=MDV8MDF8fDVjYTA2ZjVhN2MwNjQyMWYzMDcxMDhkYjA0MzAwZDg3fGNlNTZmYWU2MDU1ZDRjOWZiNmM5OWQzNDE1MDZhNDkxfDB8MHw2MzgxMDgzNzY2MzQ5NjIwMzN8VW5rbm93bnxWR1ZoYlhOVFpXTjFjbWwwZVZObGNuWnBZMlY4ZXlKV0lqb2lNQzR3TGpBd01EQWlMQ0pRSWpvaVYybHVNeklpTENKQlRpSTZJazkwYUdWeUlpd2lWMVFpT2pFeGZRPT18MXxNVFkzTlRJME1EZzJNamN3T1RzeE5qYzFNa

(I've trimmed off several lines of this for space-saving.)

So I started nosing around in the navigation links and found that the links that produced this behaviour were simply pointing at the top level of the site:

https://xxx.sharepoint.com/sites/DataMI/

... with or without the closing slash.

Of course, in a Modern Experience site, you can't have a navigation link that doesn't have a URL ... so I switched those links to labels, which solved the problem temporarily.

If I pasted the URL of the actual Home page into the browser address window, I got the actual home page:

https://xxx.sharepoint.com/sites/DataMI/SitePages/Home.aspx

And if I clicked on the Home link in the top navigation menu, I also got the Home page.


... but no great surprise, as this also had the full link to Home.aspx.

I began wondering if this was something to do with the setting of the default page for the site. So on a hunch, I found Home.aspx in the SitePages library and set it as the site default page.

Problem solved.

All I can think of is that at some time in the site's past, someone either deleted the default page (I don't know how, as SharePoint won't let you delete a designated default page) or found some way to NOT have a default page at all. The fact that the Home navigation link had the full URL of the Home page tends to support both those ideas.

Anyway, if you see this behaviour, now you know why.

I hope this helps someone.


Thursday, 22 December 2022

Power Apps: Add person to SharePoint Name field via dropdown in Canvas App form

POWER APPS AND SHAREPOINT IS AN IMMENSELY POWERFUL COMBINATION that allows you to construct time-saving automated applications that will save your colleagues valuable time when following business processes. But you knew that already, right?

I was recently working on a business process that required the Requestor choose an Approver from a list of authorised Approvers. Each area of the business had a different set of Approvers, and I wanted to make sure that the Requestor wasn't able to select the wrong Approver for their business area.

What's the problem, I hear you shout. Just whack in a ComboBox or a DropDown and off you go ... and, in truth, that's how I first approached the problem.

In addition to the main list which would hold the requests ("FAC") I created a lookup list ("FAClob") with two columns - a simple text column (I just used the existing Title column) to hold the Line of Business values and Person or group column to hold the corresponding Authorisers.

Here's the lookup list. Normally, I'd order by the Title column, but here I've ordered by the Underwriter column to show that the Title column contains an assortment of duplicate values.

I did then try to integrate the lookup list into the main list by adding a lookup column and pointing it at my LoB/Authorisers lookup list ... but quickly realised that was not the right approach. Far better to handle the looking up in the actual Canvas App that will handle the Requestors' submissions to the main list. So I deleted lookup column in the main FAC list and instead added a simple text field for the Line of Business and a Person or group field for the Authoriser.

Here's the corresponding columns in the main FAC list.

So next I switched over to Power Apps, refreshed the DataSources to ensure that my app was looking at the latest versions of the lists, then set about adding the two new FAC fields to the New Form I was working on ...

Here's the new fields with the dropdowns already in place.

With the fields in place in the Canvas App Form, I then set up the Line of Business DataCard. I added a DropDown to the DataCard and renamed it ddLoB. Then, switched to Advanced in the dropdown's Property panel and set the Items value to:

ddLoB.Items = Distinct(FAClob,Title)

and

ddLoB.Value = Result

You can leave the pane's Default value as "1", the Defaults default value, as changing it doesn't seem to do anything.

The "Distinct" ensures that we only display one of each of the LoB values from the lookup list.

Next, we need to set up the DataCard by editing a couple of fields in the DataCard's Advanced Properties pane ...

We need the single quotes around '1-LoB' because it contains a hyphen.

The default value should already be set to ThisItem.'1-LoB' (the single quotes are needed because I called my SharePoint List column 1-LoB, denoting this is a field for Form 1 in the process), but we have to change the Update value to:

1-LoB_DataCard1.Update = ddLoB.SelectedText.Value

Right ... that's the Line of Business field taken care of. Next, the Authoriser field.

What I need to do here is to make sure that when a requestor selects a Line of Business from the dropdown, the choice of authoriser is limited to the corresponding names from the lookup list. So I added a dropdown ("ddAUW") to the Authorisers DataCard and set these fields in the Properties/Advanced window ...

ddAUW.Items = Distinct(Filter(FAClob,Title = ddLoB.SelectedText.Value),Underwriter.DisplayName)

ddAUW.Value = Result

The Authorisers dropdown's Items formula is a little more complicated because a Person or Group field holds a table rather than a single value, and we have to tell the dropdown which part of the table to return.

Then I turned my attention to the Update value in the DataCard ... and initially I fell into the trap of thinking I could just update the SharePoint list with a value from the Authoriser dropdown. Like this:

1-AuthorisingUW_DataCard1.Update = ddAUW.Result

I was just using a submit button to send the form's values to the SharePoint list, with the simple command:

Submit_Button.OnSelect = Submit(Form1)

But, of course, it didn't work. And, of course, it couldn't be as simple as that, could it?

So I asked my colleague Ernani if he had any idea what was going on. He suggested switching out the simple Submit button for a patch function, and even went to the trouble of writing the patch formula for me ... which was great, and it worked. But I like simplicity, and I felt that as I developed the forms needed for the whole application, having complex patches instead of simple Submits might become an albatross around my neck.

So, I wondered if I could take the section of the patch formula that sends the Authoriser details to the SharePoint list and instead pasted that code into the DataCard's Update action, that might serve the same function, while still allowing me to use a simple submit button. Here's the formula:

{  

'@odata.type': "#Microsoft.Azure.Connectors.SharePoint.SPListExpandedUser",  

Claims: "i:0#.f|membership|" & LookUp(

    FAClob,

    Underwriter.DisplayName = ddAUW.SelectedText.Value,

    Underwriter.Email

),

DisplayName: "",

Email: LookUp(

    FAClob,

    Underwriter.DisplayName = ddAUW.SelectedText.Value,

    Underwriter.Email

)

}

And here's what it looks like in place:

This is what the Advanced properties looks like after adding the formula.

Then I just checked that the Default value of the DataCard was:

1-AuthorisingUW_DataCard1.Default = ThisItem.'1-AuthorisingUW'

And you know what? When I tested it, it worked!

There's a lot more to this particular form than what I've outlined above, but for me, the key breakthrough was the updating of the SharePoint Person and Group field from a Power Apps dropdown.

Here's what the final cascade looks like ... select UK Casualty in the Line of Business dropdown and the Authorising Underwriters are restricted to those who can sign off requests for that business area.

I hope this helps someone.


Saturday, 4 June 2022

Simple approval form with PowerApps, Deep Links and Flow

I STRUGGLED WITH THIS FOR A COUPLE OF DAYS BEFORE REALISING that Microsoft had recently moved the goalposts on how Deep Linking works in PowerApps. Consequently, many of the "how-to" instructions on the Internet have been rendered inaccurate. It wasn't until I stumbled across a post on the Microsoft site that I realised something had been fundamentally changed.

So I'll go through the method that worked for me, and add comments on what I was doing wrong as I go ...

THE REQUIREMENT WAS ...

... the client wanted to create a process where colleagues could request a report from a database. The request would be forwarded to an authoriser, who would add a few more details to the request and save their amendments to the queue.

A SharePoint list seemed the best way to do this and I thought all I needed to do was to create a Canvas App in PowerApps and then pass the ID of the newly-created list item to an EditForm, the method referred to as "deep linking".

I'd started on a similar project in November 2021, but it never progressed beyond the early stages. Nonetheless, I figured I could re-use some of the tech from that project in this new one. That was my first mistake.

I figured I needed to add an "If" statement to the OnStart control of the App in the canvas app, so we would know whether this was a call for a NewForm or an EditForm ... something like:

App.OnStart = If(
   !IsBlank(Param("ID")),
   Set(
      varID,
      Value(Param("ID"))
   );
   Navigate(Screen2)
)

... ought to work, right?

Except that PowerApps told me I couldn't have "Navigate" in the OnStart control.

So I tried other combinations, searched on Google for a day or two and was just about to beg a colleague for some help when I found a mention in a Microsoft blog that good ol' MS had changed the way the App.OnStart and App.StartScreen works.

It's probably my fault for not following the PowerApps roadmap more closely, but still ...

Anyway, piecing together the info from the Microsoft blog and the work I'd done on the earlier project, I was able to figure out a way to get a working app for my client, and ...

THIS IS HOW I DID IT

I won't bother going in to how you add fields to a Canvas App ... there's plenty of other blogs that tell you how to do that. So let's assume you have a SharePoint List configured to hold answers to questions you want to ask. And let's assume you have created a Canvas App and you've set the SharePoint List as the App's data source and added the necessary Form fields. Let's take a look at what the Canvas App looks like at this stage.

Screen1 is the part that acts like a NewForm. The requestor fills in the visible fields and clicks Submit to save the data to the list.
So we leave the App.OnStart control blank, as we no longer have a need to set a variable and we can't use it to Navigate. Instead, we put this expression in the App.StartScreen control:

App.StartScreen = If(Value(Param("parID")) >= 1, Screen2, Screen1)

What we're saying here is, if the value of the parameter we pass to the App in the query string (which we'll get to later) is equal to or greater than the numerical value "1", go to Screen2 ... otherwise, go to Screen1.

Wrapping the 'Value ()' around the 'Param("parID")' expression makes sure we're using a number rather than a text string.

Simple, yes?

Now we jump to the Form in Screen2 and add an expression into its Item control.

Screen2 will hold the form we're using as the EditForm. We need to set it up to receive the ID passed to it in the query string.
The expression is:

Form2.Item = LookUp('MI Requests', ID=Value(Param("parID")))

This is just saying, go and find the item in the list (MI Requests) whose ID matches the value in the query string that was just passed to you.

That's that part done. Next, let's get the Submit buttons set up.

For the first form, use this submit expression.

Button1.OnSelect = SubmitForm(Form1); Navigate(Screen3, ScreenTransition.Fade)

For the second form, use this submit expression.

Button2.OnSelect = SubmitForm(Form2); Navigate(Screen3, ScreenTransition.Fade)

Here's the submit expression for the second Submit button ... pretty similar to the Submit button for Form1.
And the query string (told you we'd get to it) to guide your approver to the second (EditForm) form is:

https://apps.powerapps.com/play/[yourAppID]?[yourTenantID]&parID=[ID]

Strictly speaking, you only need the [yourTenantID] part if you expect to be using this form outside of your organisation, but I've included it here for the sake of clarity. The [ID] value you will retrieve in the Flow when you create the dynamic link as part of your request/approval process.

But in the meantime, you can test that your forms are working correctly by substituting the [ID] value in the above query string with an actual ID value for an item in your list.

GO WITH THE FLOW

As with the PowerApp form, I'm not going to go through every step of creating the Flow to send the link to your approver person, but let's just quickly look at how you create the dynamic link that sends the query string to the form.

I find this works best if you add a Send an Email (V2) action in the Flow. In my application, I set up a Condition to check whether the incoming list-change included a value for the Status field (which the requestor's form doesn't include). If not, it was a request for a New Item. If it did, then it was an Edit Item change and as such needed no further action ... up to you whether you elaborate on that.

But the key bit is ... in the Send an Email (V2) action, switch to HTML view then build the link like this:

<a href="https://apps.powerapps.com/play/[yourAppID]?[yourTenantID]&parID=[ID]" Review the request and add any relevant information to the form</a>

Switching the body of the email action to HTML view really helps you get the dynamic ID in the right place. You'll struggle otherwise.
You'll need to swap out the [ID] for the actual dynamic ID from the When an item is created or modified section.

Now, when you fill in Form1 and submit, the new item is created. The Flow sends an email containing the link/query string to the reviewer/approver. When they click on the link, the form opens the submitted item's Edit Form, like this ...

For ease of use, I displayed the requestor's data in non-editable fields in the top half of Form2, and placed the fields the reviewer needs to complete in the lower half.
The pale blue section at the top of the form shows the data that was submitted by the requestor, the white section of the form shows the data added by the reviewer/approver.

And that should be it, really ... Though I found the Microsoft change annoying at first, it does make for a cleaner and simpler PowerApp in the end.

I hope this helps someone ...


PS - [Here's the link to blog that explains Microsoft's changes.]

Tuesday, 12 April 2022

Why doesn't SharePoint understand British Summer Time?

I'VE HAD THIS PROBLEM A COUPLE OF TIMES ... you add some fiddly code to your Flow (or Workflow) to generate a handy Calendar Invite (.ics file) for your end user, but the resulting calendar entry is an hour out. For some reason, Microsoft have never been able to offer us anything other than UTC time in SharePoint and Outlook. And it's an awful pain for us developers.

I was creating a Meeting Calendar for an event our company would be attending. My colleagues would need to book the meeting space set aside for our company to use at the event, and it made sense for us to offer an automated booking service for those attending.

I could have used a SharePoint Calendar as the starting point, but I wanted to have something a bit more user-friendly, so I opted for a SharePoint Custom List. This would also give me a bit more control over the fields in the list.

So I set up the list and modified the input form in PowerApps to make it a bit more visually attractive (exactly how that's done can be discovered with a quick Google search - it's outside the scope of this article) and I ended up with something like this:

To keep things simple, I'm asking the user to just select a Date, Time and Duration of the meeting they want to book. (They're also asked to select a Venue, but that's not important right now.)

You can see that all the attendee has to do is add the Name of the Host (Name field) - the person filling in the form may not be the meeting host - add the names of any colleagues who may also be attending, then select the Date of the meeting, the Time of the meeting and the Duration of the meeting. I was planning to have the Power Automate Flow do the configuring of the EventDate and EndDate for the meeting.

I'm deliberately mimicking the column names that are found in Calendars, as these are needed when it comes to generating the .ics file later in the process. It doesn't hurt to have a Location column as well.

These three columns are hidden (and not included in the NewForm) because the user never needs to see them.

ADDING EXTRA COLUMNS TO THE LIST

So, the Venue, Date, Time and Duration fields are simple Choice columns in the SharePoint list, which return text values. If I was going to generate an iCalendar file, then I'd need to convert that text into valid Dates and Times. It's probably possible to do that in PowerApps (and I will have a think about that for next time), but because I wanted to get it done, I chose the Power Automate route.

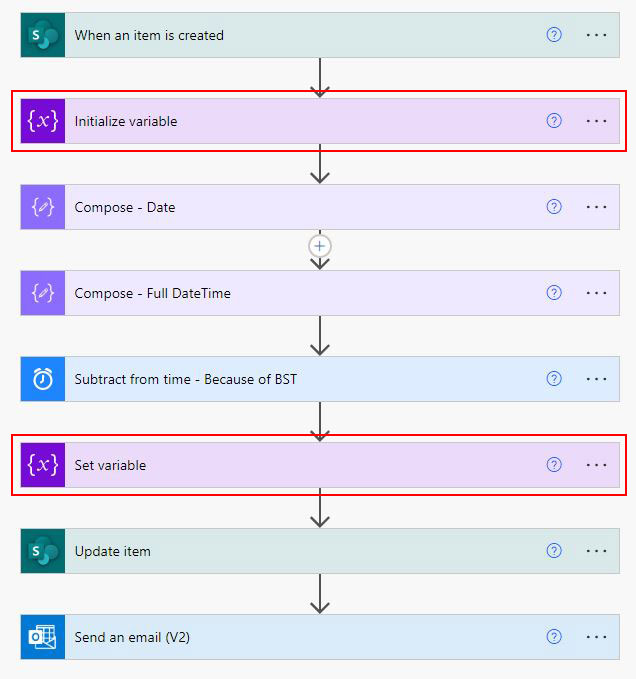
I created an "On create" Flow and added the Site and List. Then I added the Update Item and Send an Email components. We'll fill those in later. But mainly, I needed to figure out a way to transform the simple text values in the List into properly formatted DateTime values. Then I discovered the Compose action.

It's funny how you can use a platform for years, yet still discover new things about it. I'd never come across Compose before, but what a great tool ...

The Compose action is an absolute wonder ... I'm so annoyed that I didn't know about it before ...

I added a couple of Compose actions then set about adding the scripting that would do the conversion. The trickiest was the Date. The scripting was fairly straightforward, but I did get some unexpected results, at first. So, use formatDateTime and transform the text value into a date by typing this script:

formatDateTime(triggerOutputs()?['body/Date/Value'],'yyyy-MM-dd')

... into the Expression area of the Compose function's Dynamic Content, here:

However, when I tested the output of Compose - Date action, the result was a scrambled date which had reversed the Day and Month values, so instead of 11th of May, it was rendering as 5th December. Straightaway, I checked the Region Setting of the parent site, but that was set to "English (UK)" and to the correct London TimeZone.

So why it was rendering the date incorrectly, I have no idea. And rather than spending ages trying to figure it out, I cheated and changed the formula to:

formatDateTime(triggerOutputs()?['body/Date/Value'],'yyyy-dd-MM')

... which did the trick!

Once I had the Date rendered correctly, I had to append the chosen time to it. This is where the second Compose action comes in. Using the concatenate command, I built this expressions and added it to the Expression field of the "Compose_-_Full_DateTime" action:

concat(outputs('Compose_-_Date'),'T',triggerOutputs()?['body/Time/Value'],':00Z')

All I've done here is build a DateTime value by structuring it in a format that SharePoint understands, eg:

2022-05-11T10:00:00Z

The real puzzler came when I tested the Flow to see whether the above would help me generate a calendar invite for the end user.

SO ... WHY DOESN'T SHAREPOINT UNDERSTAND BST?

There is annoying glitch in SharePoint where the TimeZone of a site can only be set to a UTC value. In the case of the "00:00 Dublin, Edinburgh, Lisbon, London" setting, that translates to Greenwich Meantime ... which isn't a problem in the winter, but becomes an issue in the Summer when UK clocks are wound forward by an hour. (I think in the US, this is referred to as Daylight Saving Time).

The result is that when you set a DateTime value in SharePoint and copy it over to Outlook, the date goes in at an hour ahead of the time you wanted.

There doesn't seem to be a fix for this and, though it comes up in many SharePoint and Microsoft forums, no one at Microsoft seems to have the appetite to fix it.

The upshot of this is, I needed to find a way to compensate for this anomaly myself.

Luckily, I found a function in my list of Flow actions called Subtract from time. I added the action, changed its name to "Subtract from Time - Because of BST" to remind me of why it's there when I come back a few weeks from now, then just set it to the following:


The Base time is set to the output from the previous action Compose - Full DateTime. The Interval is set to 1 and the Time unit is Hour. That's it.

Now we have all the components in place to configure the Update item action.

So open up the Update item panel and set it up like this:


  • Set the Title to: "Meeting at [Venue value]".
  • Set the EventDate field to the output from the Subtract from time - Because of BST action.
  • Set the Location field to [Venue Value].

My last job was to set up the notification that goes to the Requestor once they click Save on the SharePoint input form. The main thing I wanted to do was to include an iCalendar invite so the Requestor could add the event to their Outlook calendar.

It's not hard to find on the Interweb, but to save you looking it up, here's the script for generating an iCalendar event:

[YourSite]/_vti_bin/owssvr.dll?CS=109&Cmd=Display&List=[YourListID]&CacheControl=1&ID=[ID]&Using=event.ics

For this to work properly, you must have at least the two Date columns in your list named EventDate and EndDate. Without these, the script just won't work. 

As mentioned earlier, you would do well to have a Location field as well, and to configure the content of the Title field in a way that makes sense (The Title field content will become the Name of the event when it's added to the user's Outlook calendar.)

The List ID can be found by going to the List's Settings window and grabbing it from the end of the URL window ...

Click on the image to enlarge it.

... and you'll need to replace [ID] with the ID of the list item we're processing at that point. I actually found it a lot easier to configure this formula using a Flow Variable.

So, add an Initialise variable action and a Set variable action, like this:


Then in the Initialise variable action, name your variable as "calendarInvite", set the Type to "String" and leave the Value field blank.


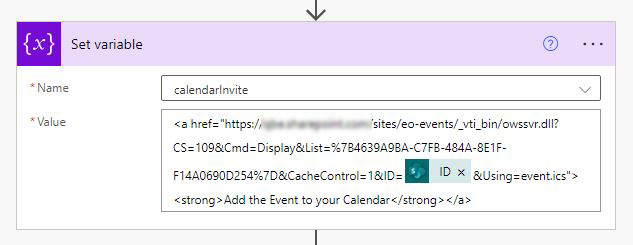
Next, in the Set Variable action, set the variable Value to:

<a href="[YourSite]/_vti_bin/owssvr.dll?CS=109&Cmd=Display&List=[YourListID]&CacheControl=1&ID=[ID]&Using=event.ics"><strong>Add the Event to your Calendar</strong></a>

You should be able to replace the "[ID]" with the item's ID from the When an item is created action ... so the Set Variable action looks like this:


But if that isn't working for you, try replacing the [ID] with the expression:

@{triggerOutputs()?['body/ID']}

All that remains is to compile the email notification that's sent to Requestor to confirm their booking. Because the variable now contains the text and the URL for the Calendar Invite, all you need to do is add the Variable to the body text of the email in the appropriate place, like this:


And that is pretty much it.

When the recipient of the email clicks on the email's Calendar link, the new event has a subject line of "Meeting at [Venue]", a seasonally adjusted EventDate and End Date, and even a Location value.

There may be a more "correct" way to deal with the fact that SharePoint is unable to adjust the time of the event for local, seasonal timeshifts, but at least this quick fix works.

If you wanted to be really ambitious, you could add a Condition action to the process to create two branches ... one for events in the winter (not British Summer Time) and one for summer when there is some form of daylight saving time in place.

Hope this helps someone ...


Monday, 14 March 2022

PowerApps - linking the Gallery Arrow to a DispForm / Editform

I WAS BUILDING a gallery linked to SharePoint in a Canvas App, and ran into a spot of bother.

It's that arrow on the right that was giving me grief.

It was really easy to create a Title in the Gallery that linked back to the relevant item in the SharePoint list. I just used an HTML field and a concatenate expression, like this:

Concatenate(

     "<b><a href='https://MySite.sharepoint.com/sites/EO-IT/Lists/CaTS%20Calendar/DispForm.aspx?ID=",

     ThisItem.ID,

     "' style='text-decoration:None;'>",

     ThisItem.Title,

     "</a></b>"

)

But you see that pesky arrow on the right side of the Gallery Item? Well, I struggled with the syntax to make that link to the same item in the SP list. I tried several variations on what I thought would work in the item's OnSelect control and kept drawing a blank.

Finally, I tried this simple formula:

Launch(Concatenate("https://MySite.sharepoint.com/sites/EO-IT/Lists/CaTS%20Calendar/DispForm.aspx?ID=",ThisItem.ID))

… and to my surprise it worked. The reason I was surprised is that I’m fairly sure that this was the first formula I tried and that PowerApps threw an error.

So in case anyone else experiences the same glitch, I can confirm that the above is the correct syntax.

Hope that helps someone.

Saturday, 17 April 2021

Flow: Send an email to multiple addresses stored in a list or library

SO HERE'S A STRANGE THING. I was working on a scheduled Flow that would loop through the items in a list and send out alerts to groups of Owners and Responders when a task was close to its deadline. Sounds straightforward, right? Being fairly new to Flow, I certainly thought so, and even went as far as to trust Microsoft's recommendations as I was building my Flow application. But it turns out that there were "unexpected benefits" along the way. Notably, all the Owners were receiving duplicate notifications from all the tasks - not what I intended and definitely not what the Owners wanted.

Here's a screengrab of the list. You can see that I've added a couple of Owners and a couple of Responders for each task. I want each Responder to receive a notification and all appropriate Owners to be CCed on each notification.
So for this exercise, I created a simplified version of the list I built. You can see each task in the list has a set of Owners (generally managers in charge of the project phases) and Responders (who are generally supposed to carry out the tasks). The list also has a "Completed" tickbox so Responders can set the task to "Complete".

Right, so with my List all ready and populated with Tasks, I set to creating the Flow that would scan the List once a week, then send notifications to all named stakeholders as a task fell due.

I want my Flow to run once a week, and notify all Responders that the deadline for their task is drawing close.
You can set the parameters of your Scheduled Flow at the point of creation or after you've created it ... I generally choose after. In this example, I want the Flow to run once a week on Wednesdays at 1pm.

Let's have the Flow run on Wednesday at 13.00.
The next step is to add the Get Items call. We need the Flow to scan the entire list, looking for deadlines to act upon. So we add a Get Items action, then point it at the SharePoint site and specific list we want it to scan.

Pretty basic stuff, right ... create a Flow, add a Get Items action. Don't get too comfortable. It starts getting more challenging from here on.
What I wanted was to set up a Condition that would only trigger the remainder of the Flow if the deadline was in the range of one week ago to one week from now. This would mean that a deadline falling within the two-week window would result in notifications being triggered. If Responders don't mark the task "Complete", they'll continue to receive alerts in that two-week window. You might prefer a one-month window, but as you'll see, that's no more difficult to achieve.

Add a condition. We'll need more than one condition, but I'm getting to that.
So ... we add a Condition to the Flow. Then, when we select the Deadline in the "Choose a value" window, Microsoft helpfully adds an Apply to each wrapper around the Condition. I didn't ask it to do this, but it makes sense ... because we want the Flow to loop through all the items, looking for Tasks that have a Deadline that falls inside our two week window, right? So, I'm happy with that.

The value we're going to filter on first is the Deadline. As soon as we add that value in the left-hand field, we automatically get an Apply to each wrapper ...
Now we'll need to set two boundaries for our two-week window - one for the start and one for the end. Again, this can be tricky if you're new to Flow, but pretty easy to discover via Google as I did.

We set the first parameter to the following formula, like this:

addDays(utcNow(), -7)

This means take today's date and subtract seven days. We add the formula as an Expression to the condition, saying that if the Task's Deadline is Greater to or Equal to the above value, then act.

Apply the filter value for Deadline as a calculated Expression ...
Next, we have to define the future parameter for the condition. We do that by adding a second condition that defines a Deadline date seven days from now, using this formula:

addDays(utcNow(), 7)

You could also add a "+" in front of the 7, but it's not necessary. Add the parameter, like this:

Having two Deadline filter values is how we bracket a two week window. Adjust the number of days to change the beginning and end of the trigger time period.
Finally, we don't want alerts to trigger on Tasks that have been marked completed, so we add a third parameter to the Condition, saying if the Complete box is not ticked, you can continue to issue an alert on that item.

Finally, we need a filter value that prevents Task already marked as Complete from triggering a Flow response.
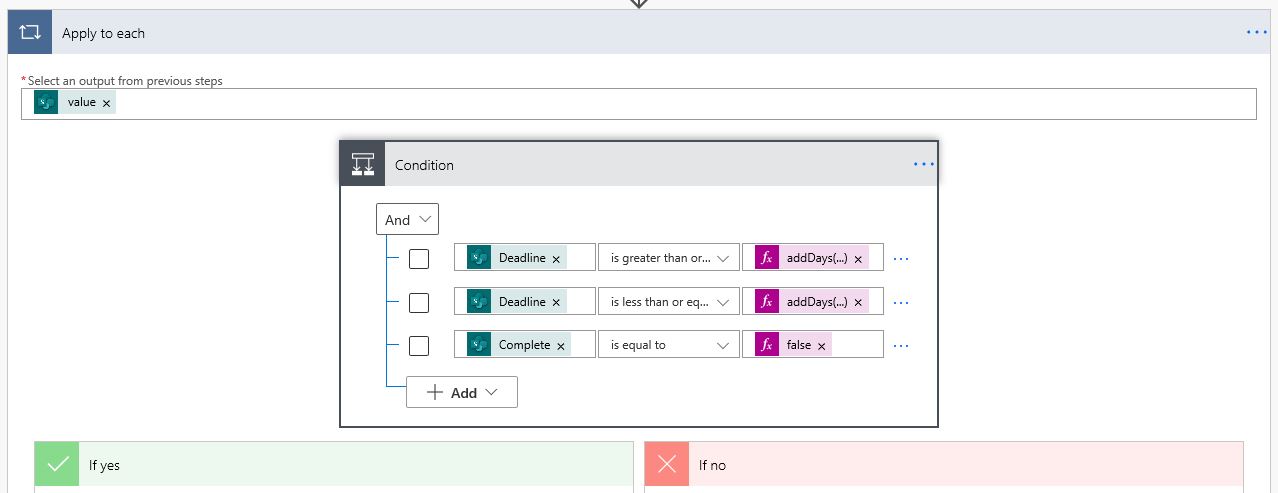
The final completed Condition panel should look like this:

And there we are ... all the Condition filters applied.
Right, so that's the easy part done. Things only started to go wrong for me when I tried to set up an Alert Email that would tell the Owners and the Responders that their Task was due for completion.

I did that by adding a Send Email action to the "If yes" branch of the Condition. But the minute I add the Responder data to the "To" field, helpful ol' Microsoft added an enclosing Apply to each function.

I was beginning to see a pattern emerging. Every time I added a value from the list, Flow added an Apply to each wrapper ... which I assumed was necessary.
Again, that's a good thing, right? Because I want the Flow to loop through all the Responders that I added to the Responder field in the list.

And when I tested the Flow at this stage, each of the Responders receives an email so, again, that's good and what I intended. But it was when I added the Owners as a CC to the email that the problems started.

Go to the Send an email action and click the link at the bottom of the panel that says, "Show advanced options", and add a dynamic value for the Owners into the CC field.

I wanted the add the Owners on the notification as a CC, as they didn't have to do anything, except be aware that the notification had gone to the Responders.
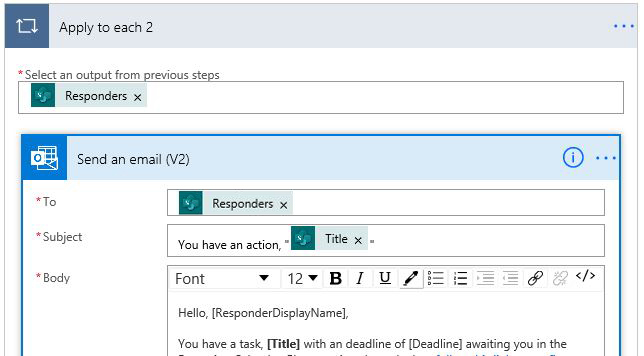
And, predictably, Flow then wraps your Send an email action in another Apply to each, this time for retrieving the Owners values for each email. The thing is, this addition doesn't work like you expect it to.

What happens is that the Flow creates several emails for each task as it loops through the Responders and the Owners ... so for Responders A & B and Owners C & D, you get four emails for the same task, like this:
  • Responder A + Owner C
  • Responder A + Owner D
  • Responder B + Owner C
  • Responder B + Owner D

... meaning that The Responder is getting two emails for each task and the Owners are getting two emails for each task. And if you had three Owners and Three Responders, then there would nine emails going out, and so on. We definitely don't what that to be happening. We're going to need a different approach.

I don't mind each Responder getting their own email for a given task, but I don't want that to be multiplied by each Owner also getting an email. So what if we roll up all the Owners for a given task into a single string of email addresses? This is a job for Variables ...

First, we have to declare a Variable for Owner Email Addresses. And that has to be done that outside the Apply to each action, like this:

I added the Initialize variable action after the Get items action, as it has to be listed in the main section of the Flow, outside of any Conditions or Apply to each actions.

Add the action Initialise variable. The Variable Type is String. Leave the Value field blank. Now, I needed to rearrange the way the Apply to each actions were nested, so I unpicked them (by removing any dependent values in the enclosed Actions) and laid them out like this:

To rearrange the Apply to each actions, you first need to remove any dynamic values in the enclosed actions. Then you can drag the Apply to each actions to the correct positions and re-instate any dynamic values in the child actions.

... adding the Append to string variable action that will compile a string of Owners' email addresses for each email as the Flow loops through Apply to each 3.

Really important - do not forget to add the semi-colon after the Owners Email value in the Value field. This is to ensure the string of email addresses are separated correctly.

When we run this Flow, a curious thing happens. All the Owners' email addresses in the group of tasks that qualify under the filter are compiled into an ever-growing string ...

What on earth is going on here? The Flow has compiled all the Owner email addresses from every qualifying task and added them to the CC field of the notification. By the time we get to the fourth notification, every Task Owner is getting the notification, even though they're not an Owner on the fourth task.

... until by the end of the cycle, all Owners are CCed into the last notification.

I tried a few things to fix this - including changing the order of the Apply to each actions - but nothing seemed to work and I wasn't able to find a solution via Google.

The next day, I had a flash of inspiration ... I added another Set variable action before the Apply to each 3 (that appends and holds the Owner emails), and configured it to give the variable a value of "null". This would clear the Owner variable after each notification is sent, preventing a build-up of Owner email addresses in the CC field of the notification.

And that seemed to do the trick. No longer were Owner email addresses from previous notifications being copied into subsequent notifications.

And when I ran a test, there was no more build-up of emails and, as I'd wanted, there was one notification for each Responder with all appropriate Owners for that task CCed on each of the notifications.

There may well be a better way of doing this, but I'm just happy I got a solution that works.

SOME FINAL THOUGHTS

Because Flow can sometimes be a bit difficult to wrangle, here's some extra hints and tips to make this solution better.

Sometimes, when I add an email value to a notification it displays strangely. For example in the below image, you can see that the salutation of the notification displays as "Owners DisplayName" ... but I had actually added the Responders DisplayName, and the notification does show the Responders name on arrival. I don't lose much sleep over this, but I just wondered if anyone else sees this glitch when they use Flow.

Here's what the final Send an email action in Flow should look like. I had put in the Owner and Responder email values for testing purposes, so I could see what Flow was writing into the emails without actually having to send the emails.

Next, if you just put the "Deadline" in the body of the notification, the date displays backwards in the final delivered email, like this: 2021/04/14. To get it to display the right way round and in the right format, add the Deadline as an Expression, like this:

formatDateTime(items('Apply_to_each_2')?['Deadline'],'dd/MM/yyyy')

You can change the "dd/MM/yyyy" bit to a format that suits you, if you prefer.

You can also see, for testing purposes, I had the Responders Email (mislabelled by Flow here as "Owners Email") and the Owners variable in the body of the notification. This saves me peppering my colleagues with emails while I'm testing. However, it's tricky to add the Responders Email value directly into the body of the notification - Flow doesn't offer me that option. So what I did was first add the Responders Email value as an expression, like this:

items('Apply_to_each_2')?['Email']

On saving, Flow converted it to an actual dynamic value (though it still managed to mislabel it as "Owners Email").

I hope this has helped someone ...