I WAS LOOKING TO PASS LIST VALUES FROM ONE LIST TO ANOTHER in Power Apps, and it was quite a bit trickier than I imagined.
The company I work for has a private box at one of the big London concert venues that is used for entertaining corporate clients. My colleagues in the Events team manage the use of the box, but the process had become mired down in a maze of emails and Excel spreadsheets. I was asked if there was a better way to manage requests to use the box.
 |
| Click the image to enlarge. |
We already had a SharePoint classic calendar which was populated with the forthcoming events at the venue, but I wanted to create an application form that could manage the request process end-to-end.
The first barrier I ran into is that you can't customise the form-set for a classic calendar using Power Apps. And I wasn't able to see if using SharePoint Designer was an option, as my SPD stopped working a few months back (I've no idea why). So I had to come up with another way.
I didn't really want to get rid of the SharePoint calendar, because a lot of work had been invested in it and it is a pretty good way for our requestors to see a simple layout of forthcoming events ... so I wondered if I could create a second SharePoint list to manage the requests to use the box. It would all hinge on whether I could send some data from the calendar to the secondary Requests list. I was thinking ... query strings!
THE SOLUTION
The first step was to see whether I could send data to a Power Apps form in a query string. So I set up the Requests Management list and made sure I had a DateTime field to hold the Event's start time from the Calendar ("Start Time"). Both Lists would use the Title column to pass the name of the event.
 |
| Click the image to enlarge. |
So, to see whether it would work, I built a link, including the query string, using the simple canvas app I built to manage the Requests list, like this:
https://apps.powerapps.com/play/[PowerAppID]?tenantId=[tenantID]&Event=[Title]&Date=[Start Time]
I knew from previous Power Apps I'd built that the Date value would be passed in the format "2022-11-06T18:00:00Z", but there would be no need to try to reformat that at this stage.
Then, I needed to prepare the fields in the recipient form to receive the data from the query string. To do that I set the Event field in the Power Apps form to:
Event_DataCardValue1.Default =
Param("Event")
... and the Date field to:
DataCardValue2.DefaultDate =
Param("Date")
But when I pasted the constructed URL into the browser and hit Return, the result wasn't quite what I was looking for.
 |
| Click the image to enlarge. |
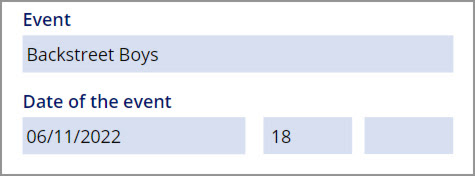
The Event value passed just fine, but the Date ... well, all I got was the date.
A quick search of Google suggested that a Power Apps Date field can't display the time value from a DateTime field. Quite why Microsoft thought that was a good idea, I couldn't say. But it left me in a bit of a bind. Because sometimes, concert venues have more than one show on a particular date and I needed to understand which show the Requestor was asking for.
One partial solution I found via Google was a suggestion that to fill in a time value in a Power Apps form, I could add an invisible dropdown, pre-populated with hour values, to the DateTime DataCard and then have the query string value select the appropriate hour value from the drop down to display. Sounded a bit convoluted, but I thought I might be able to adapt it to my needs.
So, I added the dropdown, then put this in its Items field:
["09","10","11","12","13","14","15","16","17","18","19","20"]
I figured I'd just put the hours that I knew would be likely to turn up in the query string - no show would start before 09.00 hours or after 20.00 hours.
Then I made the Hours dropdown's Default value:
 |
| Click the image to enlarge. |
ddHours.Default = Text(DateTimeValue(Param("Date")), "hh")
... and tried again. Success!
 |
| Click the image to enlarge. |
That was easier than I thought ... but then came the Minutes field. Using a similar approach, I added a dropdown for the Minutes value into the DateTime DataCard, and set it up like this:
 |
| Click the image to enlarge. |
Putting this in the Minutes dropdown's Items field:
["00","11","15","30","45"]
... and setting the Mins dropdown's Default value to:
ddMins.Default = Text(DateTimeValue(Param("Date")), "mm")
But it didn't work.
 |
| Click the image to enlarge. |
A bit more frantic Googling and I came across this variation for the Default field:
ddMins.Default = Minute(Param("Date"))
Ah-ha! Success! This one worked. All I had to do next was figure out the Update value for the parent DataCard and we'd be in business ...
 |
| Click the image to enlarge. |
So, in the same Google search I found a formula for updating the DateTime column in the Requests Management list. It looked like this:
EventDate_DataCardValue1.Update = DataCardValue2.SelectedDate + Time(Value(ddHours.Selected.Value), Value(ddMins.Selected.Value),0)
I'm not entirely sure what's going on here, but the first bit fetches the Date value that's been passed to the form by the query string. The second bit adds the Hours value from the invisible hours dropdown and the third bit adds the Mins value from the invisible mins dropdown. The bit I'm not sure about is the zero at the end (could it be the value for seconds?) ... but never mind, it works!
AND ... BACK TO THE CALENDAR
So, the other part of this problem was to create a link in the original source calendar that would send our intrepid requestor to the Power Apps Request form.
I've used Power Platform to create a dynamic link before and documented it here. So my first thought was to see if this could be adapted to generate a dynamic link that would be formatted the same way as my manually-created test link above. Just to remind you, the link needed to look like this:
https://apps.powerapps.com/play/[PowerAppID]?tenantId=[tenantId]&Event=[Title]&Date=[Start Time]
But first create a new field in the source calendar, Register, and make it a "Hyperlink or picture field".
Next, as in the earlier post, I thought I could create a Flow in Power Automate that would generate a dynamic link when a new Calendar entry was added.
I used a "When an item is created or modified" flow, because I figured that it would be useful if the time of an event changed, the administrator could make the change, then delete the existing link, and a new link would be generated.
So, to build the dynamic link in the Flow, we're going to use the Send an HTTP Request to SharePoint action:
 |
| Click the image to enlarge. |
The settings in this Action should be:
Set Method to:
POST
Set Uri to:
_api/web/lists/GetByTitle('Calendar')/items([ID])
... where the [ID] is replaced with a dynamic ID look up.
Set Header to:
{
"Content-Type": "application/json;odata=verbose",
"X-HTTP-Method": "MERGE",
"IF-MATCH": "*"
}
And finally, I set Body to:
{'__metadata': {'type':'SP.Data.HRBookSlotListItem'},'Register':
{'Description': 'Book this slot',
'Url': 'https://apps.powerapps.com/play/[PowerApps ID]?tenantId=[tenantId]&Event=[Title]&Date=[Start Time]'}
}
BUT ... this only nearly worked. What I found on testing was that the dynamic link generated wasn't quite right. Any wordspaces from the Title field were being replaced with a "+" sign. Random! Why not "%20", which is the usual replacement for a word space in a URL? Who knows?
So I figured what I would do is write the Title value to a variable then replace the + symbol with the more functional encoded wordspace ("%20"). Here's how I did it.
First, Initialise a variable to hold the Title value.
 |
| Click the image to enlarge. |
Then, initialise a second variable to process and hold the transformed Title value.
 |
| Click the image to enlarge. |
Here's the formula that we use to scan the Title value and replace the open word space with the encoded "%20":
[
{
"Old": " ",
"New": "%20"
}
]
Next, I added a condition to make sure that the new Register field in the calendar was empty:
 |
| Click the image to enlarge. |
In the Yes branch of the Condition, we need to add an Apply To Each container, so we can cycle through the Title values and replace the wordspace with "%20", like this:
 |
| Click the image to enlarge. |
We place the vReplace variable in the Select an output from a previous step.
Then we add a Compose action and insert this expression:
Inputs.fx = replace(variables('vTitle'), item()?['Old'], item()?['New'])
Finally, add a Set variable action and select vTitle in the Name field and add Outputs from the Compose action in the Value field.
Next comes the Send an HTTP request to SharePoint that we already configured earlier, but now we've replaced the dynamic Title value with the vTitle variable.
 |
| Click the image to enlarge. |
Now when you add a new event to the event calendar, the appropriate dynamic link is generated and added to the Register field in the Calendar, like this:
 |
| Click the image to enlarge. |
That's pretty much it. The Event Name and the Event DateTime get passed from the original calendar item, via the Power Apps form, to the Requests Management list. Once a new instance is created in the Requests Management list, a different Flow takes care of routing the request to the Department Head for approval, and finally informing the Requestor of the status of their request.
EDIT - REVISE A STEP
So, I was having to move my applications from Classic SharePoint TeamSites to Modern SharePoint, because, you know, Microsoft is switching stuff off. But when it came to generating the dynamic link in the Calendar that leads our intrepid requestor to the Event Booking Form, I wondered why I was making it so complicated.
The original Calendar used a SharePoint hyperlink column to hold the link, but as you've seen, populating that content type requires some gymnastics with the Send an HTTP Request to SharePoint Flow Action. As we were starting from scratch again I thought I'd use the opportunity to simplify things a bit.
Instead of using a Link content type, I decided to use two simple text content types - one to hold the display text of the link and the other to hold the link itself, then I could just concatenate them in a HTMLText box in the Power App form and save myself unnecessary scripting.
| Click the image to enlarge. |
The Concatenate call would be:
Concatenate("<b><a href='",ThisItem.BookURL,"'>",ThisItem.Book_txt,"</a></b>")
Then, to populate those columns in the List, instead of the Send an HTTP Request to SharePoint Action, I just used an Update item Flow Action, like this:
 |
| Click the image to enlarge. |
And that kept that part of the application a good deal simpler to implement.
I hope that helps someone.
Next: More query string shenannigans
No comments:
Post a Comment