Showing posts with label Power Apps. Show all posts

Tuesday, 12 April 2022

Why doesn't SharePoint understand British Summer Time?

I'VE HAD THIS PROBLEM A COUPLE OF TIMES ... you add some fiddly code to your Flow (or Workflow) to generate a handy Calendar Invite (.ics file) for your end user, but the resulting calendar entry is an hour out. For some reason, Microsoft have never been able to offer us anything other than UTC time in SharePoint and Outlook. And it's an awful pain for us developers.

I was creating a Meeting Calendar for an event our company would be attending. My colleagues would need to book the meeting space set aside for our company to use at the event, and it made sense for us to offer an automated booking service for those attending.

I could have used a SharePoint Calendar as the starting point, but I wanted to have something a bit more user-friendly, so I opted for a SharePoint Custom List. This would also give me a bit more control over the fields in the list.

So I set up the list and modified the input form in PowerApps to make it a bit more visually attractive (exactly how that's done can be discovered with a quick Google search - it's outside the scope of this article) and I ended up with something like this:

To keep things simple, I'm asking the user to just select a Date, Time and Duration of the meeting they want to book. (They're also asked to select a Venue, but that's not important right now.)

You can see that all the attendee has to do is add the Name of the Host (Name field) - the person filling in the form may not be the meeting host - add the names of any colleagues who may also be attending, then select the Date of the meeting, the Time of the meeting and the Duration of the meeting. I was planning to have the Power Automate Flow do the configuring of the EventDate and EndDate for the meeting.

I'm deliberately mimicking the column names that are found in Calendars, as these are needed when it comes to generating the .ics file later in the process. It doesn't hurt to have a Location column as well.

These three columns are hidden (and not included in the NewForm) because the user never needs to see them.

ADDING EXTRA COLUMNS TO THE LIST

So, the Venue, Date, Time and Duration fields are simple Choice columns in the SharePoint list, which return text values. If I was going to generate an iCalendar file, then I'd need to convert that text into valid Dates and Times. It's probably possible to do that in PowerApps (and I will have a think about that for next time), but because I wanted to get it done, I chose the Power Automate route.

I created an "On create" Flow and added the Site and List. Then I added the Update Item and Send an Email components. We'll fill those in later. But mainly, I needed to figure out a way to transform the simple text values in the List into properly formatted DateTime values. Then I discovered the Compose action.

It's funny how you can use a platform for years, yet still discover new things about it. I'd never come across Compose before, but what a great tool ...

The Compose action is an absolute wonder ... I'm so annoyed that I didn't know about it before ...

I added a couple of Compose actions then set about adding the scripting that would do the conversion. The trickiest was the Date. The scripting was fairly straightforward, but I did get some unexpected results, at first. So, use formatDateTime and transform the text value into a date by typing this script:

formatDateTime(triggerOutputs()?['body/Date/Value'],'yyyy-MM-dd')

... into the Expression area of the Compose function's Dynamic Content, here:

However, when I tested the output of Compose - Date action, the result was a scrambled date which had reversed the Day and Month values, so instead of 11th of May, it was rendering as 5th December. Straightaway, I checked the Region Setting of the parent site, but that was set to "English (UK)" and to the correct London TimeZone.

So why it was rendering the date incorrectly, I have no idea. And rather than spending ages trying to figure it out, I cheated and changed the formula to:

formatDateTime(triggerOutputs()?['body/Date/Value'],'yyyy-dd-MM')

... which did the trick!

Once I had the Date rendered correctly, I had to append the chosen time to it. This is where the second Compose action comes in. Using the concatenate command, I built this expressions and added it to the Expression field of the "Compose_-_Full_DateTime" action:

concat(outputs('Compose_-_Date'),'T',triggerOutputs()?['body/Time/Value'],':00Z')

All I've done here is build a DateTime value by structuring it in a format that SharePoint understands, eg:

2022-05-11T10:00:00Z

The real puzzler came when I tested the Flow to see whether the above would help me generate a calendar invite for the end user.

SO ... WHY DOESN'T SHAREPOINT UNDERSTAND BST?

There is annoying glitch in SharePoint where the TimeZone of a site can only be set to a UTC value. In the case of the "00:00 Dublin, Edinburgh, Lisbon, London" setting, that translates to Greenwich Meantime ... which isn't a problem in the winter, but becomes an issue in the Summer when UK clocks are wound forward by an hour. (I think in the US, this is referred to as Daylight Saving Time).

The result is that when you set a DateTime value in SharePoint and copy it over to Outlook, the date goes in at an hour ahead of the time you wanted.

There doesn't seem to be a fix for this and, though it comes up in many SharePoint and Microsoft forums, no one at Microsoft seems to have the appetite to fix it.

The upshot of this is, I needed to find a way to compensate for this anomaly myself.

Luckily, I found a function in my list of Flow actions called Subtract from time. I added the action, changed its name to "Subtract from Time - Because of BST" to remind me of why it's there when I come back a few weeks from now, then just set it to the following:


The Base time is set to the output from the previous action Compose - Full DateTime. The Interval is set to 1 and the Time unit is Hour. That's it.

Now we have all the components in place to configure the Update item action.

So open up the Update item panel and set it up like this:


  • Set the Title to: "Meeting at [Venue value]".
  • Set the EventDate field to the output from the Subtract from time - Because of BST action.
  • Set the Location field to [Venue Value].

My last job was to set up the notification that goes to the Requestor once they click Save on the SharePoint input form. The main thing I wanted to do was to include an iCalendar invite so the Requestor could add the event to their Outlook calendar.

It's not hard to find on the Interweb, but to save you looking it up, here's the script for generating an iCalendar event:

[YourSite]/_vti_bin/owssvr.dll?CS=109&Cmd=Display&List=[YourListID]&CacheControl=1&ID=[ID]&Using=event.ics

For this to work properly, you must have at least the two Date columns in your list named EventDate and EndDate. Without these, the script just won't work. 

As mentioned earlier, you would do well to have a Location field as well, and to configure the content of the Title field in a way that makes sense (The Title field content will become the Name of the event when it's added to the user's Outlook calendar.)

The List ID can be found by going to the List's Settings window and grabbing it from the end of the URL window ...

Click on the image to enlarge it.

... and you'll need to replace [ID] with the ID of the list item we're processing at that point. I actually found it a lot easier to configure this formula using a Flow Variable.

So, add an Initialise variable action and a Set variable action, like this:
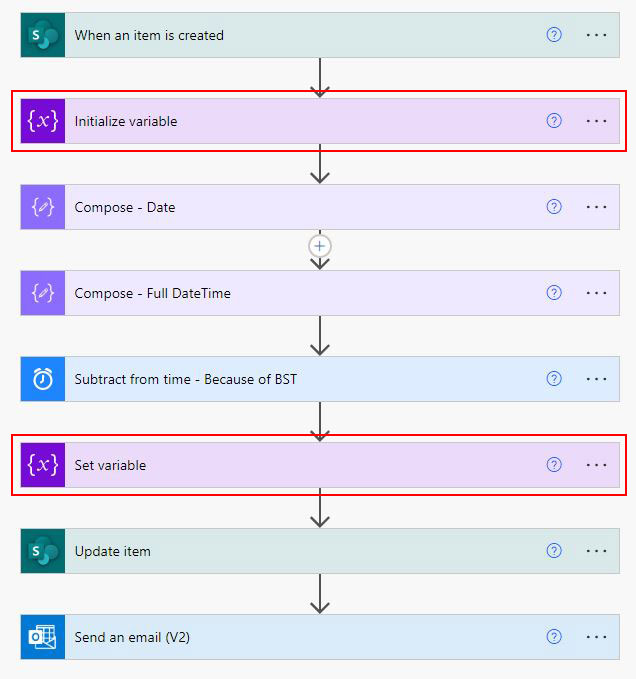

Then in the Initialise variable action, name your variable as "calendarInvite", set the Type to "String" and leave the Value field blank.


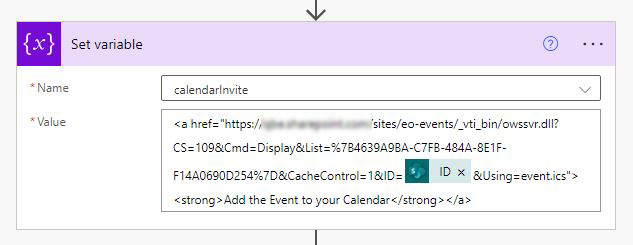
Next, in the Set Variable action, set the variable Value to:

<a href="[YourSite]/_vti_bin/owssvr.dll?CS=109&Cmd=Display&List=[YourListID]&CacheControl=1&ID=[ID]&Using=event.ics"><strong>Add the Event to your Calendar</strong></a>

You should be able to replace the "[ID]" with the item's ID from the When an item is created action ... so the Set Variable action looks like this:

But if that isn't working for you, try replacing the [ID] with the expression:

@{triggerOutputs()?['body/ID']}

All that remains is to compile the email notification that's sent to Requestor to confirm their booking. Because the variable now contains the text and the URL for the Calendar Invite, all you need to do is add the Variable to the body text of the email in the appropriate place, like this:


And that is pretty much it.

When the recipient of the email clicks on the email's Calendar link, the new event has a subject line of "Meeting at [Venue]", a seasonally adjusted EventDate and End Date, and even a Location value.

There may be a more "correct" way to deal with the fact that SharePoint is unable to adjust the time of the event for local, seasonal timeshifts, but at least this quick fix works.

If you wanted to be really ambitious, you could add a Condition action to the process to create two branches ... one for events in the winter (not British Summer Time) and one for summer when there is some form of daylight saving time in place.

Hope this helps someone ...


Friday, 25 September 2020

Create a Word brochure generator with Power Apps and Power Automate: Part One

I was asked by my Marketing colleagues whether I could build an application in SharePoint that would generate and store marketing brochures from Word templates and organise them by region and line of business.

In the old world of SharePoint Designer I would be able to do that quite easily, but as we're all aware, Microsoft started deprecating core SPD functions, like custom input forms, around the beginning of June 2020, leaving us SPD workers a bit stranded.

Though I haven't seen any posting about it anywhere, my work was further limited by being unable to connect Data View Web Parts to Data Sources in SPD. This may be an internal problem at my company, but the effects are just as real.

So, with no DVWPs, no custom forms in SPD and 2010 workflows being turned off in November 2020 I didn't have a lot to work with. My company was able to arrange a course for me on Power Platform and Power Automate, though these turned out to be quite entry-level and lacking the depth I'd need for this brochure project. But with the help of some more knowledgeable colleagues, I was able to find a way through and create quite an effective application.

How it works

Here's how the marketing team wanted the Brochure Generator to work.

  1. The user creates a new document from a template
  2. A form pops up for the User to add the customer's name, the date of the brochure as well as region, Line of Business and, behind the scenes, the name of the Supervising Manager. 
  3. The user then adds the sales pitch into the Word document and saves and checks in. This initiates an automated approval process
  4. The Supervising Manager receives an alert that a new brochure has been created. They review and approve (or not approve)
  5. If approved, the system converts the Word doc to a PDF
  6. The user receives notification of the manager's approval, with the PDF as an attachment, ready to send out to the customer
  7. If not approved, the user makes amendments and saves and checks in and the Approval process kicks off again (repeat until approval obtained).

What you need

  • A SharePoint Modern Experience Teamsite
  • A Document Library (set to "Require documents to be checked out before they can be edited", in versioning settings)
  • A Custom List with four columns - Region, Dept, Line of Business, Approving Manager
  • One or more Word templates, configured with Quick Parts to hold the dynamic data
  • Access to Power Apps and Power Automate
  • Access to OneDrive

How I did it

I started with a Modern Experience Teamsite. You may be able to use an old-school Classic Teamsite, but I was told on my course that some Power Platform functions don't work properly on Teamsites that were created in Classic mode.

You don't have to have a nice-looking Landing Page, but it does give the whole thing more of a professional look, don't you think?

I believe all Teamsites come with some basic components, like a Document Library. In our site farm, they do, anyway. 

Navigate to Site Content Types, click on create and follow the onscreen prompts. If you need detailed instructions for this, a quick Goggle search will help.

My first task was to create custom Content Types to hold the metadata for the Documents in the Document Library. I think it's possible to use List/Library Columns in Content types, but why do that? Using Site Columns means the Content Types can be used with other Libraries in the site, something that saved me a bunch of work later, as you'll see. In addition, since we're planning to import list column values into the Word Document, I believe that the Quick Parts we'll be using for that only recognise Content Types and not List Columns.

You may want to use more than one template, so make sure you give your Content Types simple and descriptive names, so your users know what they're getting. 

So I got to work to create some Site Columns that would make up my first Content Type.

As an inexperienced Power Platform student, my first thought was to create Site Columns as Lookups. That's what we'd do if we were using SharePoint Designer, right? Then add a bit of JQuery to get the cascades to work? You don't do that with Power Apps.

I wasted a whole lot of time searching via Google to find a way to do cascading menus in Power Apps. I found several "solutions". None of them worked. That could have been my fault, but I don't think so. I'm fairly good at following instructions. The working solution came from my friend and colleague Ernani, who showed me how to do great drop-down cascades in Power Apps ... but I'll get to that later.

So, like I say, normally, I'd do Look-Up columns to achieve a cascading menu set. But in this case, we're going to Single Line of Text columns to hold the cascade info. Bear with me, it'll become plain.

This is what my finished Content Type looked like when I added all the necessary Site Columns.

Once you've added all the new Site Columns to the Content Type, navigate to the Library Settings and add the Content Type to your Library.

This is what it looks like with your Content Type in place. Note that I've used two different Content Types to handle two different templates - you can only attach one Word Template to a Content Type.

Now we can create the Custom List (I called mine "metadata") that will power the cascading drop-downs. The columns I used were:

  • Geography (single line of text)
  • Dept (single line of text)
  • Line of Business (using the Title Column, single line of text)
  • Approver (name field)

This is how I set my metadata list up. Make sure you use the same column types.

The final list looks like this, though obviously, I'm not showing all the rows here.

Here's a snapshot of the populated metadata list. I used the Title column for the unique "Line of Business" values, but it doesn't matter if you want to create a new column.

We'll use Power Apps to make the Custom List and the Document Library talk to each other.

This is what the Properties input form (EditForm.aspx) looks like at this stage of the build. Quite a few of the fields/Content Types are missing.

Even though the Content Type has been added to the Library and the Site Columns should be available, when you try to amend the Properties of an uploaded document, you don't get all the fields in the default Properties window, so the next thing I did was to start up PowerApps to create a custom input form. 

It's pretty easy to fire up Power Apps from your main Library. You may prefer to work from a Canvas App, but that's up to you.

I chose Customise Forms so that I had a basis to work on. Even so, what's available is a bit sparse. All I had on the EditForm stage was "Title". 

A bit of a blank canvas, really ... 

Before we can go any further, we'll need to add the custom list to the Power Apps form so that any custom field we add can pick up the data from the list. This is essential to get our cascades working. So, click on the Data icon in the very far left of your screen


Now click on
Connectors and select SharePoint. Sign in as yourself, if prompted.


Over on the right hand side, you'll now see a list of all the SharePoint sites available to you. Click on the appropriate site to select it. 


The view now switches to display all the Libraries and Lists in the selected site. Choose the List to connect to, in my case, I chose the list "metadata" that holds my cascade options.


So, that done, we can now begin adding some more fields to get the cascades working. This is how it's done.

If you can't see the Fields panel, then click on the text link Edit Fields in the right hand panel. (I spent ages looking for this!)

This was a tricky little sucker to find, if you're new to Power Apps. If you get lost, just highlight the SharePointForm1 heading in the left hand column first, then on the Properties link in the right-hand column.

Once the Fields panel displays, you can click on the Add Fields link to grab more columns from your Doc Library and place them on the EditForm stage.


Once the field is on the stage, you can manipulate it as required. For example, you can access the ellipsis in the Field's panel and select the Move Up action to change the field's position on the stage. I'll be removing the Title field at some point in the process, but for now, I'll just move the "Geography_txt" field up to sit above the Title field.


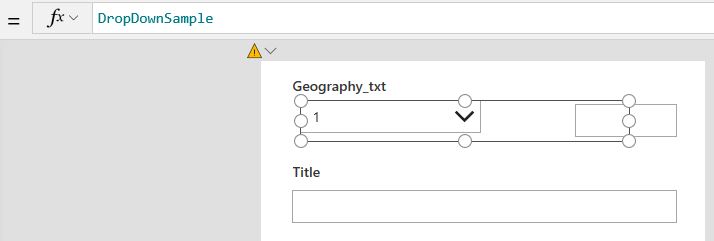
I'm not going to make you sit through the entire process, but I'll do enough so that you can see how the cascade works. So the first thing to do is to make the text field for Geography_txt a little smaller, as we're going to squeeze another custom "Drop down" input in this "card". To do that, highlight the card by clicking in it, then select Insert tab at the top left of the page. Click on Input and select Drop down from the drop-down menu.


The new Drop down input should appear within your card. If it doesn't, then you didn't have your card selected correctly. Delete the rogue Drop down and try again. A successful insert should look like this.


You can resize the new Drop down field so it doesn't overlap the existing text box. Before you can make any changes to the new field you first have to unlock the card in the Advanced panel on the right.


Now you can start making changes. First, rename the label of the card from "Geography_txt" to "Region". Power Apps is picking up the label "Geography_txt" from the list. To change the text, we simply over-write the "Parent.DisplayName" call in the fx field with "Region" (include the quotes).


Next - and this is where it starts to get a bit more complex, we're going to change the underlying programming of the card so that the custom Drop down picks up data from the custom list "Metadata" and sends it to the "Geography_txt" text field.

Highlight the custom drop-down field by clicking on it. Click on the Advanced tab. Add this code into the Items window:

Distinct(metadata,Geography)


Now add this code to the Default window:

ThisItem.Geography_txt


Finally, to complete the sequence, you need to click the entire card to highlight it and then add this code:

Dropdown2.SelectedText.Result

... to the Update field in the Advanced section (you may have to click the More options button to see the Update field):


I'll leave it entirely up to you whether you rename the field "Dropdown2" to something a bit more friendly and descriptive. I didn't do that when I built my original application, but in hindsight, I probably should have. For this example, I'm renaming the field to "ddGeog". Even if I do it at this stage, Power Apps automatically updates the above formula to "ddGeog.SelectedText.Result".


Next, we have to add the dependent drop-down, "Department". So, same method as before. Click on the Add Fields link, and select "Dept_txt".

Highlight the card by clicking in it, then select Insert tab at the top left of the page. Click on Input and select Drop down from the drop-down menu. Highlight the custom drop-down field by clicking on it. Click on the Advanced tab. Add this code into the Items window:

Distinct(Filter(metadata,Geography =ddGeog.Selected.Result),Dept)

And add this code to the Update window:

ddDept.SelectedText.Value

I found as I went through adding these formulae that the Default field usually seems to default to the appropriate formula. In this case it would be "ThisItem.Dept_txt". But if it doesn't, you'll have to add it manually

At this point, it'd be a good idea to test the form and make sure your cascade is working as expected.


Right, final cascading drop-down for this form. But before we do, let's just hide that Title field, as it's getting in the way:


Now add the final cascading drop down in the same way. I've called my "LOB" (Line of Business), and changed the name of the field to ddLOB. Use these formulae to bind the drop-down to the main library:

Items: Distinct(Filter(metadata,Dept =ddDept.Selected.Result),Title)

Default: ThisItem.LOB_txt (usually filled in by default)

Update: ddLOB.Selected.Result

So that's the cascade sorted out. What I did was add another field - which I'll make invisible - to automatically select the Manager responsible for approving each request according to the Line of Business they are responsible for. This is neat, because it prevents users making mistakes and sending Approval requests to the wrong manager.

So we add another field, for "Approver" and add the following formulae:

Items: Distinct(Filter(metadata,Title =ddLOB.Selected.Result),Approver.Email)

Default: ThisItem.Approver_txt

Update: ddApprover.Selected.Result

It's a little trickier if you have a choice of two or more approvers, but I didn't have that requirement and won't be covering it here.

Test and make sure it works. You could hide this field now, but I would leave it visible so you know it's working. Plenty of time to hide it at the end of the build.

It'd probably be a good idea to Save at this point.

The rest of the fields are pretty straight forward to add, and will work fine out-of-the-box. These are:

  • DocType (renamed as "Brochure" in the form)
  • Client
  • Due Date
  • Revenue

One useful tip I have is to add a currency sign to the Revenue field. Simply change the Hint Text.


OK ... so we're all done on the Input Form. Time to Publish the form and test it in the Library.

Ready for the next bit? Well, you'll have to wait a few days for that. Pop back soon and find out how to:

  • create the Word Template
  • attach it to the Content Type
  • then insert the Quick Parts that will hold the data or text from the Library columns
  • ... and lots more.


Next: Word shenanigans and building the Approval Flow in Power Automate