Friday, 25 September 2020

Create a Word brochure generator with Power Apps and Power Automate: Part One

I was asked by my Marketing colleagues whether I could build an application in SharePoint that would generate and store marketing brochures from Word templates and organise them by region and line of business.

In the old world of SharePoint Designer I would be able to do that quite easily, but as we're all aware, Microsoft started deprecating core SPD functions, like custom input forms, around the beginning of June 2020, leaving us SPD workers a bit stranded.

Though I haven't seen any posting about it anywhere, my work was further limited by being unable to connect Data View Web Parts to Data Sources in SPD. This may be an internal problem at my company, but the effects are just as real.

So, with no DVWPs, no custom forms in SPD and 2010 workflows being turned off in November 2020 I didn't have a lot to work with. My company was able to arrange a course for me on Power Platform and Power Automate, though these turned out to be quite entry-level and lacking the depth I'd need for this brochure project. But with the help of some more knowledgeable colleagues, I was able to find a way through and create quite an effective application.

How it works

Here's how the marketing team wanted the Brochure Generator to work.

  1. The user creates a new document from a template
  2. A form pops up for the User to add the customer's name, the date of the brochure as well as region, Line of Business and, behind the scenes, the name of the Supervising Manager. 
  3. The user then adds the sales pitch into the Word document and saves and checks in. This initiates an automated approval process
  4. The Supervising Manager receives an alert that a new brochure has been created. They review and approve (or not approve)
  5. If approved, the system converts the Word doc to a PDF
  6. The user receives notification of the manager's approval, with the PDF as an attachment, ready to send out to the customer
  7. If not approved, the user makes amendments and saves and checks in and the Approval process kicks off again (repeat until approval obtained).

What you need

  • A SharePoint Modern Experience Teamsite
  • A Document Library (set to "Require documents to be checked out before they can be edited", in versioning settings)
  • A Custom List with four columns - Region, Dept, Line of Business, Approving Manager
  • One or more Word templates, configured with Quick Parts to hold the dynamic data
  • Access to Power Apps and Power Automate
  • Access to OneDrive

How I did it

I started with a Modern Experience Teamsite. You may be able to use an old-school Classic Teamsite, but I was told on my course that some Power Platform functions don't work properly on Teamsites that were created in Classic mode.

You don't have to have a nice-looking Landing Page, but it does give the whole thing more of a professional look, don't you think?

I believe all Teamsites come with some basic components, like a Document Library. In our site farm, they do, anyway. 

Navigate to Site Content Types, click on create and follow the onscreen prompts. If you need detailed instructions for this, a quick Goggle search will help.

My first task was to create custom Content Types to hold the metadata for the Documents in the Document Library. I think it's possible to use List/Library Columns in Content types, but why do that? Using Site Columns means the Content Types can be used with other Libraries in the site, something that saved me a bunch of work later, as you'll see. In addition, since we're planning to import list column values into the Word Document, I believe that the Quick Parts we'll be using for that only recognise Content Types and not List Columns.

You may want to use more than one template, so make sure you give your Content Types simple and descriptive names, so your users know what they're getting. 

So I got to work to create some Site Columns that would make up my first Content Type.

As an inexperienced Power Platform student, my first thought was to create Site Columns as Lookups. That's what we'd do if we were using SharePoint Designer, right? Then add a bit of JQuery to get the cascades to work? You don't do that with Power Apps.

I wasted a whole lot of time searching via Google to find a way to do cascading menus in Power Apps. I found several "solutions". None of them worked. That could have been my fault, but I don't think so. I'm fairly good at following instructions. The working solution came from my friend and colleague Ernani, who showed me how to do great drop-down cascades in Power Apps ... but I'll get to that later.

So, like I say, normally, I'd do Look-Up columns to achieve a cascading menu set. But in this case, we're going to Single Line of Text columns to hold the cascade info. Bear with me, it'll become plain.

This is what my finished Content Type looked like when I added all the necessary Site Columns.

Once you've added all the new Site Columns to the Content Type, navigate to the Library Settings and add the Content Type to your Library.

This is what it looks like with your Content Type in place. Note that I've used two different Content Types to handle two different templates - you can only attach one Word Template to a Content Type.

Now we can create the Custom List (I called mine "metadata") that will power the cascading drop-downs. The columns I used were:

  • Geography (single line of text)
  • Dept (single line of text)
  • Line of Business (using the Title Column, single line of text)
  • Approver (name field)

This is how I set my metadata list up. Make sure you use the same column types.

The final list looks like this, though obviously, I'm not showing all the rows here.

Here's a snapshot of the populated metadata list. I used the Title column for the unique "Line of Business" values, but it doesn't matter if you want to create a new column.

We'll use Power Apps to make the Custom List and the Document Library talk to each other.

This is what the Properties input form (EditForm.aspx) looks like at this stage of the build. Quite a few of the fields/Content Types are missing.

Even though the Content Type has been added to the Library and the Site Columns should be available, when you try to amend the Properties of an uploaded document, you don't get all the fields in the default Properties window, so the next thing I did was to start up PowerApps to create a custom input form. 

It's pretty easy to fire up Power Apps from your main Library. You may prefer to work from a Canvas App, but that's up to you.

I chose Customise Forms so that I had a basis to work on. Even so, what's available is a bit sparse. All I had on the EditForm stage was "Title". 

A bit of a blank canvas, really ... 

Before we can go any further, we'll need to add the custom list to the Power Apps form so that any custom field we add can pick up the data from the list. This is essential to get our cascades working. So, click on the Data icon in the very far left of your screen


Now click on
Connectors and select SharePoint. Sign in as yourself, if prompted.


Over on the right hand side, you'll now see a list of all the SharePoint sites available to you. Click on the appropriate site to select it. 


The view now switches to display all the Libraries and Lists in the selected site. Choose the List to connect to, in my case, I chose the list "metadata" that holds my cascade options.


So, that done, we can now begin adding some more fields to get the cascades working. This is how it's done.

If you can't see the Fields panel, then click on the text link Edit Fields in the right hand panel. (I spent ages looking for this!)

This was a tricky little sucker to find, if you're new to Power Apps. If you get lost, just highlight the SharePointForm1 heading in the left hand column first, then on the Properties link in the right-hand column.

Once the Fields panel displays, you can click on the Add Fields link to grab more columns from your Doc Library and place them on the EditForm stage.


Once the field is on the stage, you can manipulate it as required. For example, you can access the ellipsis in the Field's panel and select the Move Up action to change the field's position on the stage. I'll be removing the Title field at some point in the process, but for now, I'll just move the "Geography_txt" field up to sit above the Title field.


I'm not going to make you sit through the entire process, but I'll do enough so that you can see how the cascade works. So the first thing to do is to make the text field for Geography_txt a little smaller, as we're going to squeeze another custom "Drop down" input in this "card". To do that, highlight the card by clicking in it, then select Insert tab at the top left of the page. Click on Input and select Drop down from the drop-down menu.


The new Drop down input should appear within your card. If it doesn't, then you didn't have your card selected correctly. Delete the rogue Drop down and try again. A successful insert should look like this.
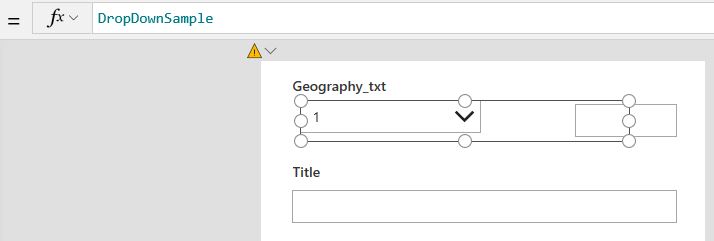

You can resize the new Drop down field so it doesn't overlap the existing text box. Before you can make any changes to the new field you first have to unlock the card in the Advanced panel on the right.


Now you can start making changes. First, rename the label of the card from "Geography_txt" to "Region". Power Apps is picking up the label "Geography_txt" from the list. To change the text, we simply over-write the "Parent.DisplayName" call in the fx field with "Region" (include the quotes).


Next - and this is where it starts to get a bit more complex, we're going to change the underlying programming of the card so that the custom Drop down picks up data from the custom list "Metadata" and sends it to the "Geography_txt" text field.

Highlight the custom drop-down field by clicking on it. Click on the Advanced tab. Add this code into the Items window:

Distinct(metadata,Geography)


Now add this code to the Default window:

ThisItem.Geography_txt


Finally, to complete the sequence, you need to click the entire card to highlight it and then add this code:

Dropdown2.SelectedText.Result

... to the Update field in the Advanced section (you may have to click the More options button to see the Update field):


I'll leave it entirely up to you whether you rename the field "Dropdown2" to something a bit more friendly and descriptive. I didn't do that when I built my original application, but in hindsight, I probably should have. For this example, I'm renaming the field to "ddGeog". Even if I do it at this stage, Power Apps automatically updates the above formula to "ddGeog.SelectedText.Result".


Next, we have to add the dependent drop-down, "Department". So, same method as before. Click on the Add Fields link, and select "Dept_txt".

Highlight the card by clicking in it, then select Insert tab at the top left of the page. Click on Input and select Drop down from the drop-down menu. Highlight the custom drop-down field by clicking on it. Click on the Advanced tab. Add this code into the Items window:

Distinct(Filter(metadata,Geography =ddGeog.Selected.Result),Dept)

And add this code to the Update window:

ddDept.SelectedText.Value

I found as I went through adding these formulae that the Default field usually seems to default to the appropriate formula. In this case it would be "ThisItem.Dept_txt". But if it doesn't, you'll have to add it manually

At this point, it'd be a good idea to test the form and make sure your cascade is working as expected.


Right, final cascading drop-down for this form. But before we do, let's just hide that Title field, as it's getting in the way:


Now add the final cascading drop down in the same way. I've called my "LOB" (Line of Business), and changed the name of the field to ddLOB. Use these formulae to bind the drop-down to the main library:

Items: Distinct(Filter(metadata,Dept =ddDept.Selected.Result),Title)

Default: ThisItem.LOB_txt (usually filled in by default)

Update: ddLOB.Selected.Result

So that's the cascade sorted out. What I did was add another field - which I'll make invisible - to automatically select the Manager responsible for approving each request according to the Line of Business they are responsible for. This is neat, because it prevents users making mistakes and sending Approval requests to the wrong manager.

So we add another field, for "Approver" and add the following formulae:

Items: Distinct(Filter(metadata,Title =ddLOB.Selected.Result),Approver.Email)

Default: ThisItem.Approver_txt

Update: ddApprover.Selected.Result

It's a little trickier if you have a choice of two or more approvers, but I didn't have that requirement and won't be covering it here.

Test and make sure it works. You could hide this field now, but I would leave it visible so you know it's working. Plenty of time to hide it at the end of the build.

It'd probably be a good idea to Save at this point.

The rest of the fields are pretty straight forward to add, and will work fine out-of-the-box. These are:

  • DocType (renamed as "Brochure" in the form)
  • Client
  • Due Date
  • Revenue

One useful tip I have is to add a currency sign to the Revenue field. Simply change the Hint Text.


OK ... so we're all done on the Input Form. Time to Publish the form and test it in the Library.

Ready for the next bit? Well, you'll have to wait a few days for that. Pop back soon and find out how to:

  • create the Word Template
  • attach it to the Content Type
  • then insert the Quick Parts that will hold the data or text from the Library columns
  • ... and lots more.


Next: Word shenanigans and building the Approval Flow in Power Automate

Tuesday, 18 February 2020

How to append comments to a multi-line text column in a document library

I recently needed to create a Document Library in SharePoint Online with a text field that could append blocks of text against each document to track progress of several workflows. Of course, the first task is to check Google to see whether there was a workaround for not being able to select an "Append" option on the Multiple lines of text field in a Document Library. After about an hour of trying different search terms I had to conclude that there wasn't an easy, out-of-the-box way of doing this. But there's always a workaround, right?

The secret lies in workflow variables.

But first, create a Multiple lines of text field. I called mine "Actions Log", because I'm logging the workflow actions. Then you'll need to use either an existing workflow or - if append text is the only action you need to take - create a new workflow.

Within the workflow, you're going to need two variables. One to hold any existing text in your Multiple lines of text field and one to hold a copy of the original text plus any appended text.

To create a Workflow variable, you need to first select "Set Workflow Variable" from the Actions drop-down.
So create your first workflow variable ... I've put some conditions in my workflow, but of course you don't have to. Click on the Action drop-down and find Set Workflow Variable. If you can't see that option, start typing the text "set workflow variable" and it should appear.

Having selected "Set Workflow Variable" you're now prompted to create a new variable.
I'm calling my new Variable "ActionLog" (dropping the "s" so I can easily distinguish between the two), and I'm setting (content) Type to "String".

Naming the new variable and setting the content type are both done in the same dialogue box.
Next, set the Variable to hold the contents of the ActionsLog field. This will copy the existing text - if any - in the ActionsLog field to the ActionLog variable.

This step causes the value in the Action Log text column to be copied into the ActionsLog variable.
Now you're ready to create your second variable. I called this one ActionsLogAppend, also set as a string. So just repeat the above steps ...

Create a second variable called ActionsLogAppend which will hold the original Action Log text and any new appended text. 
Now you're ready to build the actual machinery of the Append Text function. In the example here, I'm having the Workflow append predetermined text into the existing Multiple Lines of Text field. And I do that by opening up the Parameter Builder to create a value for the second variable.

Click on the ellipsis to launch the String Builder window, which in turn creates the ActionLogAppend value.
Building the value for the variable is pretty simple. I wanted my appended text to look like this:

20/11/2019: 10.55 - 18 months to End of Lease acknowledged by John Smith:
[Content of first variable]

So in the String-Builder, add a lookup for the Date (and the Time, if you want it), and add the identity of the person who carried out the action (that'll be the value for ModifiedBy).

I set the Date and Time to "Short Date" and "Short Time" content types, but you may prefer a different setting.
Then I just copied the combined text of the two variables into the Actions Log variable of the Workflow.

This is what the string looks like in the String Builder window. I put a line return after the ModifiedBy call for clarity, putting the appended text on a new line ...
The final String in the String-Builder would look like this - 

[ModifiedDate]: [ModifiedTime] - 18 months to End of Lease acknowledged by [ModifiedBy]:
[Variable:ActionLog]

But if you wanted to, you could copy this combined text back into the Multiple Lines of Text field via the workflow.

POWER AUTOMATE AND SHAREPOINT ONLINE

Of course, old-school workflows don't last forever - Microsoft has probably turned off 2010 WorkFlows by the time you read this. You could just use a 2013 WorkFlow without too much hassle ... but it's better to switch to Power Automate and use a Flow - it's a steep learning curve, but not if you're already familiar with WorkFlows.

Using a Flow to append text in a document library is, if anything, even easier than messing with SharePoint Designer variables.

In the Flow that you have set up to manage changes to your library metadata, insert an Update File Properties action (if there's not one in there already), then find the Multiple Line Text field and add this to it:

The method is remarkably similar to how we achieved the WorkFlow version above, with a couple of small differences.
The "formatDateTime" expression captures the date when this latest update was made. I used this bit of code (in an Expression) to grab the date that the "Start and Wait for Approval" action earlier in the Flow was completed ... then formatted it to omit the time, which wasn't so important. Like this:

formatDateTime(outputs('Start_and_wait_for_an_approval_-_End_Date_18')?['body/completionDate'], 'dd/MM/yyyy')

Then a bit of explanatory text, then the name of the person who made the Approval ("Responder Display Name") ... then a semicolon as a separator from earlier Log Actions.

To put the earlier Log Actions on a separate line, I added a Shift-Return, then just inserted a Dynamic Content call for the previous value in the ActionsLog field from the Get Files (properties only) call at the top of the Flow.

Pretty, simple, right?

That's it ... I hope this helps someone.


Tuesday, 6 August 2019

Can’t use Calculated Column to generate a URL?

ANYBODY WHO HAS WORKED WITH SHAREPOINT ONLINE will know that Microsoft loves to turn off functions we rely on. A recent casualty was the facility to use List Calculated Columns to concatenate a URL to a customised Display or Edit Form.


Oh, how I love to concatenate. And how sad I was when Microsoft decided
they didn't like me concatenating links.
How we would have done it in the past would be to create a Calculated column in a list, then add a formula like this:

=CONCATENATE("<A HREF='/sites/SiteName/Lists/ListName/DispForm00.aspx?ID=",[ID]'>Display Form</A>")

Or if you wanted to be really smart, you could include a redirect to take your user to a particular destination after they’d finished with the form, like this:

=CONCATENATE("<A HREF='/sites/SiteName/Lists/ListName/DispForm00.aspx?ID=",[ID],"&Source=https://xxx.sharepoint.com/sites/SiteName/Lists/ListName/'>Display Form</A>")

The problem is that Microsoft have now disabled that functionality, so that while the Calculated column will compile the link, the list will display the HTML line of code, and not a link as you intended.

I went trawling around Google, looking for a workaround for this “undocumented feature” and came up empty. There’s quite a few folks who suggest many different JavaScript and JQuery solutions, but I couldn’t get any of them to work. JavaScript is okay and can solve some of your problems in SharePoint, but I can’t help feeling it’s a bit of a hack. Far better to use in-built SharePoint technology to solve SharePoint problems where possible.

So I resolved to come up with a workable solution myself, something simpler than fiddling around with a JavaScript function that would magically transform a string of HTML into a working link.

Everything was pointing to a workflow. (You can also use a Flow, which I've documented at the foot of this posting.)

I set one up to copy the calculated HTML code into a simple text column, but of course that didn’t work.

My next attempt was to copy the concatenated string into a Hyperlink column. That kind of did work, but displayed both the link URL and the link text as the full line of HTML … and it seemed to be clickable, but it didn't quite work as I thought it would.

Even though it appeared to produce a functioning link, the "gotcha"
was that the call to the item's ID didn't work, so I had a rethink.
But that roadblock led me to a simpler, more elegant solution anyway ... use a Workflow Variable to compile and copy the URL string into a Hyperlink column.

From there, it was a straightforward task to fire up SharePoint Designer and add a simple workflow to copy the contents of a Variable to your Hyperlink Column.

In your new Workflow - I used a 2010 Workflow - under Actions, select "Set Workflow Variable".

Add your first action ...
In the following window, click on Workflow variable and select 'Create a new variable". Give a useful name and select "String" for the Type. The click on Value, and select the ellipsis to open the String Builder.

Make sure you set up the URL string in a format
that the Hyperlink column will accept.
The string should be in this format:

https://xxx.sharepoint.com /sites/SiteName/Lists/ListName/DispForm00.aspx?ID=[ID]&Source=https://xxx.sharepoint.com/sites/SiteName/Lists/ListName/, Display Form

Replace the "[ID]" in the above string with the "Current Item:ID" value from the Add or Change Lookup function.

The comma and the word space after the URL (but before the link text) is vital to ensure the string transfers to the Hyperlink field correctly.

I also set up my Workflow to check whether the Hyperlink Column was populated then, if not, copy the contents of the Variable into the Hyperlink Column, like this:

Having the Condition  place to check whether the Hyperlink column is populated or not
saves triggering the whole workflow process unnecessarily.
Then set the Workflow to trigger when a new item is created and that should be it.

This is how you want your Hyperlink column to look after the Workflow has done its job.

USING POWER AUTOMATE WITH SHAREPOINT ONLINE

So, someone asked in the comments if I'd gotten this to work with Flow ... and I can now reply, "Yes, I have."

I've had so much work converting all my existing 2010 WorkFlows to Flow that I haven't had any time to do bits of research explicitly for The SharePoint Hive, but I've just had to wait until one of my remediations called for me to do a Flow version of a WorkFlow action before posting the solution here.

It turns out that populating a SharePoint list URL field is a little fiddly in Flow, but works fine once you have it set up. Here's how ...

First we're going to add in an action - Send an HTTP Request to SharePoint. The way I used this, it was the only action in the Flow, as I needed it to create the appropriate dynamic link each time I added an item to a list. But you can use this method in any Flow where you need to create a dynamic link on the fly.

This Action is already set up, but check below for the changes you should make and any relevant code ...
So, first add your site address to the first field. Set the Method to POST. In the Uri field, add this:

_api/web/lists/GetByTitle('Reward Training')/items({ID})

... but make the {ID} bit a Dynamic Content call to the item ID. Reward Training is the name of my list

Next, click on the icon to the right of the Headers field and add this script:

 {
   "Content-Type": "application/json;odata=verbose",
   "X-HTTP-Method": "MERGE",
   "IF-MATCH": "*"
 }

The in the Body field, add this script:

{'__metadata': {'type':'SP.Data.NAMEOFYOURLISTListItem'},'NameOfColumn':
 {'Description': 'Book this slot',
 'Url': 'https://YourSite.sharepoint.com/sites/eo-event-registrations/Lists/Reward%20Training/EditForm.aspx?ID=[ID]&Source=https://YourSite.sharepoint.com/sites/eo-event-registrations/Lists/Reward%20Training/'}
}

It took me a couple of goes to understand what was going on here. I hope I've made it clear ... but the bit after SP.Data is the Name of Your List + "ListItem", no spaces. If your list name has spaces (best avoided, but on this occasion I didn't listen to my own advice) you'll need to use _x0020_ for the space.

(Weirdly, you can use a regular word space in the Uri field, and a %20 in the link you paste into the Body field. You have the whole set with this Flow Action!)

My link is a call to an Edit Form. This can be the standard out-of-the-box Edit Form or something you've customised in Power Apps - makes no difference.

And the Description value "Book this slot" is what will appear in the list as the link text.

I also added a "Source" reference so that users are taken back to the main List page once they've finished with the EditForm, but that's not mandatory.

I hope this has helped someone.


Friday, 16 November 2018

Add File Name field to custom EditForm

It's been a while since I posted here. Maybe this is because I've now switched to using SharePoint Online, and I'm finding it needs fewer workarounds than SP2007.

Okay ... that sounds a bit unlikely.

So here's a challenge I had recently. One of my clients asked that they get a File Name edit field in a custom EditForm I'd created for a Document Library.

The out-of-the-box EditForm included a File Name field as standard.

Here's an example of how a standard EditForm presents its fields. Right at the top, labelled "Name" is the file name field. We can tell it's for a PDF, as Microsoft has helpfully rendered the file suffix outside the editable field.

It seems that Microsoft disable the File Name field in custom EditForms. So I Googled to find a solution. The only workaround I came across suggested that the File Name field could be added manually by pasting some code into the EditForm in SharePoint Designer.

<asp:TextBox runat="server" id="ff26{$Pos}" ControlMode="Edit" text="{@FileLeafRef}" __designer:bind="{ddwrt:DataBind('u',concat('ff26',$Pos),'Text','TextChanged','ID',ddwrt:EscapeDelims(string(@ID)),'@FileLeafRef')}"/>

Except that this doesn't quite work.

Let me explain.

If you use the above code - pasted in to the second table cell in the new row you'd create to hold it - you get this result:

Spot the difference - this version, the custom EditForm with the above code added doesn't render the file suffix. A bit confusing for end users, I'm thinking.
For me this was a bit of a deal-breaker. Without the visual hint that the file suffix gives the end-user, I didn't think it was obvious what that editable field was doing. Even more alarming, end users might change the file name without realising what they were doing.

This would explain why Microsoft chose to exclude this feature from the custom forms. Except, in this instance, my client needed it.

So I took a look at some of the other fields in the code and figured out a solution. Well, more of a lucky guess, really.

But first, let me say this. Look at the ID value in the above code: "ff26". SharePoint uses these values to differentiate between input fields. If you have two fields with the same ID, you will get an error: "Unable to display this web part ..." or similar.

So first make sure that before you add any code to the EditForm page you've scrolled to the end of the form fields section and checked the ID value of the last row in the form. In my case, it had the ID value of ff25.

Then, because I could see that the code for all the other form fields began with:

<SharePoint:FormField ...

I thought I'd try that instead, and re-wrote the above line of code as this:

<SharePoint:FormField runat="server" id="ff26{$Pos}" ControlMode="Edit" FieldName="FileLeafRef" __designer:bind="{ddwrt:DataBind('u',concat('ff26',$Pos),'Text','TextChanged','ID',ddwrt:EscapeDelims(string(@ID)),'@FileLeafRef')}"/>

Be aware that the attribute "text" isn't permissible in the SharePoint:FormField tag, so I used FieldName instead.

And it worked.

The File Name field rendered perfectly and even tagged on a file suffix after the text field.


Success ... those small alterations to the code cause the custom EditForm to render in exactly the same way as the out-of-the-box one.
I hope that's helped someone ...


Friday, 22 April 2016

Add an "Out of date" alert to SharePoint content pages

I was at an Intranet Experts conference last year in Geneva, courtesy of Advatera. During the day, the subject of how we can get Site Builders in a federated content model to ensure they keep their content up to date. One suggestion was to add a banner to the top of any page that hasn't been updated within a certain time period, for example, a year.

Trouble is, no one really knew how to do it.

So I had a bit of think about it and figured that if I could come up with some way to retrieve the page's Modified value and put that into a JavaScript variable, then it would be easy to get a message to display on the page ... say, like this.


So ... how do you do it? The key is in the SharePoint control:

<SharePointWebControls:FieldValue ID="Modified" FieldName="Modified" runat="server"/>

So, with a lot of help from my colleague David T., this is what we came up with:

<script>
   $( document ).ready(function() {
      var shareDate = '<SharePointWebControls:FieldValue ID="Modified" FieldName="Modified" runat="server"/>';
      var regex = /(\d+)/g;
      var dateParts = shareDate.match(regex);
      var docDate = new Date(dateParts[2]+"/"+dateParts[1]+"/"+dateParts[0]);
      var prevDate = new Date();
      prevDate.setDate(prevDate.getDate() - 365); //This is the number of days in the past to check

      if(docDate < prevDate){
      $( ".Breadcrm" ).append("<strong class='OutOfDate'>The content on this page has not been updated in over a year and may be unreliable</strong>");
}
   });

</script>

To get this work cleanly, I inserted the script at the end of the <div> block that holds the breadcrumb trail in the content page's MasterPage (see the screengrab above for what the final (active) alert looks like.

It's not a foolproof method, because all a content editor has to do is Edit the page then immediately Publish it and the Alert will disappear. But at least it will concentrate the attention of the more diligent content editor.

Hope this helps someone.