Showing posts with label workflow. Show all posts

Tuesday, 6 August 2019

Can’t use Calculated Column to generate a URL?

ANYBODY WHO HAS WORKED WITH SHAREPOINT ONLINE will know that Microsoft loves to turn off functions we rely on. A recent casualty was the facility to use List Calculated Columns to concatenate a URL to a customised Display or Edit Form.


Oh, how I love to concatenate. And how sad I was when Microsoft decided
they didn't like me concatenating links.
How we would have done it in the past would be to create a Calculated column in a list, then add a formula like this:

=CONCATENATE("<A HREF='/sites/SiteName/Lists/ListName/DispForm00.aspx?ID=",[ID]'>Display Form</A>")

Or if you wanted to be really smart, you could include a redirect to take your user to a particular destination after they’d finished with the form, like this:

=CONCATENATE("<A HREF='/sites/SiteName/Lists/ListName/DispForm00.aspx?ID=",[ID],"&Source=https://xxx.sharepoint.com/sites/SiteName/Lists/ListName/'>Display Form</A>")

The problem is that Microsoft have now disabled that functionality, so that while the Calculated column will compile the link, the list will display the HTML line of code, and not a link as you intended.

I went trawling around Google, looking for a workaround for this “undocumented feature” and came up empty. There’s quite a few folks who suggest many different JavaScript and JQuery solutions, but I couldn’t get any of them to work. JavaScript is okay and can solve some of your problems in SharePoint, but I can’t help feeling it’s a bit of a hack. Far better to use in-built SharePoint technology to solve SharePoint problems where possible.

So I resolved to come up with a workable solution myself, something simpler than fiddling around with a JavaScript function that would magically transform a string of HTML into a working link.

Everything was pointing to a workflow. (You can also use a Flow, which I've documented at the foot of this posting.)

I set one up to copy the calculated HTML code into a simple text column, but of course that didn’t work.

My next attempt was to copy the concatenated string into a Hyperlink column. That kind of did work, but displayed both the link URL and the link text as the full line of HTML … and it seemed to be clickable, but it didn't quite work as I thought it would.

Even though it appeared to produce a functioning link, the "gotcha"
was that the call to the item's ID didn't work, so I had a rethink.
But that roadblock led me to a simpler, more elegant solution anyway ... use a Workflow Variable to compile and copy the URL string into a Hyperlink column.

From there, it was a straightforward task to fire up SharePoint Designer and add a simple workflow to copy the contents of a Variable to your Hyperlink Column.

In your new Workflow - I used a 2010 Workflow - under Actions, select "Set Workflow Variable".

Add your first action ...
In the following window, click on Workflow variable and select 'Create a new variable". Give a useful name and select "String" for the Type. The click on Value, and select the ellipsis to open the String Builder.

Make sure you set up the URL string in a format
that the Hyperlink column will accept.
The string should be in this format:

https://xxx.sharepoint.com /sites/SiteName/Lists/ListName/DispForm00.aspx?ID=[ID]&Source=https://xxx.sharepoint.com/sites/SiteName/Lists/ListName/, Display Form

Replace the "[ID]" in the above string with the "Current Item:ID" value from the Add or Change Lookup function.

The comma and the word space after the URL (but before the link text) is vital to ensure the string transfers to the Hyperlink field correctly.

I also set up my Workflow to check whether the Hyperlink Column was populated then, if not, copy the contents of the Variable into the Hyperlink Column, like this:

Having the Condition  place to check whether the Hyperlink column is populated or not
saves triggering the whole workflow process unnecessarily.
Then set the Workflow to trigger when a new item is created and that should be it.

This is how you want your Hyperlink column to look after the Workflow has done its job.

USING POWER AUTOMATE WITH SHAREPOINT ONLINE

So, someone asked in the comments if I'd gotten this to work with Flow ... and I can now reply, "Yes, I have."

I've had so much work converting all my existing 2010 WorkFlows to Flow that I haven't had any time to do bits of research explicitly for The SharePoint Hive, but I've just had to wait until one of my remediations called for me to do a Flow version of a WorkFlow action before posting the solution here.

It turns out that populating a SharePoint list URL field is a little fiddly in Flow, but works fine once you have it set up. Here's how ...

First we're going to add in an action - Send an HTTP Request to SharePoint. The way I used this, it was the only action in the Flow, as I needed it to create the appropriate dynamic link each time I added an item to a list. But you can use this method in any Flow where you need to create a dynamic link on the fly.

This Action is already set up, but check below for the changes you should make and any relevant code ...
So, first add your site address to the first field. Set the Method to POST. In the Uri field, add this:

_api/web/lists/GetByTitle('Reward Training')/items({ID})

... but make the {ID} bit a Dynamic Content call to the item ID. Reward Training is the name of my list

Next, click on the icon to the right of the Headers field and add this script:

 {
   "Content-Type": "application/json;odata=verbose",
   "X-HTTP-Method": "MERGE",
   "IF-MATCH": "*"
 }

The in the Body field, add this script:

{'__metadata': {'type':'SP.Data.NAMEOFYOURLISTListItem'},'NameOfColumn':
 {'Description': 'Book this slot',
 'Url': 'https://YourSite.sharepoint.com/sites/eo-event-registrations/Lists/Reward%20Training/EditForm.aspx?ID=[ID]&Source=https://YourSite.sharepoint.com/sites/eo-event-registrations/Lists/Reward%20Training/'}
}

It took me a couple of goes to understand what was going on here. I hope I've made it clear ... but the bit after SP.Data is the Name of Your List + "ListItem", no spaces. If your list name has spaces (best avoided, but on this occasion I didn't listen to my own advice) you'll need to use _x0020_ for the space.

(Weirdly, you can use a regular word space in the Uri field, and a %20 in the link you paste into the Body field. You have the whole set with this Flow Action!)

My link is a call to an Edit Form. This can be the standard out-of-the-box Edit Form or something you've customised in Power Apps - makes no difference.

And the Description value "Book this slot" is what will appear in the list as the link text.

I also added a "Source" reference so that users are taken back to the main List page once they've finished with the EditForm, but that's not mandatory.

I hope this has helped someone.


Thursday, 26 March 2015

Manage an email subscription list in SharePoint

I had a request from the Business about using a SharePoint teamsite to store an Excel email subscription list so that users could add and delete subscribers. It seemed to me that the requester was missing a trick, as SharePoint is capable of so much more than just storing documents and data. So I suggested that we transfer the Excel document data into a SharePoint list and use SharePoint's SMTP function to send out the email newsletter to the subscribers.

Most of it was quite easy. For example, it wasn't difficult to figure out that I'd need a teamsite containing two lists, one for the newsletter content and another for the subscribers.

But I ran into a bit of a barrier when I tried to load the subscribers' addresses into the "To" field of the Workflow email, as these were people outside the Business without access to our Intranet. As usual when I have a tricky problem, I Googled for a solution, but that got me nowhere, so I braced myself to figure out an answer for myself.


Subscribers list

I set this one up first as I knew I'd need to call it as a lookup in the Newsletter Content list.

It doesn't need to be complicated, but I included other information to help identify the subscriber's company and who in our organisation was their contact or sponsor, so the columns of this list looked like this:
  • Title - with the default value of "Subscriber" (Single line of text)
  • Company - so we know who they work for (Single line of text)
  • Email - obviously  (Single line of text)
  • Position - so we know their job title (Single line of text)
  • Underwriter - name of their sponsor/contact in our company (Single line of text)
  • UWteam - name of the team the subscriber deals with (Choice)
  • Owner - admin responsible for taking care of this subscriber's profile (Choice)

I could have made the Underwriter field a Name field, but we had no plans to include this group of people on any communications, so I kept it simple. The Team and Owner fields are choices to minimise user error.


NewsletterFooter list

My first thought was to hard code the email footer text into the Workflow email, but then I decided to include it in a separate (third) list so that if any of the info changed, the administrators of the list could edit the text. The columns were simply:
  • Title - with a default value of "Edit details" (Single line of text)
  • Address - just what it says (Single line of text)
  • Phone - Phone numbers, fax and website URL (Single line of text)
I did try to include the Disclaimer in here as well, but then remembered you can't do a look up on a Multiple Line field.


Newsletter content list

How many fields you put in this list depends entirely on what kind of newsletter you want to send out. I kept our one simple, with just a few columns:
  • Title - used for the newsletter headline (Single line of text)
  • Body - the main text goes here (Multiple lines of text)
  • Link01 - to hold an embedded link (Hyperlink or Picture)
  • Link02 - to hold an embedded link (Hyperlink or Picture)
  • Link03 - to hold an embedded link (Hyperlink or Picture)
  • Address - for the footer (Lookup)
  • Phone - for the footer (Lookup)
  • Disclaimer - for the footer (Multiple lines of text)
  • Recipients - the subscribers (Lookup)
So the Address and Phone fields lookup the data from the NewsletterFooter list. The Recipients column looks up the data from the Subscribers list and I ticked the Allow multiple values box.

So far so good.


The Workflow email

I figured I could use a Workflow Email function to mail out the newsletter. Shouldn't be difficult, right?

So using HTML and embedded CSS styles, I put together an email that would gather up the content from the list and compile it into a simple rich format email. As this was going to subscribers outside our company, I knew any imagery or attachments would have to be stored on an external server. None of this is difficult and is amply documented anywhere else.

The snag came when I wanted to load the subscribers' email addresses in the "To" field of the email.


Trying to use a WorkFlow lookup on the "To" field resulted in not very many options. Certainly no Recipients field. I figured that this was because the Worklow Lookup was only accomodating Single line of text fields. I had to find another way. The trouble was, after an hour or two of Googling, I was no nearer to finding out how to get the subscriber email addresses into the "To" field.

After sleeping on it, I wondered if I could use a variable to dump the text of the subscribers' emails in. So I set up a variable by clicking the Variables button.


I gave the variable a name, "var_recip", and set its Type to string.


Next I had to populate the variable. You can do that by finding Build a dynamic string on the Actions dropdown. 

Then move this new action to sit above the Email action. Next click on the text workflow variable, and select the Variable: var_recip option. The click on dynamic string to bring up the String Builder.


In the String Builder, click on Add Lookup, then find Recipients in the drop down.


Click OK. Now click on Variable and select Variable: var_recip.

And that was pretty much it. You can test it by adding just your own email in the Newsletter's Recipients column. Maybe it was just too obvious for anyone to include in a blog ...


How to put the subscribers' emails in the BCC

The other thing was that I didn't really want to have the entire subscription list revealed in the "To" field of the email. It would be better to somehow include them in the BCC. Except that a Workflow doesn't have a BCC ... okay, that's not quite true. It does have a BCC, but you just can't see it.

This one I was able to solve via Google. I found this anonymous post that explains how to hack the code and turn the CC field into a BCC field. [http://blog.summitcloud.com/2010/03/how-to-bcc-in-sharepoint-workflow-email/]

So, in SharePoint Designer, first add your var_recip variable to the CC field in the email, by clicking on the lookup icon next to the CC field (circled in red in the screengrab). Then select Workflow Lookup from the list or options. Click Add to bring up the Define Workflow Lookup dialogue box. Change Source to Workflow Data, and select Variable: var_recip in the Field window.


Click OK. Click OK again. And click OK again. Finally, click Finish to close the Workflow Designer window.

Now find the .xoml file in SharePoint Designer's left-hand navigation bar and right-click on it to reveal the drop-down menu. Select Notepad under the Open With option.


Now search the Notepad document for "BCC", then make the "BCC" text "CC", and the "CC" text "BCC".


Save the changes.

That's it. If it's worked, your CC field should now be blank.


Trigger the Workflow Email from the list back in the teamsite. My email looked like this ...


Hope that helps someone.

Tuesday, 12 August 2014

Display a user's name in workflow email

I needed to create a List in SharePoint 2007 that would allow my colleagues in IT to track installations on staff PCs and laptops. I then wanted to be able to trigger an email to the staff member when the installation was completed, giving instructions on how and when to reboot their computers.

Obviously, a Workflow was the way to go, but I kept bumping my head against the problem of extracting the staff member's name from the "Name (with presence)" field in the SharePoint list. The Workflow was writing "domain\userID" instead of "Firstname Lastname". So I had a bit of a Google and came up with ... not very much. Others were obviously having the same problem - it seems to be a known issue with SP2007.

How to resolve full names from a Person or Group column

Workflow generated email - Username lookup - TechNet

[Annoyingly, the messageboard moderators had in both cases marked these questions as answered, even though the OPs had reported that the answer didn't work for them.]

So how do you get the text of a person's name out of a "Name" list column? Well, you can't really ... at least, not out of the box.

I certainly didn't want to start installing Codeplex solutions onto our server (I work in a Corporate environment and making changes to the server involves much tsk-ing and shaking of heads). So I had to come up with another way of doing it.

I reasoned that the IT project manager running the project would have to type in the staff member's name anyway, so why not just type the name into a plain text field? No difference in effort, right?

So I set up the list with these columns (among others):

Employee - plain text field
UserName - Person or Group, Show field value = Name (with presence)
UserID - Person or Group, Show field value = User Name
Department - Person or Group, Show field value = Department

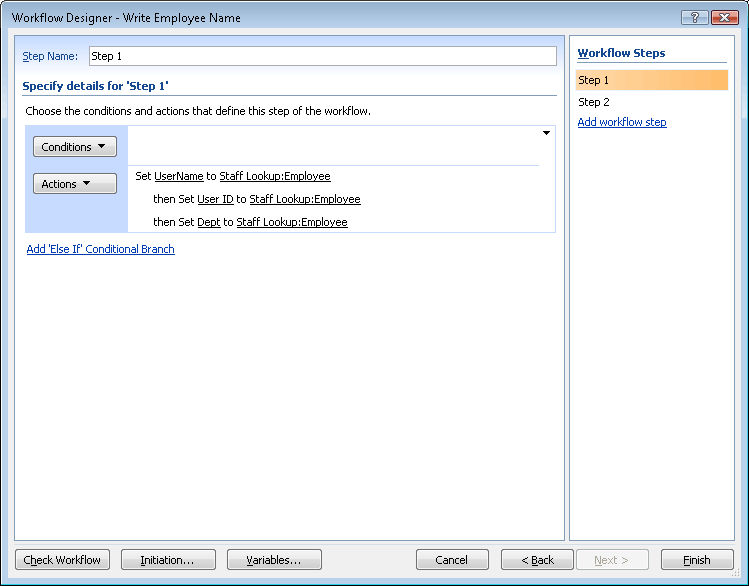
Then I set up a workflow to copy the values for UserName, User ID and Department from the plain text Employee field, when a new item is created ... that's Step 1.


This copies the user's name from the plain text column into the Person or Group columns ... like this:


Step 2 is where I create an email template to alert the employee that their installation is complete. (For test purposes, I'm sending this email to myself using the "Created by" value, but you can use the "User Name" value to send the email to the employee named in the List Item.) 

Be careful to insert a pause before the email is triggered. If you don't, the email will contain the plain text value as entered in the Employee field for each of the other columns. That is because the system takes a few seconds to resolve the plain text into a "Name (with presence)".


Setting up the email is quite easy. I've reproduced a simplified version here, so you can see which columns I called in the email, then the finished result below:


You can see from the email reproduced here how the columns output into a Workflow email. The one to use if you want the include the User's name, say, in a salutation, is the first, plain text one.


Hope this helps someone.


Thursday, 9 January 2014

SharePoint 2007: WorkFlow email removes space from Lookup URL


Here's a thing ... A colleague wanted SharePoint to handle requests for printed stationery (letterheads and so forth), based on Templates stored as PDF files in a SharePoint Document Directory. So, the best way of doing this was to create a new separate Custom List to store the requests and when a new request was logged, use a SharePoint Designer WorkFlow to fire off an email to our facilities people so they could action the printed stationery request.

Sounds simple, right? Well, it was ... up to a point.

So I created the list, and added these columns:

SelectTemplate - A Lookup. This points at the Doc Directory where the PDF tempates are stored. As I couldn't retrieve the file name (SharePoint doesn't offer that option), I had to target the Title field. I made this work this by adding a separate WorkFlow that copies the file name into the Title field whenever you add a new document to the Directory. This field shows as a drop-down picklist in the NewForm.aspx page.

Quantity - obviously, we need to know how many copies of the letterhead they want.

UserText - this is to convert the User ID into a proper name - see the very first post in this blog for how to do that.

This meant that users could create a new item in the Order Stationery list, fill in the NewForm and let the WorkFlow fire off the email. For the email I stole the code SharePoint generates for a List Alert and customised it to hold the fields I wanted. The content of the email would include the Title (I gave the Title field a default value of "Stationery Order"), The PDF template name rendered as a link to the stored PDF, the Quantity required, the name of the Requestor and the date the request was made.

All pretty straightforward.

But when I ran a test, I found something really odd was happening. The link to the PDF didn't work. Here's how I sent up the link in the WorkFlow email:

<a href="http://myserverpath/[%LH Orders:SelectTemplate%].pdf">[%LH Orders:SelectTemplate%]</a>

No reason why that shouldn't work, right? But when I did View Source on the email in my Inbox I could see, weirdly, SharePoint had stripped out the first word space it encountered in the URL but translated the remainder into "%20". Like this:

<a href="http://myserverpath/Birmingham-%20Letterhead%20Jan%2014.pdf">Birmingham - Letterhead Jan 14</a>

Why it was doing that I had no idea. A search on Google showed this problem was frustrating other people as well. So, not just me then.

Not one instance of this problem, posted in the various forums (fora?), had an adequate answer beyond, "Don't put word spaces in file names". My problem with that advice is that these systems are used by human beings and people find file names full of underscores and hyphens hard to read on-screen. Even more confusing when they're trying to find a complex file name in a picklist of many complex file names.

However, because I'd been able, on an earlier occasion, to use JavaScript in a list's NewForm.aspx page to transform the UserID value into a fully-rendered user name I figured there might be a way to replace the word spaces throughout the filename with the "%20" character. So the first thing to do was to create a new column to hold the cleaned up text of the file name. I called it "templateURL".

templateURL - this is the field where we'll store the "escaped" file name.

Then I needed to retrieve the ID of the field as rendered in the NewForm.aspx page. So I opened the NewForm page and did View Source, then grabbed the IDs of both the SelectTemplate field and the templateURL field.

Now my JavaScript skills are pretty poor, so I managed to get a colleague to help me with this. The script he came up with was this:

<script>
function getSelectedText( obj ) {
   return obj.options[obj.selectedIndex].text;
}
    function encodeTemplate() {
var templateURL = document.getElementById("ctl00_m_g_23fc3b40_9a6b_4126_bcf4_a3bfc2fff76d_ctl00_ctl04_ctl05_ctl00_ctl00_ctl04_ctl00_ctl00_TextField");
var templateLookup = document.getElementById("ctl00_m_g_23fc3b40_9a6b_4126_bcf4_a3bfc2fff76d_ctl00_ctl04_ctl01_ctl00_ctl00_ctl04_ctl00_Lookup");
templateURL.value = encodeURI("http://oneintranet.qbe.eo/departments/cres_procedures/QBE Claims/" + getSelectedText(templateLookup) + ".pdf");
}

var templateLookup = document.getElementById("ctl00_m_g_23fc3b40_9a6b_4126_bcf4_a3bfc2fff76d_ctl00_ctl04_ctl01_ctl00_ctl00_ctl04_ctl00_Lookup");
templateLookup.attachEvent("onchange", function(){encodeTemplate()});
</script>

I pasted this script into the NewForm.aspx page after this line:

<asp:Content ContentPlaceHolderId="PlaceHolderBodyAreaClass" runat="server">

The JavaScript grabs the value rendered by the SelectTemplate field. It then replaces the word spaces with "%20" (that's the encodeURI function), then copies the result into the plain text field I set up, templateURL. Finally, it builds a URL for the PDF template file by putting in the server path at the front and tagging ".pdf" on the end. Note that the actual name of the document directory that holds the templates also has a word space in it. The encodeURI takes care of that, too.

All that remained was to change the link in the WorkFlow email to:

<a href="[%LH Orders:templateURL%]">[%LH Orders:SelectTemplate%]</a>

And there you go. All done and dusted. You have a link to a stored document that works and gets round SharePoint's strange habit of removing just the first space it encounters in a URL inserted from a Lookup in a WorkFlow email.

One enhancement you might make would be to hide the text fields in the NewForm.aspx page, so that your users can't mess with the text automatically copied there during the placing of an order. Another of my earlier blogs describes Hiding Fields in NewForm.aspx.

Hope this helps someone.

Wednesday, 14 September 2011

SP2007 - Extract User Name for Workflow Email

We've been searching hard for a solution or workaround to the problem of including a User's name in a Workflow email in SharePoint 2007 (it's a known omission), and were just about to give up when fellow hive member Steve came up with this nifty workaround, by adding some JavaScript to the NewForm.aspx file.

We can take advantage of the fact that SharePoint always knows who you are ...
The idea is to grab the text displayed at the top right of the browser that says, "Welcome John Smith", then render it into a hidden field called Username in the list. You can then call the hidden field in the Workflow email and Robert, as they say, is your mum's brother.

1. So, in SharePoint Designer, open the NewForm.aspx file associated with the list you're attaching the Workflow to.
2. Go to line 66 and replace this code:

<asp:Content ContentPlaceHolderId="PlaceHolderTitleAreaClass" runat="server">
<script id="onetidPageTitleAreaFrameScript">
   document.getElementById("onetidPageTitleAreaFrame").className="ms-areaseparator";
</script>
</asp:Content>

with this:

<asp:Content ContentPlaceHolderId="PlaceHolderTitleAreaClass" runat="server">
<script id="onetidPageTitleAreaFrameScript">
   var userText = document.getElementById('ctl00_m_g_ca8da27f_3ce7_4d29_9adf_e1a96ec0ff6b_ctl00_ctl04_ctl05_ctl00_ctl00_ctl04_ctl00_ctl00_TextField');
   userText.value = document.getElementById("zz6_Menu").innerText.substring(8);
   userText.parentNode.parentNode.parentNode.style.display = "none";
   //document.getElementById("onetidPageTitleAreaFrame").className="ms-areaseparator";
</script>
</asp:Content>

The reference to zz6_Menu is for identifying where on the page the logged-in user's name is appearing (the "Welcome" drop-down menu). But you should double-check this by going View Source on the NewForm.aspx, as I've found the identifier varies depending on your SharePoint set-up.

The getElementById method is identifying the List field where you want to paste the User's Name. You'll have to View Source in order to find out what the ID Number is for the field in your list.

The final line of the new script hides the Username field (used for storing the name) on the Input form. You don't want your end users filling in their name manually.

I found that the original line of script was preventing the new script from working, so I moved it to the end of the sequence and the whole thing started working. So, just to be safe, I commented out the original line of script.

Once this is done, you can add a call in your Workflow Email to pick up the User's name from the Username field you've already added to your Custom List.

For added thoroughness, you should add an amended version of this code to the EditForm.aspx page, so that if the user comes back to the list later to edit their data, they are unable to edit the text of their name. Just open the EditForm.aspx page and alter the code at line 67 to:

<asp:Content ContentPlaceHolderId="PlaceHolderTitleAreaClass" runat="server">
<script id="onetidPageTitleAreaFrameScript">
var userText = document.getElementById('ctl00_m_g_8f8fe63d_e6dc_4f9e_b021_8c653a7bf520_ctl00_ctl04_ctl01_ctl00_ctl00_ctl04_ctl00_ctl00_TextField');
userText.parentNode.parentNode.parentNode.style.display = "none";
//document.getElementById("onetidPageTitleAreaFrame").className="ms-areaseparator";
</script>
</asp:Content>

Note the different value for GetElementById, as this is a different field in a different form.

Hope this helps someone.