Tuesday, 19 January 2016

SharePoint Calendar – view as a year

The one thing SharePoint doesn’t do out of the box … well, there’s many things … but the one that has given me the biggest challenge is its inability to let me display a calendar in year-view. I’m sure there’s valid reasons for this. I’ve found that the Month View of the SharePoint calendar is a snake-pit of embedded tables and weird, week-long table rows. (Go “View Source” on a Month View if you want to be horrified.)

Yes, you can go to various sites and buy an enhanced Calendar web part, and admittedly, that might well save you time. But if, like me, you work in a corporate environment, you’ll no doubt find that installing alien software on your SharePoint server will involve much sighing and sucking of teeth from the IT Department.

So I thought I’d look into using a DataView Web Part to display a year’s-worth of events. It took me quite a while (I think I started this in 2013), but I’ve finally come up with something that’s at least workable, though by no means perfect. If anyone smarter than me (essentially just about everyone) reading this is able to suggest improvements, I would be hugely grateful.

So here’s what I ended up with:


This is where we want to be at the end of the process - rendering a calendar in year view. The colours can be changed in the code.
This is going to need SharePoint Designer access level, so if you haven’t got that then this method isn’t for you.

So the first thing you need to do is to create a SharePoint Calendar and populate it with some events. The one you see here is tracking our company Board and Committee meetings throughout the year. Prior to this, our senior PAs put this information into an Excel spreadsheet and emailed it around. My version at least gives users the ability to click on an event and be taken to a detail page, courtesy of the Calendar’s DispForm.aspx page.

I’ve kept the data in the Title field of each Calendar event as short as possible – three characters – as by necessity the columns in your year calendar are going to be narrow. Users can always click on the event to see more details if they don’t understand a three character acronym.

You should also consider adding a Category column (drop-down list) to your calendar. This will come in handy later when we colour code the types of events in the calendar.

An additional "Category" column can be added in the browser view of the Calendar's Settings area.
Right, let’s crack on … create a page in your subsite to hold the year view. You’ll need a page that has a web part zone running the width of the page. Check the page in as a Shared Draft.


I create the page in the browser so I can be sure of getting the right layout quickly and easily.
Now you’ll need to switch to SharePoint Designer and open the page you just created. (You could create the page in SPD, but I find it easier and quicker to use the browser for that.) Select the Web Part Zone and then bring up the Calendar in the Data Source Details sidebar. You can drop in any column you feel like – we’re going to overwrite most of the presentation code anyhow.


It doesn't really matter what data you insert in the Data View Web Part. We'll be changing the code as we go along and build a completely different view.
The Web Part you just added will look something like this.


Oh, how I love the "Common Data View Tasks" panel.
There are some adjustments to be made in the Common Data View Tasks panel, so we might as well make them now. First, set the Paging to Display All Items. Then, in Sort and Group, make the Sort Order “Start Time” and “Ascending”.  This latter one will be needed so that events on the same day appear in time order.

Use this control panel to determine the order in which events appear in each day cell. This is important as, left to their own devices, events will appear in the order they were entered in the calendar (ie in order of ID).
At this point you might want to review Christophe Humbert’s article on adding colour coding to a SharePoint 2007 calendar on his Path to SharePoint site. It only takes fifteen minutes and it will keep your monthly calendar view consistent with the Year View we’re building here. Indeed, this Year View uses some of Christophe’s techniques, so credit is due to M. Humbert for that. 

Once you’re done with that, switch back to SP Designer and locate the line:

<xsl:variable name="dvt_1_automode">0</xsl:variable>

Directly below, type the following:

<xsl:param name="Today" />

We’ll be using that variable further along. The next thing to do is to add the XSL code that will render the months and the days of the month. This was especially tricky, and most of the heavy lifting here was done by my friend Steve M. who is a Jedi Master when it comes to all kinds of code. So first the Months template, which is added below the dvt_1 template.  (We’ll be ripping out the dvt_1 template in a moment, so don’t worry about it too much.) Here’s the code to add:

<xsl:template name="Months">
  <xsl:param name="MonthNo" />
    <tr>
      <xsl:choose>
        <xsl:when test="$MonthNo= 0">
          <th width="32px" style="border:1px solid #666666; height=30px;background-color:#009fe3;color:#ffffff;">Month</th>
        </xsl:when>
        <xsl:otherwise>
        <td width="32px" class="ms-vb" style="border:1px solid #666666; height=30px;background-color:#009fe3;color:#ffffff;"><strong>
        <xsl:choose>
          <xsl:when test="$MonthNo= 1">Jan</xsl:when>
          <xsl:when test="$MonthNo= 2">Feb</xsl:when>
          <xsl:when test="$MonthNo= 3">Mar</xsl:when>
          <xsl:when test="$MonthNo= 4">Apr</xsl:when>
          <xsl:when test="$MonthNo= 5">May</xsl:when>
          <xsl:when test="$MonthNo= 6">Jun</xsl:when>
          <xsl:when test="$MonthNo= 7">Jul</xsl:when>
          <xsl:when test="$MonthNo= 8">Aug</xsl:when>
          <xsl:when test="$MonthNo= 9">Sep</xsl:when>
          <xsl:when test="$MonthNo= 10">Oct</xsl:when>
          <xsl:when test="$MonthNo= 11">Nov</xsl:when>
          <xsl:when test="$MonthNo= 12">Dec</xsl:when>
          <xsl:otherwise></xsl:otherwise>
        </xsl:choose>
        </strong></td>
        </xsl:otherwise>
        </xsl:choose>
        <xsl:call-template name="Days">
          <xsl:with-param name="MonthNo" select="$MonthNo" />
          <xsl:with-param name="DayNo" select="1" />
        </xsl:call-template>
    </tr>
    <xsl:if test="$MonthNo &lt; 12">
      <xsl:call-template name="Months">
        <xsl:with-param name="MonthNo" select="$MonthNo +1" />
      </xsl:call-template>
     </xsl:if>
</xsl:template>

All we’re doing here is writing the first column of the table to iterate the names of the months downwards. For the sake of clarity, it’s best to convert the SharePoint data, which holds the value of the month as a number, into the name of the month.

Next, we need to write the days across the page as columns. So add this template code directly beneath the Months template:

<xsl:template name="Days">
    <xsl:param name="MonthNo" />
    <xsl:param name="DayNo" />
    <xsl:variable name="Year" select="substring-before($Today, '-')" />
    <xsl:variable name="isLeapYear">
        <xsl:choose>
            <xsl:when test="($Year mod 4 = 0 and $Year mod 100 != 0) or $Year mod 400 = 0">True</xsl:when>
            <xsl:otherwise>False</xsl:otherwise>
        </xsl:choose>
    </xsl:variable>
    <xsl:variable name="Month">
        <xsl:choose>
            <xsl:when test="$MonthNo &lt; 10">0<xsl:value-of select="$MonthNo" /></xsl:when>
            <xsl:otherwise><xsl:value-of select="$MonthNo" /></xsl:otherwise>
        </xsl:choose>
    </xsl:variable>
    <xsl:variable name="Day">
        <xsl:choose>
            <xsl:when test="$DayNo &lt; 10">0<xsl:value-of select="$DayNo " /></xsl:when>
            <xsl:otherwise><xsl:value-of select="$DayNo " /></xsl:otherwise>
        </xsl:choose>
    </xsl:variable>
    <xsl:variable name="backColor">
        <xsl:choose>
            <xsl:when test="contains(' 4 6 9 11 ', concat(' ', $MonthNo, ' ')) and $DayNo = 31">gray</xsl:when>
            <xsl:when test="$MonthNo = 2 and ($DayNo &gt;= 30 or ($isLeapYear = 'False' and $DayNo = 29))">gray</xsl:when>
            <xsl:otherwise></xsl:otherwise>
        </xsl:choose>
    </xsl:variable>
    <xsl:variable name="thisDay" select="concat($Year, '-', $Month, '-', $Day)" />
    <xsl:variable name="Rows" select="/dsQueryResponse/Rows/Row[substring-before(@EventDate, 'T') = $thisDay]"/>

    <xsl:choose>
        <xsl:when test="$MonthNo = 0">
        <th width="32px" style="border:1px solid #666666; height=30px;background-color:#83d0f5;"><xsl:value-of select="$DayNo" /></th>
        </xsl:when>
        <xsl:otherwise>
            <td class="ms-vb" width="32px" style="border:1px solid #666666; height=30px;">
            <xsl:attribute name="bgcolor"><xsl:value-of select="$backColor" /></xsl:attribute>
                <xsl:choose>
                    <xsl:when test="count($Rows) &gt; 0">
                        <xsl:for-each select="$Rows">
                            <xsl:call-template name="rowview" />
                        </xsl:for-each>
                    </xsl:when>
                    <xsl:otherwise>
                        <xsl:text />
                    </xsl:otherwise>
                </xsl:choose>
            </td>
        </xsl:otherwise>
    </xsl:choose>

    <xsl:if test="$DayNo &lt; 31">
        <xsl:call-template name="Days">
            <xsl:with-param name="MonthNo" select="$MonthNo" />
            <xsl:with-param name="DayNo" select="$DayNo +1" />
        </xsl:call-template>
    </xsl:if>
</xsl:template>

So the first section is testing for a Leap Year. Obviously, we need to know how many days February has in the current year.

The next two sections are placing a zero in front of any single digit Month or Day.

The following section beginning with variable name=”backColour” is determining which months have less than 31 days and setting a background colour for the excess days.

Then the next section is rendering the rows and applying the background colour to the “non-existent” days (for example days 30 and 31 in Feb, 31 in April and so on) … and calling the rowview template. So we’ll need to add that right after this.

<xsl:template name="Days">
    <xsl:param name="MonthNo" />
    <xsl:param name="DayNo" />                               
    <xsl:variable name="Year" select="substring-before($Today, '-')" />
    <xsl:variable name="isLeapYear">
        <xsl:choose>
            <xsl:when test="($Year mod 4 = 0 and $Year mod 100 != 0) or $Year mod 400 = 0">True</xsl:when>
            <xsl:otherwise>False</xsl:otherwise>
        </xsl:choose>
    </xsl:variable>
    <xsl:variable name="Month">
        <xsl:choose>
            <xsl:when test="$MonthNo &lt; 10">0<xsl:value-of select="$MonthNo" /></xsl:when>
            <xsl:otherwise><xsl:value-of select="$MonthNo" /></xsl:otherwise>
        </xsl:choose>
    </xsl:variable>
    <xsl:variable name="Day">
        <xsl:choose>
            <xsl:when test="$DayNo &lt; 10">0<xsl:value-of select="$DayNo " /></xsl:when>
            <xsl:otherwise><xsl:value-of select="$DayNo " /></xsl:otherwise>
        </xsl:choose>
    </xsl:variable>
    <xsl:variable name="backColor">
        <xsl:choose>
            <xsl:when test="contains(' 4 6 9 11 ', concat(' ', $MonthNo, ' ')) and $DayNo = 31">gray</xsl:when>
            <xsl:when test="$MonthNo = 2 and ($DayNo &gt;= 30 or ($isLeapYear = 'False' and $DayNo = 29))">gray</xsl:when>
            <xsl:otherwise></xsl:otherwise>
        </xsl:choose>
    </xsl:variable>
    <xsl:variable name="thisDay" select="concat($Year, '-', $Month, '-', $Day)" />
    <xsl:variable name="Rows" select="/dsQueryResponse/Rows/Row[substring-before(@EventDate, 'T') = $thisDay]"/>

    <xsl:choose>
        <xsl:when test="$MonthNo = 0">
        <th width="32px" style="border:1px solid #666666; height=30px;background-color:#83d0f5;"><xsl:value-of select="$DayNo" /></th>
        </xsl:when>
        <xsl:otherwise>
            <td class="ms-vb" width="32px" style="border:1px solid #666666; height=30px;">
                <xsl:attribute name="bgcolor"><xsl:value-of select="$backColor" /></xsl:attribute>
                <xsl:choose>
                    <xsl:when test="count($Rows) &gt; 0">
                        <xsl:for-each select="$Rows">
                            <xsl:call-template name="rowview" />
                        </xsl:for-each>
                    </xsl:when>
                    <xsl:otherwise>
                        <xsl:text />
                    </xsl:otherwise>
                </xsl:choose>
            </td>
        </xsl:otherwise>
    </xsl:choose>

    <xsl:if test="$DayNo &lt; 31">
        <xsl:call-template name="Days">
            <xsl:with-param name="MonthNo" select="$MonthNo" />
            <xsl:with-param name="DayNo" select="$DayNo +1" />
        </xsl:call-template>
    </xsl:if>
</xsl:template>

So, now we add the rowview template.  This will render the events into the appropriate table cells, and apply colour.

<xsl:template name="rowview"> <xsl:variable name="color"> <xsl:choose> <xsl:when test="@Category = 'Boards'">Blue</xsl:when> <xsl:when test="@Category = 'Formal Committees'">HotPink</xsl:when> <xsl:when test="@Category = 'Divisional Boards'">Purple</xsl:when> <xsl:when test="@Category = 'Proposed Trips'">Red</xsl:when> <xsl:when test="@Category = 'Visits'">Green</xsl:when> <xsl:when test="@Category = 'Group Committees/Boards'">Indigo</xsl:when> <xsl:when test="@Category = 'Public Holiday'">Grey</xsl:when> <xsl:when test="@Category = 'Group'">Brown</xsl:when> <xsl:when test="@Category = 'Other'">Darkorange</xsl:when> </xsl:choose> </xsl:variable> <xsl:variable name="EventDate" select="(number(ddwrt:DateTimeTick(ddwrt:GenDisplayName(string(@EventDate))))) div 864000000000" /> <xsl:variable name="EndDate" select="(number(ddwrt:DateTimeTick(ddwrt:GenDisplayName(string(@EndDate))))) div 864000000000" /> <xsl:variable name="width"> <xsl:choose> <xsl:when test="$EndDate - $EventDate = 1">143%</xsl:when> <xsl:when test="$EndDate - $EventDate = 2">178%</xsl:when> <xsl:when test="$EndDate - $EventDate = 3">217%</xsl:when> <xsl:when test="$EndDate - $EventDate = 4">232%</xsl:when> <xsl:otherwise>95%</xsl:otherwise> </xsl:choose> </xsl:variable> <a href="http://yourintranet/departments/management/Lists/Main%20Boards%20%20Committees/DispForm.aspx?ID={@ID}&amp;Source=http://yourintranet/departments/management/Pages/BoardsCommitteesYearView.aspx"> <span style="position:relative;display:inline-block;width:{$width};"> <span style="display:inline-block;width:100%;cursor:pointer;text-align:center;border:1px solid {$color};position:absolute;color:{$color};"><xsl:value-of select="@Title" /></span> <span style="display:inline-block;width:100%;background-color:{$color};text-align:center;border:1px solid;z-index:-1;filter:alpha(opacity=30);opacity:0.3;"><xsl:value-of select="@Title" /></span> </span> </a><br /> </xsl:template>

This is where I’ve swiped some of Christophe’s code to render the different categories of events in different colours, using it to set a variable, color. 

Then from Marc D Anderson’s blog, I swiped a bit of XSLT arithmetic and used it to check whether an event is more than one day. This bit gave me a bit of a problem, until I realised that a one day event gives a value of 0, a two day event returns 1, a three day event gives 2 and so on. I was then able to set the width of multiple day events accordingly, using a “width” variable.

NOTE: This is completely different to how SharePoint renders events in the Calendar’s Month View. To be honest, it’s a bit of a clumsy work-around. But the thought of trying to follow how the out-of-the-box month view works was more than a bit scary. You may have a better way of doing this, and if you do, feel free to share it. But this was the best I could manage.

The final section renders the actual event in the table cell and applies the colour. I freely admit I couldn’t done this without Christophe’s and Marc's excellent work.

We still have a couple of things to do to get this all to work. So next, remove all the XLST code that the SharePoint Designer wizard dropped in. That means delete the dvt_body template and the dvt_1.rowview template, then go back to the top and replace the two sections:

<xsl:template match …>

… and the dvt_1 template with this code.

    <xsl:template match="/" xmlns:x="http://www.w3.org/2001/XMLSchema" xmlns:d="http://schemas.microsoft.com/sharepoint/dsp" xmlns:asp="http://schemas.microsoft.com/ASPNET/20" xmlns:__designer="http://schemas.microsoft.com/WebParts/v2/DataView/designer" xmlns:SharePoint="Microsoft.SharePoint.WebControls"> <table width="100%" cellpadding="2" cellspacing="0" style="border:1px solid #666666;border-collapse: collapse;"> <xsl:call-template name="Months"> <xsl:with-param name="MonthNo" select="0" /> </xsl:call-template> <xsl:choose> <xsl:when test="ddwrt:IfHasRights(2)"> <tr> <td class="ms-addnew" style="padding: 4px" colspan="99"><img src="/_layouts/images/rect.gif" /> <a class="ms-addnew" ID="idHomePageNewEvent" href="/departments/management/Lists/Main%20Boards%20%20Committees/NewForm.aspx?Source=http://yourintranet/departments/management/Lists/Main%20Boards%20%20Committees/calendar.aspx" onclick="javascript:NewItem('/departments/management/Lists/Main%20Boards%20%20Committees/NewForm.aspx?Source=http://yourintranet/departments/management/Lists/Main%20Boards%20%20Committees/calendar.aspx', true);javascript:return false;" target="_self"> Add new meeting</a></td> </tr> </xsl:when> <xsl:otherwise></xsl:otherwise> </xsl:choose> </table> </xsl:template>

This is what pulls the whole thing together. I also added a text link at the bottom of the table to allow Site Editors to add new events without having to go the whole Site Actions > View All Site Content route.

Admittedly, this may not be the most elegant solution. But I still haven’t been able to find an alternative approach by searching the Internet. 

My least favourite aspect of this solution is how a multiple day event will simply overlay any first event in any of the other days in the date range. I wasn’t able to find a way of getting the overlaid event to sit below the multiple day event.
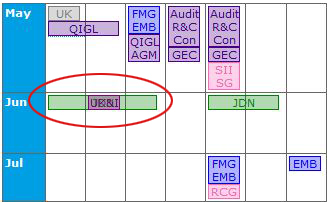

In this case, the green event (a three-dayer) is overlaid on top of the event that is scheduled for the second day, making for an ugly display.
All I could do was input the multiple day events into the calendar as a series of single day events so that everything would display correctly.


The only workaround I could think of was to split the three-day event into two separate sections, forcing the event on the second day to sit below the three day event. It's not great, but it's better than what I first had.
If you’re able to offer any improvements of a better way of doing any of the above, not just the imperfect display of events, then it would be great if you could share by leaving a comment below.

I hope this helps someone.

Tuesday, 8 December 2015

Render SharePoint list headers in the order you want

When it comes to presenting the contents of a SharePoint list in a Data View Web Part (Data Form Web Part), your out-of-the-box options are a bit limited. It's certainly possible to group list items under headings, but SharePoint relentlessly displays these headings in alphabetical (or reverse alphabetical) order. This can be a bit frustrating if you had some other order in mind.

For example, I was planning to display a list of navigational links on a page. I had stored the link data in a list, and I'd even added a custom column to the list to contain the group headings and tagged all my links with a group value.


But when I switched to SharePoint Designer and created the DVWP, and I selected Show group header under Sort and Group ...


... SharePoint helpfully displayed the headers in alphabetical order!


What I really wanted was for the headings to display in a different order. I thought about finding ways to create headings where the order of importance would also be alphabetical order, but that proved far too difficult and awkward. So I resolved to figure out another way to manage the order of the headings.

I wanted "Head Office" as the first heading, followed by "UK Locations", then "Europe", then "Rest of the World". The only way I could think of to do this was to preface each heading with a number value (to force the order) then, in the web part, perhaps use the "substring" function to remove the numerical value from the beginning of each header.


So ... in SharePoint Designer, add your DVWP to the page.

Then use the Common Data View Tasks panel to arrange the list output under headers by clicking on Sort and Group and selecting the radio button next to Show group header. This displays the headers in alphabetical order as noted earlier, but this time, we can see the number prefixes I placed at the beginning of each header value.


To get rid of the number prefixes, we're going to use the substring function.

In SharePoint Designer, navigate to the DVWP and find the XSLT call that renders the header name. It should include the variable "$fieldvalue". It'll be towards the end of the DVWP code, and look like this:

<xsl:value-of select="$fieldvalue" />

In my version, I added a <strong> tag and, as I wanted my headers to be rendered in blue, I added a color attribute, like this:

<strong style="COLOR: #009ae4;"><xsl:value-of select="$fieldvalue" /></strong>

Then, to remove the number prefix, I changed the "$fieldvalue" call to look like this:

<strong style="COLOR: #009ae4;"><xsl:value-of select="substring($fieldvalue, 3)" /></strong>


The substring function here specifies the character to begin rendering the string, in this case, the third one. The result is that my headers still appear in the order specified by the number prefixes in the List but those number prefixes are invisible.


Hope this helps someone.

Tuesday, 10 November 2015

Display multiple random list items in Dataview Web Part

I always like to configure our corporate Intranet to minimise the amount of admin work that needs to be done. One way to keep content looking fresh with minimum manual updating is to put all your text into a SharePoint list, then present it on the page using a Data View Web Part, with an added bit of XSLT scripting to show a random item from the list.

I didn't have much trouble finding a bit of scripting (via Google) to achieve this effect. I ran in to difficulties when I wanted to take this one step further and present several random items from a SharePoint list. However hard I Googled, I just couldn't turn up comprehensive, step-by-step instructions on how to display more than one random item.

The solution turned out to be a combination of two different methods, that I'd picked up in two different locations. As always, as I couldn't find the total solution by Googling alone, I'll explain how to display a number of random items from a list here.

First things first: set up a list. In my case, I wanted to display a set of four large buttons that users can click on to be taken to content in the sub-sites below the top level of the Intranet. So to have a reasonable selection of buttons to choose from, I specified at least eight for each landing page. These were stored in a document library.

As a document library is a just a flavour of list, I decided to keep things simple by using the library to double for the list and added my metadata in extra columns in the Document Library.

So I used the Title field to store the text equivalent (alt attribute) for the button image. Then I added a custom column to hold the destination URL. You could use a Hyperlink-type content type, but I just opted for a Single line of text, to keep things simple. I also added an extra column to hold the value for the tab page the buttons would be appearing on, set up as a Choice.

Then I uploaded all the button images and made sure the metadata was completed correctly.

This is what my Document library looks like when populated with my image buttons.
My next task was to create the DVWP on the tab page to display the four buttons. You almost certainly already know how to do this, so I won't waste your time here. But just in case you are struggling, here's a site that shows you How to insert a DVWP

The next step might not apply to you, but I was looking to manage a button set for each of my main tab pages on our Intranet. So once I had the Dataview Web Part on the page, I needed to filter out the irrelevant buttons. 

In SharePoint Designer, there's a wizard that allows you to Filter, sort and set the number of items displayed.
As I'd already set up a column to hold the name of the tab my button were going to appear on, I just had to click on Filter and set up a criterion for the tab I was working on, in this case "Community".

This allows me to filter out all the buttons except for those tagged as "Community".
Before I did any more work in the wizard, I thought I'd tidy up the HTML of the web part.

The raw DVWP tends to nest tables inside tables which can get messy and complex to work with. Some people prefer to replace the table elements with DIVs, and sometimes I might do that. But here, I thought I'd stick with a simplified table as I wanted to iterate across the row, rather than down the column. So first I removed the extra nested table.

Inside the "rowview" template, first take out the TR, TD and TABLE tags ...
As soon as you do that, the corresponding closing tags are highlighted by SharePoint Designer for you.

... SharePoint Designer then highlights the closing tags for you, making them easy to find and delete.
Now, because I'd knocked out the nested table and I wanted to iterate across the row, I needed to put an opening and closing <TR> tag inside the main table of the DVWP. Like this:

Wrap the dvt_1_body template in TR tags.
Next, I wanted to remove the column that holds the List Column names. You can do this quickly by right-clicking on the column in the Design view and selecting Delete, then Delete Columns from the drop-down menu.

Deleting the table column is very simple.
Next I needed to remove the <TR> tags that render the items from the list down the column. Doing this will cause the items to render across the row, instead. You might want to remove the legacy width attributes while you're at it.

So I removed the unneeded TR tags ...
Next, I needed to get all the "value-of"s into a single table cell and discard the remainder, like this.

Re-arranging the value-of calls and eliminating the unwanted TD tags.
My next job was to get the buttons to render across the row, and to have the ALT attribute inserted, and make each button a link to the relevant content I was highlighting. Rather than explain it, here's the final code ... you should be able to figure out what it's doing for yourself.

Here's the final code ...
It's starting to take shape, now:


Next, I needed to go back to the Wizard and set the Paging to Display All Items.

Select Display all items ...
At this point I was finally ready to apply the bits of XSLT scripting that would do the work of presenting four random items from the list, and would change each time a visitor came back to the page or refreshed.

I'd already previously implemented DVWPs where the script selected one item at random from the list to display. Suitable techniques for this are not difficult to find on the Internet via Google search. I've come across several ways to do this. The one I've most commonly used is:

<xsl:template name="dvt_1.body">
<xsl:param name="Rows"/>
<xsl:variable name="Random" select="ddwrt:Random(1,count($Rows))" />
<xsl:for-each select="$Rows[position()=$Random]">
<xsl:call-template name="dvt_1.rowview" />
</xsl:for-each>
</xsl:template>

... but this only displays one random item from the list. My challenge was to get the DVWP to display four random items. I figured this would be made more difficult because I didn't want to any of the items to be repeated, which would be a possibility with a routine that selected four items randomly, one after another.

But while digging around on Google, I came across several different ways of rendering a random item from a list and came to understand that I might have to combine two different methods to get the effect I wanted.

In the end I settled for a slightly different way of rendering a random item that turned up in several different SharePoint blogs, but this is the one I came back to

<xsl:for-each select="$Rows">
    <xsl:sort select="ddwrt:Random(1, $RowCount)" order="ascending"/>
    <xsl:call-template name="dvt_1.rowview" />
</xsl:for-each>

What this is doing is sorting the items in the list into a random order and rendering the first one. It's a slightly different approach to the one I was using, but it does get me a step closer to where I want to be.

I did get error messages with this saying that the variable wasn't defined, so I added in the line:

<xsl:variable name="RowCount" select="count($Rows)" />

... before the <xsl:for-each= ...> line and it seemed to work okay.

All I had to do next was figure out how to select the first four items in this randomised list and I'd be there. I found something on another blog that selected the first x number of items from a listso I figured I might be able to combine the two elements to get a randomised first four items ... I added the line:

<xsl:if test="position() &lt; 5">

This is saying: display the row if the position is less than five (ie, four, then) ... so the "for-each" section should now look like this:

<xsl:variable name="RowCount" select="count($Rows)" />
<xsl:for-each select="$Rows">
<xsl:sort select="ddwrt:Random(1, $RowCount)" order="ascending" />
<xsl:if test="position()&lt;5">
<xsl:call-template name="dvt_1.rowview" />
</xsl:if>
</xsl:for-each>

Now the buttons will change randomly each time the user lands on the page for the first time, or indeed refreshes the page. The final effect looks like this:

The images display randomly across the row.
Then it changes to this, when you refresh.

Hit refresh and another four images display.
You can probably adapt this method to suit the set of random items you want to display.

Hope this helps someone.


Thursday, 26 March 2015

Manage an email subscription list in SharePoint

I had a request from the Business about using a SharePoint teamsite to store an Excel email subscription list so that users could add and delete subscribers. It seemed to me that the requester was missing a trick, as SharePoint is capable of so much more than just storing documents and data. So I suggested that we transfer the Excel document data into a SharePoint list and use SharePoint's SMTP function to send out the email newsletter to the subscribers.

Most of it was quite easy. For example, it wasn't difficult to figure out that I'd need a teamsite containing two lists, one for the newsletter content and another for the subscribers.

But I ran into a bit of a barrier when I tried to load the subscribers' addresses into the "To" field of the Workflow email, as these were people outside the Business without access to our Intranet. As usual when I have a tricky problem, I Googled for a solution, but that got me nowhere, so I braced myself to figure out an answer for myself.


Subscribers list

I set this one up first as I knew I'd need to call it as a lookup in the Newsletter Content list.

It doesn't need to be complicated, but I included other information to help identify the subscriber's company and who in our organisation was their contact or sponsor, so the columns of this list looked like this:
  • Title - with the default value of "Subscriber" (Single line of text)
  • Company - so we know who they work for (Single line of text)
  • Email - obviously  (Single line of text)
  • Position - so we know their job title (Single line of text)
  • Underwriter - name of their sponsor/contact in our company (Single line of text)
  • UWteam - name of the team the subscriber deals with (Choice)
  • Owner - admin responsible for taking care of this subscriber's profile (Choice)

I could have made the Underwriter field a Name field, but we had no plans to include this group of people on any communications, so I kept it simple. The Team and Owner fields are choices to minimise user error.


NewsletterFooter list

My first thought was to hard code the email footer text into the Workflow email, but then I decided to include it in a separate (third) list so that if any of the info changed, the administrators of the list could edit the text. The columns were simply:
  • Title - with a default value of "Edit details" (Single line of text)
  • Address - just what it says (Single line of text)
  • Phone - Phone numbers, fax and website URL (Single line of text)
I did try to include the Disclaimer in here as well, but then remembered you can't do a look up on a Multiple Line field.


Newsletter content list

How many fields you put in this list depends entirely on what kind of newsletter you want to send out. I kept our one simple, with just a few columns:
  • Title - used for the newsletter headline (Single line of text)
  • Body - the main text goes here (Multiple lines of text)
  • Link01 - to hold an embedded link (Hyperlink or Picture)
  • Link02 - to hold an embedded link (Hyperlink or Picture)
  • Link03 - to hold an embedded link (Hyperlink or Picture)
  • Address - for the footer (Lookup)
  • Phone - for the footer (Lookup)
  • Disclaimer - for the footer (Multiple lines of text)
  • Recipients - the subscribers (Lookup)
So the Address and Phone fields lookup the data from the NewsletterFooter list. The Recipients column looks up the data from the Subscribers list and I ticked the Allow multiple values box.

So far so good.


The Workflow email

I figured I could use a Workflow Email function to mail out the newsletter. Shouldn't be difficult, right?

So using HTML and embedded CSS styles, I put together an email that would gather up the content from the list and compile it into a simple rich format email. As this was going to subscribers outside our company, I knew any imagery or attachments would have to be stored on an external server. None of this is difficult and is amply documented anywhere else.

The snag came when I wanted to load the subscribers' email addresses in the "To" field of the email.


Trying to use a WorkFlow lookup on the "To" field resulted in not very many options. Certainly no Recipients field. I figured that this was because the Worklow Lookup was only accomodating Single line of text fields. I had to find another way. The trouble was, after an hour or two of Googling, I was no nearer to finding out how to get the subscriber email addresses into the "To" field.

After sleeping on it, I wondered if I could use a variable to dump the text of the subscribers' emails in. So I set up a variable by clicking the Variables button.


I gave the variable a name, "var_recip", and set its Type to string.


Next I had to populate the variable. You can do that by finding Build a dynamic string on the Actions dropdown. 

Then move this new action to sit above the Email action. Next click on the text workflow variable, and select the Variable: var_recip option. The click on dynamic string to bring up the String Builder.


In the String Builder, click on Add Lookup, then find Recipients in the drop down.


Click OK. Now click on Variable and select Variable: var_recip.

And that was pretty much it. You can test it by adding just your own email in the Newsletter's Recipients column. Maybe it was just too obvious for anyone to include in a blog ...


How to put the subscribers' emails in the BCC

The other thing was that I didn't really want to have the entire subscription list revealed in the "To" field of the email. It would be better to somehow include them in the BCC. Except that a Workflow doesn't have a BCC ... okay, that's not quite true. It does have a BCC, but you just can't see it.

This one I was able to solve via Google. I found this anonymous post that explains how to hack the code and turn the CC field into a BCC field. [http://blog.summitcloud.com/2010/03/how-to-bcc-in-sharepoint-workflow-email/]

So, in SharePoint Designer, first add your var_recip variable to the CC field in the email, by clicking on the lookup icon next to the CC field (circled in red in the screengrab). Then select Workflow Lookup from the list or options. Click Add to bring up the Define Workflow Lookup dialogue box. Change Source to Workflow Data, and select Variable: var_recip in the Field window.


Click OK. Click OK again. And click OK again. Finally, click Finish to close the Workflow Designer window.

Now find the .xoml file in SharePoint Designer's left-hand navigation bar and right-click on it to reveal the drop-down menu. Select Notepad under the Open With option.


Now search the Notepad document for "BCC", then make the "BCC" text "CC", and the "CC" text "BCC".


Save the changes.

That's it. If it's worked, your CC field should now be blank.


Trigger the Workflow Email from the list back in the teamsite. My email looked like this ...


Hope that helps someone.

Tuesday, 12 August 2014

Display a user's name in workflow email

I needed to create a List in SharePoint 2007 that would allow my colleagues in IT to track installations on staff PCs and laptops. I then wanted to be able to trigger an email to the staff member when the installation was completed, giving instructions on how and when to reboot their computers.

Obviously, a Workflow was the way to go, but I kept bumping my head against the problem of extracting the staff member's name from the "Name (with presence)" field in the SharePoint list. The Workflow was writing "domain\userID" instead of "Firstname Lastname". So I had a bit of a Google and came up with ... not very much. Others were obviously having the same problem - it seems to be a known issue with SP2007.

How to resolve full names from a Person or Group column

Workflow generated email - Username lookup - TechNet

[Annoyingly, the messageboard moderators had in both cases marked these questions as answered, even though the OPs had reported that the answer didn't work for them.]

So how do you get the text of a person's name out of a "Name" list column? Well, you can't really ... at least, not out of the box.

I certainly didn't want to start installing Codeplex solutions onto our server (I work in a Corporate environment and making changes to the server involves much tsk-ing and shaking of heads). So I had to come up with another way of doing it.

I reasoned that the IT project manager running the project would have to type in the staff member's name anyway, so why not just type the name into a plain text field? No difference in effort, right?

So I set up the list with these columns (among others):

Employee - plain text field
UserName - Person or Group, Show field value = Name (with presence)
UserID - Person or Group, Show field value = User Name
Department - Person or Group, Show field value = Department

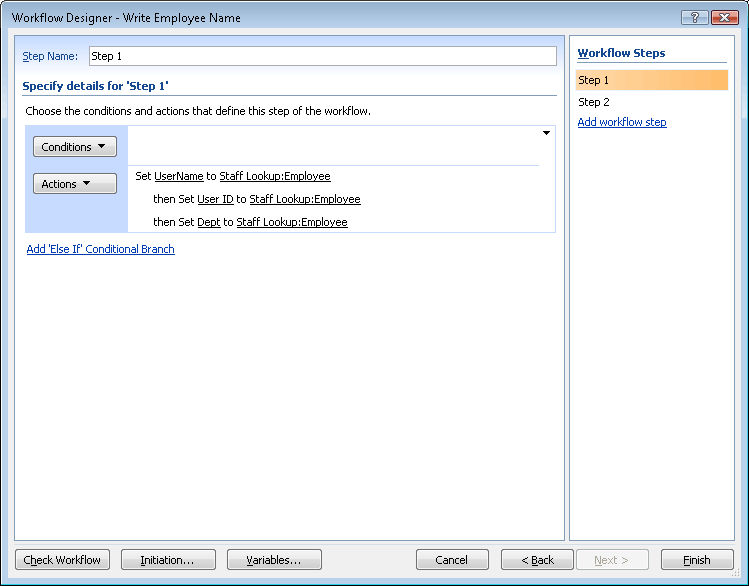
Then I set up a workflow to copy the values for UserName, User ID and Department from the plain text Employee field, when a new item is created ... that's Step 1.


This copies the user's name from the plain text column into the Person or Group columns ... like this:


Step 2 is where I create an email template to alert the employee that their installation is complete. (For test purposes, I'm sending this email to myself using the "Created by" value, but you can use the "User Name" value to send the email to the employee named in the List Item.) 

Be careful to insert a pause before the email is triggered. If you don't, the email will contain the plain text value as entered in the Employee field for each of the other columns. That is because the system takes a few seconds to resolve the plain text into a "Name (with presence)".


Setting up the email is quite easy. I've reproduced a simplified version here, so you can see which columns I called in the email, then the finished result below:


You can see from the email reproduced here how the columns output into a Workflow email. The one to use if you want the include the User's name, say, in a salutation, is the first, plain text one.


Hope this helps someone.