Tuesday, 10 November 2015

Display multiple random list items in Dataview Web Part

I always like to configure our corporate Intranet to minimise the amount of admin work that needs to be done. One way to keep content looking fresh with minimum manual updating is to put all your text into a SharePoint list, then present it on the page using a Data View Web Part, with an added bit of XSLT scripting to show a random item from the list.

I didn't have much trouble finding a bit of scripting (via Google) to achieve this effect. I ran in to difficulties when I wanted to take this one step further and present several random items from a SharePoint list. However hard I Googled, I just couldn't turn up comprehensive, step-by-step instructions on how to display more than one random item.

The solution turned out to be a combination of two different methods, that I'd picked up in two different locations. As always, as I couldn't find the total solution by Googling alone, I'll explain how to display a number of random items from a list here.

First things first: set up a list. In my case, I wanted to display a set of four large buttons that users can click on to be taken to content in the sub-sites below the top level of the Intranet. So to have a reasonable selection of buttons to choose from, I specified at least eight for each landing page. These were stored in a document library.

As a document library is a just a flavour of list, I decided to keep things simple by using the library to double for the list and added my metadata in extra columns in the Document Library.

So I used the Title field to store the text equivalent (alt attribute) for the button image. Then I added a custom column to hold the destination URL. You could use a Hyperlink-type content type, but I just opted for a Single line of text, to keep things simple. I also added an extra column to hold the value for the tab page the buttons would be appearing on, set up as a Choice.

Then I uploaded all the button images and made sure the metadata was completed correctly.

This is what my Document library looks like when populated with my image buttons.
My next task was to create the DVWP on the tab page to display the four buttons. You almost certainly already know how to do this, so I won't waste your time here. But just in case you are struggling, here's a site that shows you How to insert a DVWP

The next step might not apply to you, but I was looking to manage a button set for each of my main tab pages on our Intranet. So once I had the Dataview Web Part on the page, I needed to filter out the irrelevant buttons. 

In SharePoint Designer, there's a wizard that allows you to Filter, sort and set the number of items displayed.
As I'd already set up a column to hold the name of the tab my button were going to appear on, I just had to click on Filter and set up a criterion for the tab I was working on, in this case "Community".

This allows me to filter out all the buttons except for those tagged as "Community".
Before I did any more work in the wizard, I thought I'd tidy up the HTML of the web part.

The raw DVWP tends to nest tables inside tables which can get messy and complex to work with. Some people prefer to replace the table elements with DIVs, and sometimes I might do that. But here, I thought I'd stick with a simplified table as I wanted to iterate across the row, rather than down the column. So first I removed the extra nested table.

Inside the "rowview" template, first take out the TR, TD and TABLE tags ...
As soon as you do that, the corresponding closing tags are highlighted by SharePoint Designer for you.

... SharePoint Designer then highlights the closing tags for you, making them easy to find and delete.
Now, because I'd knocked out the nested table and I wanted to iterate across the row, I needed to put an opening and closing <TR> tag inside the main table of the DVWP. Like this:

Wrap the dvt_1_body template in TR tags.
Next, I wanted to remove the column that holds the List Column names. You can do this quickly by right-clicking on the column in the Design view and selecting Delete, then Delete Columns from the drop-down menu.

Deleting the table column is very simple.
Next I needed to remove the <TR> tags that render the items from the list down the column. Doing this will cause the items to render across the row, instead. You might want to remove the legacy width attributes while you're at it.

So I removed the unneeded TR tags ...
Next, I needed to get all the "value-of"s into a single table cell and discard the remainder, like this.

Re-arranging the value-of calls and eliminating the unwanted TD tags.
My next job was to get the buttons to render across the row, and to have the ALT attribute inserted, and make each button a link to the relevant content I was highlighting. Rather than explain it, here's the final code ... you should be able to figure out what it's doing for yourself.

Here's the final code ...
It's starting to take shape, now:


Next, I needed to go back to the Wizard and set the Paging to Display All Items.

Select Display all items ...
At this point I was finally ready to apply the bits of XSLT scripting that would do the work of presenting four random items from the list, and would change each time a visitor came back to the page or refreshed.

I'd already previously implemented DVWPs where the script selected one item at random from the list to display. Suitable techniques for this are not difficult to find on the Internet via Google search. I've come across several ways to do this. The one I've most commonly used is:

<xsl:template name="dvt_1.body">
<xsl:param name="Rows"/>
<xsl:variable name="Random" select="ddwrt:Random(1,count($Rows))" />
<xsl:for-each select="$Rows[position()=$Random]">
<xsl:call-template name="dvt_1.rowview" />
</xsl:for-each>
</xsl:template>

... but this only displays one random item from the list. My challenge was to get the DVWP to display four random items. I figured this would be made more difficult because I didn't want to any of the items to be repeated, which would be a possibility with a routine that selected four items randomly, one after another.

But while digging around on Google, I came across several different ways of rendering a random item from a list and came to understand that I might have to combine two different methods to get the effect I wanted.

In the end I settled for a slightly different way of rendering a random item that turned up in several different SharePoint blogs, but this is the one I came back to

<xsl:for-each select="$Rows">
    <xsl:sort select="ddwrt:Random(1, $RowCount)" order="ascending"/>
    <xsl:call-template name="dvt_1.rowview" />
</xsl:for-each>

What this is doing is sorting the items in the list into a random order and rendering the first one. It's a slightly different approach to the one I was using, but it does get me a step closer to where I want to be.

I did get error messages with this saying that the variable wasn't defined, so I added in the line:

<xsl:variable name="RowCount" select="count($Rows)" />

... before the <xsl:for-each= ...> line and it seemed to work okay.

All I had to do next was figure out how to select the first four items in this randomised list and I'd be there. I found something on another blog that selected the first x number of items from a listso I figured I might be able to combine the two elements to get a randomised first four items ... I added the line:

<xsl:if test="position() &lt; 5">

This is saying: display the row if the position is less than five (ie, four, then) ... so the "for-each" section should now look like this:

<xsl:variable name="RowCount" select="count($Rows)" />
<xsl:for-each select="$Rows">
<xsl:sort select="ddwrt:Random(1, $RowCount)" order="ascending" />
<xsl:if test="position()&lt;5">
<xsl:call-template name="dvt_1.rowview" />
</xsl:if>
</xsl:for-each>

Now the buttons will change randomly each time the user lands on the page for the first time, or indeed refreshes the page. The final effect looks like this:

The images display randomly across the row.
Then it changes to this, when you refresh.

Hit refresh and another four images display.
You can probably adapt this method to suit the set of random items you want to display.

Hope this helps someone.


Thursday, 26 March 2015

Manage an email subscription list in SharePoint

I had a request from the Business about using a SharePoint teamsite to store an Excel email subscription list so that users could add and delete subscribers. It seemed to me that the requester was missing a trick, as SharePoint is capable of so much more than just storing documents and data. So I suggested that we transfer the Excel document data into a SharePoint list and use SharePoint's SMTP function to send out the email newsletter to the subscribers.

Most of it was quite easy. For example, it wasn't difficult to figure out that I'd need a teamsite containing two lists, one for the newsletter content and another for the subscribers.

But I ran into a bit of a barrier when I tried to load the subscribers' addresses into the "To" field of the Workflow email, as these were people outside the Business without access to our Intranet. As usual when I have a tricky problem, I Googled for a solution, but that got me nowhere, so I braced myself to figure out an answer for myself.


Subscribers list

I set this one up first as I knew I'd need to call it as a lookup in the Newsletter Content list.

It doesn't need to be complicated, but I included other information to help identify the subscriber's company and who in our organisation was their contact or sponsor, so the columns of this list looked like this:
  • Title - with the default value of "Subscriber" (Single line of text)
  • Company - so we know who they work for (Single line of text)
  • Email - obviously  (Single line of text)
  • Position - so we know their job title (Single line of text)
  • Underwriter - name of their sponsor/contact in our company (Single line of text)
  • UWteam - name of the team the subscriber deals with (Choice)
  • Owner - admin responsible for taking care of this subscriber's profile (Choice)

I could have made the Underwriter field a Name field, but we had no plans to include this group of people on any communications, so I kept it simple. The Team and Owner fields are choices to minimise user error.


NewsletterFooter list

My first thought was to hard code the email footer text into the Workflow email, but then I decided to include it in a separate (third) list so that if any of the info changed, the administrators of the list could edit the text. The columns were simply:
  • Title - with a default value of "Edit details" (Single line of text)
  • Address - just what it says (Single line of text)
  • Phone - Phone numbers, fax and website URL (Single line of text)
I did try to include the Disclaimer in here as well, but then remembered you can't do a look up on a Multiple Line field.


Newsletter content list

How many fields you put in this list depends entirely on what kind of newsletter you want to send out. I kept our one simple, with just a few columns:
  • Title - used for the newsletter headline (Single line of text)
  • Body - the main text goes here (Multiple lines of text)
  • Link01 - to hold an embedded link (Hyperlink or Picture)
  • Link02 - to hold an embedded link (Hyperlink or Picture)
  • Link03 - to hold an embedded link (Hyperlink or Picture)
  • Address - for the footer (Lookup)
  • Phone - for the footer (Lookup)
  • Disclaimer - for the footer (Multiple lines of text)
  • Recipients - the subscribers (Lookup)
So the Address and Phone fields lookup the data from the NewsletterFooter list. The Recipients column looks up the data from the Subscribers list and I ticked the Allow multiple values box.

So far so good.


The Workflow email

I figured I could use a Workflow Email function to mail out the newsletter. Shouldn't be difficult, right?

So using HTML and embedded CSS styles, I put together an email that would gather up the content from the list and compile it into a simple rich format email. As this was going to subscribers outside our company, I knew any imagery or attachments would have to be stored on an external server. None of this is difficult and is amply documented anywhere else.

The snag came when I wanted to load the subscribers' email addresses in the "To" field of the email.


Trying to use a WorkFlow lookup on the "To" field resulted in not very many options. Certainly no Recipients field. I figured that this was because the Worklow Lookup was only accomodating Single line of text fields. I had to find another way. The trouble was, after an hour or two of Googling, I was no nearer to finding out how to get the subscriber email addresses into the "To" field.

After sleeping on it, I wondered if I could use a variable to dump the text of the subscribers' emails in. So I set up a variable by clicking the Variables button.


I gave the variable a name, "var_recip", and set its Type to string.


Next I had to populate the variable. You can do that by finding Build a dynamic string on the Actions dropdown. 

Then move this new action to sit above the Email action. Next click on the text workflow variable, and select the Variable: var_recip option. The click on dynamic string to bring up the String Builder.


In the String Builder, click on Add Lookup, then find Recipients in the drop down.


Click OK. Now click on Variable and select Variable: var_recip.

And that was pretty much it. You can test it by adding just your own email in the Newsletter's Recipients column. Maybe it was just too obvious for anyone to include in a blog ...


How to put the subscribers' emails in the BCC

The other thing was that I didn't really want to have the entire subscription list revealed in the "To" field of the email. It would be better to somehow include them in the BCC. Except that a Workflow doesn't have a BCC ... okay, that's not quite true. It does have a BCC, but you just can't see it.

This one I was able to solve via Google. I found this anonymous post that explains how to hack the code and turn the CC field into a BCC field. [http://blog.summitcloud.com/2010/03/how-to-bcc-in-sharepoint-workflow-email/]

So, in SharePoint Designer, first add your var_recip variable to the CC field in the email, by clicking on the lookup icon next to the CC field (circled in red in the screengrab). Then select Workflow Lookup from the list or options. Click Add to bring up the Define Workflow Lookup dialogue box. Change Source to Workflow Data, and select Variable: var_recip in the Field window.


Click OK. Click OK again. And click OK again. Finally, click Finish to close the Workflow Designer window.

Now find the .xoml file in SharePoint Designer's left-hand navigation bar and right-click on it to reveal the drop-down menu. Select Notepad under the Open With option.


Now search the Notepad document for "BCC", then make the "BCC" text "CC", and the "CC" text "BCC".


Save the changes.

That's it. If it's worked, your CC field should now be blank.


Trigger the Workflow Email from the list back in the teamsite. My email looked like this ...


Hope that helps someone.

Tuesday, 12 August 2014

Display a user's name in workflow email

I needed to create a List in SharePoint 2007 that would allow my colleagues in IT to track installations on staff PCs and laptops. I then wanted to be able to trigger an email to the staff member when the installation was completed, giving instructions on how and when to reboot their computers.

Obviously, a Workflow was the way to go, but I kept bumping my head against the problem of extracting the staff member's name from the "Name (with presence)" field in the SharePoint list. The Workflow was writing "domain\userID" instead of "Firstname Lastname". So I had a bit of a Google and came up with ... not very much. Others were obviously having the same problem - it seems to be a known issue with SP2007.

How to resolve full names from a Person or Group column

Workflow generated email - Username lookup - TechNet

[Annoyingly, the messageboard moderators had in both cases marked these questions as answered, even though the OPs had reported that the answer didn't work for them.]

So how do you get the text of a person's name out of a "Name" list column? Well, you can't really ... at least, not out of the box.

I certainly didn't want to start installing Codeplex solutions onto our server (I work in a Corporate environment and making changes to the server involves much tsk-ing and shaking of heads). So I had to come up with another way of doing it.

I reasoned that the IT project manager running the project would have to type in the staff member's name anyway, so why not just type the name into a plain text field? No difference in effort, right?

So I set up the list with these columns (among others):

Employee - plain text field
UserName - Person or Group, Show field value = Name (with presence)
UserID - Person or Group, Show field value = User Name
Department - Person or Group, Show field value = Department

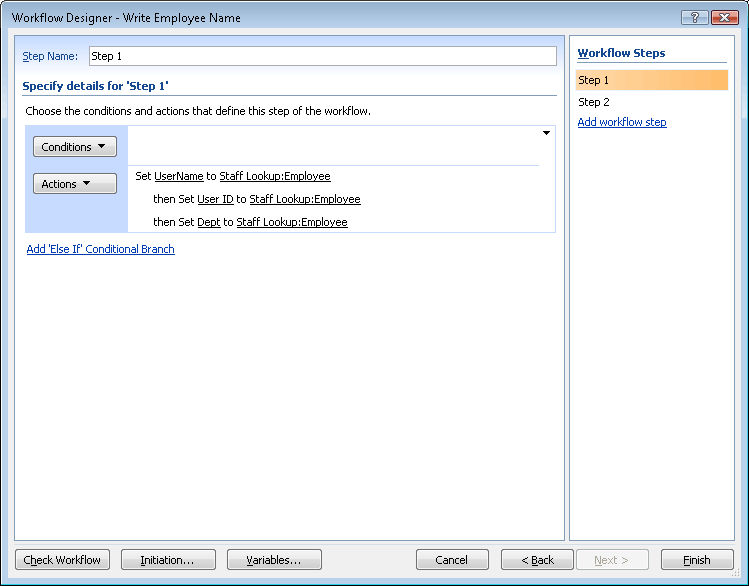
Then I set up a workflow to copy the values for UserName, User ID and Department from the plain text Employee field, when a new item is created ... that's Step 1.


This copies the user's name from the plain text column into the Person or Group columns ... like this:


Step 2 is where I create an email template to alert the employee that their installation is complete. (For test purposes, I'm sending this email to myself using the "Created by" value, but you can use the "User Name" value to send the email to the employee named in the List Item.) 

Be careful to insert a pause before the email is triggered. If you don't, the email will contain the plain text value as entered in the Employee field for each of the other columns. That is because the system takes a few seconds to resolve the plain text into a "Name (with presence)".


Setting up the email is quite easy. I've reproduced a simplified version here, so you can see which columns I called in the email, then the finished result below:


You can see from the email reproduced here how the columns output into a Workflow email. The one to use if you want the include the User's name, say, in a salutation, is the first, plain text one.


Hope this helps someone.


Thursday, 9 January 2014

SharePoint 2007: WorkFlow email removes space from Lookup URL


Here's a thing ... A colleague wanted SharePoint to handle requests for printed stationery (letterheads and so forth), based on Templates stored as PDF files in a SharePoint Document Directory. So, the best way of doing this was to create a new separate Custom List to store the requests and when a new request was logged, use a SharePoint Designer WorkFlow to fire off an email to our facilities people so they could action the printed stationery request.

Sounds simple, right? Well, it was ... up to a point.

So I created the list, and added these columns:

SelectTemplate - A Lookup. This points at the Doc Directory where the PDF tempates are stored. As I couldn't retrieve the file name (SharePoint doesn't offer that option), I had to target the Title field. I made this work this by adding a separate WorkFlow that copies the file name into the Title field whenever you add a new document to the Directory. This field shows as a drop-down picklist in the NewForm.aspx page.

Quantity - obviously, we need to know how many copies of the letterhead they want.

UserText - this is to convert the User ID into a proper name - see the very first post in this blog for how to do that.

This meant that users could create a new item in the Order Stationery list, fill in the NewForm and let the WorkFlow fire off the email. For the email I stole the code SharePoint generates for a List Alert and customised it to hold the fields I wanted. The content of the email would include the Title (I gave the Title field a default value of "Stationery Order"), The PDF template name rendered as a link to the stored PDF, the Quantity required, the name of the Requestor and the date the request was made.

All pretty straightforward.

But when I ran a test, I found something really odd was happening. The link to the PDF didn't work. Here's how I sent up the link in the WorkFlow email:

<a href="http://myserverpath/[%LH Orders:SelectTemplate%].pdf">[%LH Orders:SelectTemplate%]</a>

No reason why that shouldn't work, right? But when I did View Source on the email in my Inbox I could see, weirdly, SharePoint had stripped out the first word space it encountered in the URL but translated the remainder into "%20". Like this:

<a href="http://myserverpath/Birmingham-%20Letterhead%20Jan%2014.pdf">Birmingham - Letterhead Jan 14</a>

Why it was doing that I had no idea. A search on Google showed this problem was frustrating other people as well. So, not just me then.

Not one instance of this problem, posted in the various forums (fora?), had an adequate answer beyond, "Don't put word spaces in file names". My problem with that advice is that these systems are used by human beings and people find file names full of underscores and hyphens hard to read on-screen. Even more confusing when they're trying to find a complex file name in a picklist of many complex file names.

However, because I'd been able, on an earlier occasion, to use JavaScript in a list's NewForm.aspx page to transform the UserID value into a fully-rendered user name I figured there might be a way to replace the word spaces throughout the filename with the "%20" character. So the first thing to do was to create a new column to hold the cleaned up text of the file name. I called it "templateURL".

templateURL - this is the field where we'll store the "escaped" file name.

Then I needed to retrieve the ID of the field as rendered in the NewForm.aspx page. So I opened the NewForm page and did View Source, then grabbed the IDs of both the SelectTemplate field and the templateURL field.

Now my JavaScript skills are pretty poor, so I managed to get a colleague to help me with this. The script he came up with was this:

<script>
function getSelectedText( obj ) {
   return obj.options[obj.selectedIndex].text;
}
    function encodeTemplate() {
var templateURL = document.getElementById("ctl00_m_g_23fc3b40_9a6b_4126_bcf4_a3bfc2fff76d_ctl00_ctl04_ctl05_ctl00_ctl00_ctl04_ctl00_ctl00_TextField");
var templateLookup = document.getElementById("ctl00_m_g_23fc3b40_9a6b_4126_bcf4_a3bfc2fff76d_ctl00_ctl04_ctl01_ctl00_ctl00_ctl04_ctl00_Lookup");
templateURL.value = encodeURI("http://oneintranet.qbe.eo/departments/cres_procedures/QBE Claims/" + getSelectedText(templateLookup) + ".pdf");
}

var templateLookup = document.getElementById("ctl00_m_g_23fc3b40_9a6b_4126_bcf4_a3bfc2fff76d_ctl00_ctl04_ctl01_ctl00_ctl00_ctl04_ctl00_Lookup");
templateLookup.attachEvent("onchange", function(){encodeTemplate()});
</script>

I pasted this script into the NewForm.aspx page after this line:

<asp:Content ContentPlaceHolderId="PlaceHolderBodyAreaClass" runat="server">

The JavaScript grabs the value rendered by the SelectTemplate field. It then replaces the word spaces with "%20" (that's the encodeURI function), then copies the result into the plain text field I set up, templateURL. Finally, it builds a URL for the PDF template file by putting in the server path at the front and tagging ".pdf" on the end. Note that the actual name of the document directory that holds the templates also has a word space in it. The encodeURI takes care of that, too.

All that remained was to change the link in the WorkFlow email to:

<a href="[%LH Orders:templateURL%]">[%LH Orders:SelectTemplate%]</a>

And there you go. All done and dusted. You have a link to a stored document that works and gets round SharePoint's strange habit of removing just the first space it encounters in a URL inserted from a Lookup in a WorkFlow email.

One enhancement you might make would be to hide the text fields in the NewForm.aspx page, so that your users can't mess with the text automatically copied there during the placing of an order. Another of my earlier blogs describes Hiding Fields in NewForm.aspx.

Hope this helps someone.

Friday, 2 August 2013

SharePoint 2007 - Cannot access "Page Settings" area in Publishing site

Here's an odd thing. I wanted to change the Page template of a SharePoint page that was displaying in an old, outdated template. But when I went Edit Page, then Page > Page Settings ... 


... I wasn't seeing the familiar Page Settings page. I was seeing this:


No sign of my picklist of Page Templates at all. I knew I had encountered this problem before, but couldn't remember what the solution was, so I got on to trusty Google, figuring someone is bound to have the answer to this vexing issue. But no ... nothing doing.

I tried going to the Pages Directory and seeing if Editing Properties of the page would help, but that got me nowhere.

Then, running out of options, I fired up SharePoint Designer and navigated to the sub-site. And there it was! 


The dad-blasted Page Layout was detached, obviously from some earlier Designer fiddling and I'd forgotten to reattach. Simply reattaching the Page Layout fixed the problem and I was able to access the Page Layout picklist in the Page Settings area.


It might seem screamingly obvious but then, you can't always remember everything, and incredibly, no one has posted an explanation for this problem that crops up in the first ten screens of a Google search. 

So hopefully, this will save someone thrashing around, trying to figure out why they can't change the Template for a SharePoint Publishing page.

Monday, 8 July 2013

Place a Picture Library SlideShow on a SharePoint 2007 page

I wanted to embed a Picture Library as a SlideShow in a SharePoint 2007 page, but when I checked the Microsoft web site, their coverage of the SharePoint 2007 Picture Library function didn't have the information I needed. So, I had to figure it out for myself.

So here's what I did to embed a Picture Library SlideShow on the page ...

  1. First, I created a SharePoint Picture Library in the normal way and loaded up the images.
  2. Next, in the newly-created Picture Library, I selected View Slide Show from the Actions menu.


  3. This brings up the Slide Show in a new browser window. I right-clicked on the Slide Show and selected Properties.


  4. I highlighted the URL of the Slide Show and copied to the clipboard with the ctrl-c function.


  5. Then I placed a Page Viewer Web Part on the selected SharePoint page and added the URL from the clipboard. You may have to adjust the height of the Page Viewer Web Part to accommodate the size of image you're using.
That's it ...

Tuesday, 21 May 2013

Setting default values for Content Types on creating a new page


While trying to set up a facility in SharePoint to email around summaries of the week's top news stories, I ran into a strange problem.

If you've read my previous post, you'll recall that I had set up a sub-site in SharePoint to hold the news articles - each article was on a new page and the pages incorporated metadata stored in Content Types created for that purpose.

I'd built the pages that way so that the non-technical News publishers would be able to set vital meta-data for each story without having to go the 

Site Actions > View all Site Content > Pages 

route to get to the Edit Properties function.

All that went fairly smoothly - apart from a small glitch around retrieving the current Page URL (see the previous Blog posting) - and we proudly launched our new News facility.

The next glitch came when one of the publishers was compiling the weekly round up of top News stories. I'd made a page containing a DVWP which looked at the Pages folder that contained all the News stories and displayed just those where a value for "weekly roundup email position" had been set. This is a Content Type that contains a choice of values "1st story, 2nd story, etc". The publisher creates a new story, then selects a value for "weekly roundup position" from a pick list. If the story isn't required in the weekly round up then they leave the value as "Select a position for email". The Content Type had the same value set as the default value.

The issue was, when the publisher created a new story, the value for "weekly roundup position" was blank by default. Where was the default value?


Above left is what the metadata setting looked like when a new page was created, but we needed it to look like the above right image, with a default value displayed in the Roundup picklist.

Everything looked like it was set up correctly but it wasn't working ... so had a trawl around on Google and was unable to find anyone else with the same problem. Then I chanced on a site where someone was talking about not seeing default values on Content types. After following a series of links and putting the information together, it became apparent to me what was causing the problem. Turns out you have to make the group of Content Types the Default Content Type Group for the List you're looking at.

So here's what I did ...

I had set up my new Content Types in the Article Page group. So I drilled down to the Content Type and made sure the default value was set to what I wanted.


Next I went back to the List - in this case, the Pages Directory that held the News articles - and from the Settings menu selected Document Library Settings.

Then I found the Content Types section - note that the Page Content Type is set as the default - and clicked on the link Change new button order and default content type.


Now it's not screamingly obvious but what you have to do is bring the Content Type Group that holds the Content Types you want to display the Default Values for up to the top of the list by setting its value to "1", then clicking OK.


That's it. The Content Types section should now look like this, with Articles at the top and ticked as the Default Content Type.


Now when you create a new page, the default values you set in the Content types will be added to the metadata for that page, unless (or until) you choose a different Content Type value.

Hope this helps someone ...